天飞 学习笔记


  • 首页

  • 关于

  • 标签

  • 分类

  • 归档

  • 公益404

  • 搜索

salt配置

发表于 2019-02-12 | 更新于: 2019-11-08   |   更新于 2019-11-08 | 分类于 salt

配置salt

这一部分将展示如何配置用户访问,查看和存储job结果,安全性,排错和其它管理任务.

Configuring the Salt Master
Configuring the Salt Minion
Configuring the Salt Proxy Minion
Configuration file examples
Minion Blackout Configuration
Access Control System
Job Management
Managing the Job Cache
Storing Job Results in an External System
Logging
External Logging Handlers
salt.log.handlers.fluent_mod
salt.log.handlers.log4mongo_mod
salt.log.handlers.logstash_mod
salt.log.handlers.sentry_mod
Salt File Server
Git Fileserver Backend Walkthrough
MinionFS Backend Walkthrough
Salt Package Manager
Storing Data in Other Databases
Running the Salt Master/Minion as an Unprivileged User
Using cron with Salt
Use cron to initiate a highstate
Hardening Salt
Security disclosure policy
Salt Transport
Master Tops System
Returners
Renderers

配置salt master

salt系统配置另人惊讶的简单和轻松,两个组件各自有单独的配置文件.salt-master,salt-minion两个文件分别对应两个组件.
默认的salt-master组件的配置文件在/etc/salt/master,FREEBSD显著的不同,位置/usr/local/etc/salt.

主master配置

/etc/salt/master配置文件用来管理salt-master的行为.
约定:被注释的值后面有一个空白行的,表示不需要配置使用默认值.如果没有空白行的表示这个是一个示例,并没有默认值.

1
2
默认的,master会自动包含在master.d/*.conf下的所有配置文件,master.d是一个目录,在master相同的目录级别下.
#default_include: master.d/*.conf

minions配置

配置salt-minion非常简单.一般的,惟一需要设置的值是master,这样minion就知道如何定位master.
默认配置文件在/etc/salt/minion,FREEBSE显著不同的,位于/usr/local/etc/salt/minion.

salt ssh,agentless模式

发表于 2019-02-11 | 更新于: 2019-11-08   |   更新于 2019-11-08 | 分类于 salt

salt ssh

执行salt commands及states通过ssh,不需要安装salt-minion.

开始

salt ssh方式使用非常简单,通过配置/etc/salt/roster文件定义系统需要连接的主机,salt-ssh命令使用方式跟salt相同.

  • salt ssh在2014.7.0版本产品化
  • 远端需要有至少python2.6(也可以使用-r选项发送原子的ssh命令)
  • 大多数系统中都是使用salt-ssh命令执行
  • salt ssh并不是用来替代标准的salt通信系统,它提供了不需要zeromq和远程agent的一个选择.由于所有通信都是通过ssh会在速度上慢于salt+zeromq
  • 目前fileserver选项必须会封装,确保关联的文件会使用salt-ssh交付.state模块是例外,在master端编译,进程会找到所有salt://路径指向然后复制打tar包,fileserver封装还在开发中.

salt ssh roster

salt roster系统轻松定义远程minions.https://docs.saltstack.com/en/latest/topics/ssh/roster.html#ssh-roster

默认roster文件是在/etc/salt/roster:

1
2
3
4
5
6
7
web1:
host: 192.168.42.1 # The IP addr or DNS hostname
user: fred # Remote executions will be executed as user fred
passwd: foobarbaz # The password to use for login, if omitted, keys are used
sudo: True # Whether to sudo to root, not enabled by default
web2:
host: 192.168.42.2
1
2
3
Note

sudo works only if NOPASSWD is set for user in /etc/sudoers: fred ALL=(ALL) NOPASSWD: ALL

salt-ssh部署ssh key

默认salt-ssh将为ssh生成密钥对,默认路径是/etc/salt/pki/master/ssh/salt-ssh.rsa.密钥对将在第一次运行salt-ssh命令时生成.

之后使用ssh-copy-id命令部署公钥到minions.

1
ssh-copy-id -i /etc/salt/pki/master/ssh/salt-ssh.rsa.pub user@server.demo.com

可以创建一个简单的脚本:

1
2
3
4
5
6
#!/bin/bash
if [ -z $1 ]; then
echo $0 user@host.com
exit 0
fi
ssh-copy-id -i /etc/salt/pki/master/ssh/salt-ssh.rsa.pub $1
1
2
./salt-ssh-copy-id.sh user@server1.host.com
./salt-ssh-copy-id.sh user@server2.host.com

当公钥部署完成后,salt-ssh就可以控制这些minions了.

调用salt-ssh

RHEL/centos 5 python2.6

1
salt-ssh centos-5-minion -r 'yum -y install epel-release ; yum -y install python26'

python3.x
在2017.7.0版本之前,salt是不支持python3.x,最好使用-r参数.
salt-ssh的使用方法跟salt基本相同,有着相似的语法
默认salt-ssh使用在远程minions上使用salt执行模块,使用-r会使用raw shell命令

1
salt-ssh '*' test.ping

salt ssh 使用state

salt ssh 使用state系统与salt一样抽象了相同的接口.

salt ssh 使用target

只支持glog与regex targets

配置salt ssh

还是在/etc/salt/master中.
Minion 配置选项可以在master配置中的ssh_minion_opts中配置,也可以在roster中的minion_opts中配置.

salt-ssh使用非root用户

默认salt读取/etc/salt配置.如果你使用普通用户必须修改pki_dir和cachedir路径,否则会报权限错误.
推荐为普通用户创建单独的配置文件并使用-c加载.

使用saltfile定义命令行参数

使用saltfile定义命令行参数,可以在一台服务器上管理多个不同的salt项目.
可以cd到saltfile的目录执行

1
2
3
4
salt-ssh:
config_dir: path/to/config/dir
ssh_max_procs: 30
ssh_wipe: True

salt-ssh –config-dir=path/to/config/dir –max-procs=30 –wipe * test.ping
使用saltfile可简化成
salt-ssh * test.ping.

saltssh debug

salt-ssh 加 -ltrace 参数或定义SALT_ARGV变量.

man 手册中的下划线

发表于 2019-02-07 | 更新于: 2020-01-02   |   更新于 2020-01-02 | 分类于 linux

一直印象里觉得man手册中的下划线是个链接,可以跳转到另一个文档.
查看了man的help都没有提到这一块知识,后面才发现原来记忆的都是info命令功能;info命令是可以使用tab跳转到另一个文档的.
man手册中的下划线单纯就是个下划线标识而已.

1
haotianfei@tianfei-opensuse:~> man man

1
haotianfei@tianfei-opensuse:~> info zypper

ssh透传

发表于 2019-02-05 | 更新于: 2019-11-08   |   更新于 2019-11-08 | 分类于 uncategorized

nodeC节点上有一个HTTP服务器,监听在80端口
nodeA节点可以访问nodeB,nodeB可以访问节点nodeC,但nodeA无法直接访问nodeC.

[root@nodeB ~]# ssh -N -f -o GatewayPorts=yes -L *:8808:192.168.0.3:80 root@192.168.0.3
[root@nodeB ~]# curl http://localhost:8808/zabbix

301 Moved Permanently

Moved Permanently

The document has moved here.

postgresql 11 install

发表于 2019-02-05 | 更新于: 2019-11-08   |   更新于 2019-11-08 | 分类于 Databasees

https://yum.postgresql.org/repopackages.php

[root@postgresql ~]# yum install https://download.postgresql.org/pub/repos/yum/11/redhat/rhel-7-x86_64/pgdg-centos11-11-2.noarch.rpm

[root@postgresql ~]# yum install postgresql11-server postgresql11-contrib

[root@postgresql ~]# /usr/pgsql-11/bin/postgresql-11-setup initdb
Initializing database … OK
[root@postgresql ~]# ll /usr/lib/systemd/system/ |grep postgre

[root@postgresql ~]# systemctl enable postgresql-11 –now
Created symlink from /etc/systemd/system/multi-user.target.wants/postgresql-11.service to /usr/lib/systemd/system/postgresql-11.service.
[root@postgresql ~]# systemctl status postgresql-11
● postgresql-11.service - PostgreSQL 11 database server
Loaded: loaded (/usr/lib/systemd/system/postgresql-11.service; enabled; vendor preset: disabled)
Active: active (running) since Tue 2019-02-05 21:37:11 CST; 43s ago
Docs: https://www.postgresql.org/docs/11/static/
Process: 14569 ExecStartPre=/usr/pgsql-11/bin/postgresql-11-check-db-dir ${PGDATA} (code=exited, status=0/SUCCESS)
Main PID: 14575 (postmaster)
CGroup: /system.slice/postgresql-11.service
├─14575 /usr/pgsql-11/bin/postmaster -D /var/lib/pgsql/11/data/
├─14577 postgres: logger
├─14579 postgres: checkpointer
├─14580 postgres: background writer
├─14581 postgres: walwriter
├─14582 postgres: autovacuum launcher
├─14583 postgres: stats collector
└─14584 postgres: logical replication launcher

Feb 05 21:37:11 postgresql.wasu.iot systemd[1]: Starting PostgreSQL 11 database server…
Feb 05 21:37:11 postgresql.wasu.iot postmaster[14575]: 2019-02-05 21:37:11.150 CST [14575] LOG: listening on IPv6 address “::1”, port 5432
Feb 05 21:37:11 postgresql.wasu.iot postmaster[14575]: 2019-02-05 21:37:11.150 CST [14575] LOG: listening on IPv4 address “127.0.0.1”, port 5432
Feb 05 21:37:11 postgresql.wasu.iot postmaster[14575]: 2019-02-05 21:37:11.154 CST [14575] LOG: listening on Unix socket “/var/run/postgresql/.s.PGSQL.5432”
Feb 05 21:37:11 postgresql.wasu.iot postmaster[14575]: 2019-02-05 21:37:11.161 CST [14575] LOG: listening on Unix socket “/tmp/.s.PGSQL.5432”
Feb 05 21:37:11 postgresql.wasu.iot postmaster[14575]: 2019-02-05 21:37:11.174 CST [14575] LOG: redirecting log output to logging collector process
Feb 05 21:37:11 postgresql.wasu.iot postmaster[14575]: 2019-02-05 21:37:11.174 CST [14575] HINT: Future log output will appear in directory “log”.
Feb 05 21:37:11 postgresql.wasu.iot systemd[1]: Started PostgreSQL 11 database server.

修改/var/lib/pgsql/11/data/postgresql.conf

1
listen_addresses = '*'

修改/var/lib/pgsql/11/data/pg_hba.conf,添加

1
host    zabbix          zabbix          10.0.0.0/25          md5

[root@postgresql ~]# systemctl restart postgresql-11
[root@postgresql data]# firewall-cmd –add-service postgresql –permanent
[root@postgresql data]# firewall-cmd –add-service postgresql

[root@postgresql data]# ss -lnpt
State Recv-Q Send-Q Local Address:Port Peer Address:Port
LISTEN 0 128 :22 *: users:((“sshd”,pid=3737,fd=3))
LISTEN 0 128 :5432 *: users:((“postmaster”,pid=15874,fd=3))
LISTEN 0 100 127.0.0.1:25 : users:((“master”,pid=4105,fd=13))
LISTEN 0 128 :::22 :::* users:((“sshd”,pid=3737,fd=4))
LISTEN 0 128 :::5432 :::* users:((“postmaster”,pid=15874,fd=4))
LISTEN 0 100 ::1:25 :::* users:((“master”,pid=4105,fd=14))

ovirt spice 代理服务

发表于 2019-02-03 | 更新于: 2019-11-08   |   更新于 2019-11-08 | 分类于 Ovirt

由于engine管理平台是做SNAT映射出去的,所以

ovirt虚拟机管理手册

发表于 2019-02-01 | 更新于: 2019-11-08   |   更新于 2019-11-08 | 分类于 Ovirt

chapter 7. 模板templates

模板是虚拟机的复本,在接下来操作中轻松重复创建相似的虚拟机.模板封装了软件,配置和硬件,还有模板基于的源虚拟机的所有安装软件.使用模板启动的虚拟机基于源虚拟机.

当基于一个虚拟机创建一个模板,虚拟机的一个只读复本硬盘被创建.这个只读硬盘成为新模板和由此模板创建的虚拟机的基本磁盘,因此,如果ovirt中存在基于这个模板创建的虚拟机,这个硬盘不能被删除.

基于模板创建的虚拟机使用跟源虚拟机相同的网卡类型和驱动,便被分配特别的不重复的MAC地址.

7.1 封装虚拟机并部署为模板

封装是基于虚拟机创建模板之前从虚拟机中移除所有特殊的系统细节的处理过程.封装是保证基于相同模板创建的多个虚拟机防止使用显明相同的细节的需要.同时也是确保其它特性的功能如预期的网卡定制的需要.

7.1.1 封装linux做为模板

linux封装通过新创建模板窗口勾选Seal Template勾选框创建处理.

7.1.2 封装windows做为模板

部署windows虚拟机创建的模板必需是无特殊性的.这保证机器特殊配置不会复制到模板.
使用sysprep用来封装windows模板.sysprep创建一个完整的没有附加的安装回答文件. /usr/share/ovirt-engine/conf/sysprep/目录下有多个windows操作系统的默认设置值文件. 这些文件是sysprep的模板.文件中的字段可以根据需求复制,粘贴,修改.这些定义将覆盖”修改虚拟机”->”初始运行”中设置.被修改的sysprep文件会多方面影响附加了sysprep文件的模板所创建的windows虚拟机.包含域成员,主机名,安全策略等.

7.1.2.1 封装windows虚拟机的先决条件

略,详细查看https://access.redhat.com/documentation/en-us/red_hat_virtualization/4.2/html/virtual_machine_management_guide/chap-templates

7.1.2.2 封装windows 7,2008,2012为模板

略,详细查看https://access.redhat.com/documentation/en-us/red_hat_virtualization/4.2/html/virtual_machine_management_guide/chap-templates

7.2 创建模板

从一个已经存在的虚拟机创建模板作为蓝本创建其它虚拟机.

当创建模板,需要指定硬盘模式,raw或QCOW2:

  • QCOW2 是瘦提供,即动态分配.
  • RAW 硬盘在文件存储上是动态分配.
  • RAW 硬盘在块存储上是预分配的.

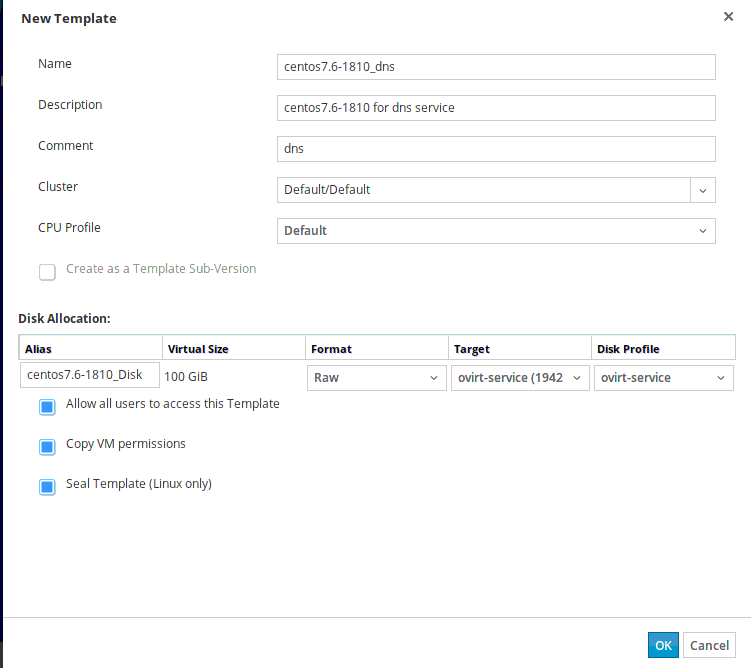
创建模拟步骤:

  1. Compute → Virtual Machines,选择源虚拟机
  2. 确保虚拟机是关机的
  3. More Actions → Make Template.
  4. 输入模板名称,说明,评语
  5. 选择分配给的集群,默认同源虚拟机相同
  6. 可选的,选择CPU配置集
  7. 可选的,创建为另一个模板的子模板
  8. 硬盘分配,别名,格式,存储域,硬盘配置集;默认与源虚拟机相同.
  9. 选择允许所有用户访问模板,是否公开模板.
  10. 选择是否复制源虚拟机的权限设置
  11. 如果是linux主机勾选封装模板
  12. OK

模板创建过程中显示虚拟机image lock.处理过程有可能花费几个小时,决定于硬件能力及源虚拟机硬盘大小.完成后模板添加到Tamplates选项中,至此你可以基于模板创建虚拟机了.

创建模板会复制虚拟机,模板与源虚拟会同时存在.

7.3 编辑模板

7.4 删除模板

7.5 导出模板

7.6 导入模板

7.7 模板权限

7.8 使用cloud-init自动配置虚拟机

7.9 使用sysprep自动配置虚拟机

7.10 基于模板创建虚拟机

从模板创建一个预配置了操作系统,网络,应用和其它资源的虚拟机.
如果基于模板创建了虚拟机,模板将不能被删除;如果要删除模板,可以选择clone方式.

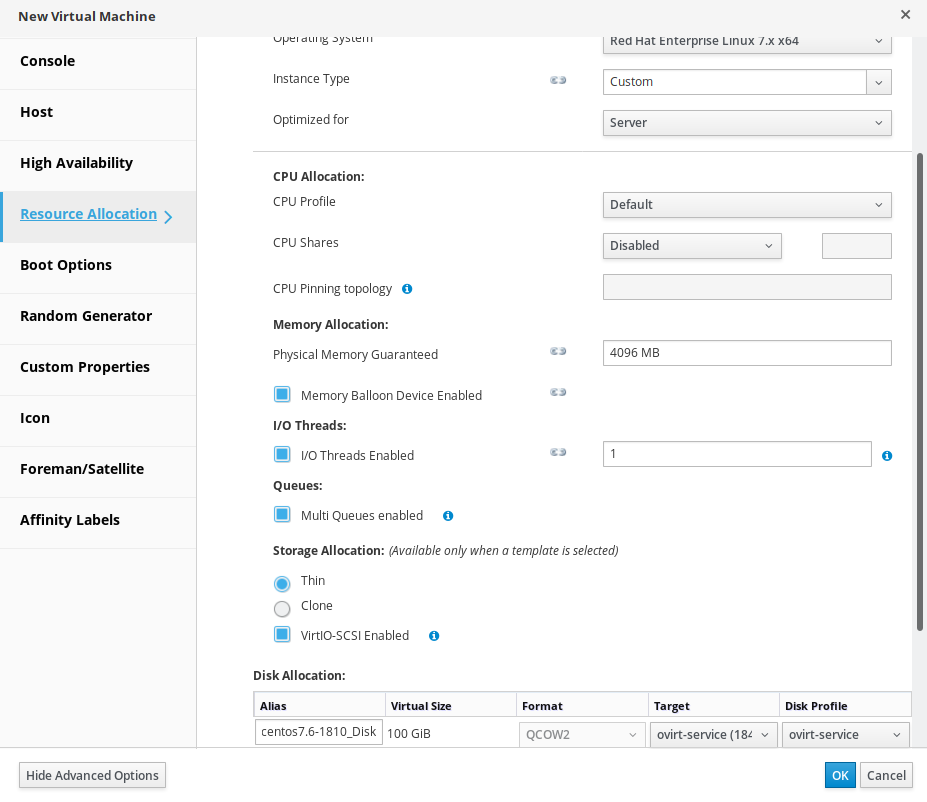
模板创建虚拟机步骤:

  1. Compute → Virtual Machines.

  2. 创建

  3. 选择集群

  4. 选择模板

  5. 输入名称,说明,评论

  6. 资源分配标签

  7. 选择存储是thin(QCOW2)或clone(QCOW2/RAW)方式

  8. 选择存储域

  9. OK.

7.11 基于模板创建cloned虚拟机

ovirt 4.2 为Centos linux虚拟机安装 guest agent

发表于 2019-01-31 | 更新于: 2019-11-08   |   更新于 2019-11-08 | 分类于 Ovirt

2.4.1. Red Hat Virtualization Guest Agents and Drivers

Oivrt guest agents 为Linux和Windows虚拟机提供了附加信息和功能,其中最核心的包括监控虚拟机资源使用和使用管理界面优雅的关闭或重启虚拟机

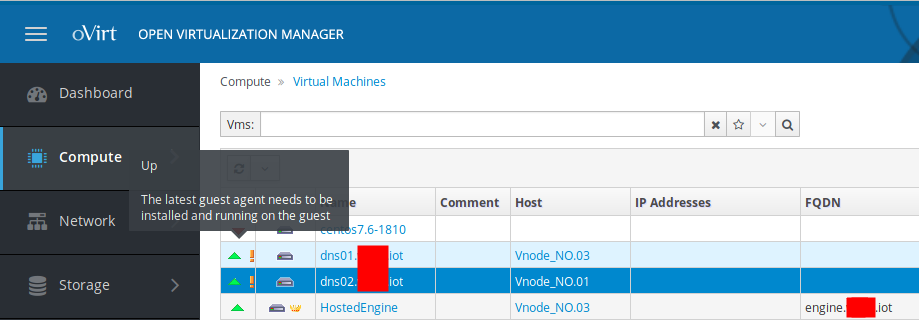
没有安装前虚拟机的IP地址无法获取

生产主要使用CentOS7.6的系统(其它CentOS系列基本相同),安装如下:

1
2
[root@dns01 ~]# yum install centos-release-ovirt42
[root@dns01 ~]# yum install -y ovirt-guest-agent-common

启动服务

1
2
3
4
5
6
7
8
9
10
11
12
13
14
15
16
17
18
19
20
21
22
23
24
25
26
27
28
29
30
31
[root@dns01 ~]# systemctl start ovirt-guest-agent.service 
[root@dns01 ~]# systemctl enable ovirt-guest-agent.service
[root@dns01 ~]# systemctl status ovirt-guest-agent.service
● ovirt-guest-agent.service - oVirt Guest Agent
Loaded: loaded (/usr/lib/systemd/system/ovirt-guest-agent.service; disabled; vendor preset: disabled)
Active: active (running) since Sat 2019-02-02 22:38:38 CST; 2s ago
Process: 12089 ExecStartPre=/bin/chown ovirtagent:ovirtagent /run/ovirt-guest-agent.pid (code=exited, status=0/SUCCESS)
Process: 12086 ExecStartPre=/bin/touch /run/ovirt-guest-agent.pid (code=exited, status=0/SUCCESS)
Process: 12083 ExecStartPre=/sbin/modprobe virtio_console (code=exited, status=0/SUCCESS)
Main PID: 12093 (python)
CGroup: /system.slice/ovirt-guest-agent.service
└─12093 /usr/bin/python /usr/share/ovirt-guest-agent/ovirt-guest-agent.py

Feb 02 22:38:38 dns01.talen.iot systemd[1]: Starting oVirt Guest Agent...
Feb 02 22:38:38 dns01.talen.iot systemd[1]: Started oVirt Guest Agent.
Feb 02 22:38:38 dns01.talen.iot userhelper[12101]: pam_succeed_if(ovirt-container-list:auth): requirement "user = ovirtagent" was met by user "ovirtagent"
Feb 02 22:38:38 dns01.talen.iot userhelper[12101]: running '/usr/share/ovirt-guest-agent/container-list' with root privileges on behalf of 'ovirtagent'
Feb 02 22:38:39 dns01.talen.iot userhelper[12103]: pam_succeed_if(ovirt-container-list:auth): requirement "user = ovirtagent" was met by user "ovirtagent"
Feb 02 22:38:39 dns01.talen.iot userhelper[12103]: running '/usr/share/ovirt-guest-agent/container-list' with root privileges on behalf of 'ovirtagent'

[root@dns01 ~]# systemctl start qemu-guest-agent.service
[root@dns01 ~]# systemctl enable qemu-guest-agent.service
[root@dns01 ~]# systemctl status qemu-guest-agent.service
● qemu-guest-agent.service - QEMU Guest Agent
Loaded: loaded (/usr/lib/systemd/system/qemu-guest-agent.service; enabled; vendor preset: enabled)
Active: active (running) since Sat 2019-02-02 22:38:38 CST; 20min ago
Main PID: 12082 (qemu-ga)
CGroup: /system.slice/qemu-guest-agent.service
└─12082 /usr/bin/qemu-ga --method=virtio-serial --path=/dev/virtio-ports/org.qemu.guest_agent.0 --blacklist=guest-file-open,guest-file-close,guest-file-read,guest-file-write,guest-file-seek,gue...

Feb 02 22:38:38 dns01.talen.iot systemd[1]: Started QEMU Guest Agent.

服务启动后提示消失,并能获取到虚拟机IP等信息.

Install SecureCRT 8.3.4 on openSUSE 15.1

发表于 2019-01-27 | 更新于: 2019-11-08   |   更新于 2019-11-08 | 分类于 openSUSE

官方下载scrt-sfx-8.3.4.1699.rhel7-64.tar.gz并解压,我这里是/home/haotianfei/bin/scrt8.3.4/scrt-sfx-8.3.4/

1
2
cd /home/haotianfei/bin/scrt8.3.4/
tar zxvf scrt-sfx-8.3.4.1699.rhel7-64.tar.gz

解压后进入bin目录运行提示找不到openssl的库文件

1
2
3
haotianfei@tianfei-opensuse:~/bin/scrt8.3.4/scrt-sfx-8.3.4> ./SecureCRT
./SecureCRT: error while loading shared libraries: libssl.so.10: cannot open shared object file: No such file or directory
./SecureCRT: error while loading shared libraries: libcrypto.so.10: cannot open shared object file: No such file or directory

这里使用www.openssl.org官方网站下载编译,然后链接到/usr/lib64/的方式

https://www.openssl.org/source/old/1.0.2/

1.0.2版本的最后一个版本1.0.2p
https://www.openssl.org/source/old/1.0.2/openssl-1.0.2p.tar.gz

解压并编译

1
2
haotianfei@tianfei-opensuse:~/bin/scrt8.3.4/openssl-devel/openssl-1.0.2p> ./config shared zlib-dynamic
haotianfei@tianfei-opensuse:~/bin/scrt8.3.4/openssl-devel/openssl-1.0.2p> make

将编译好的so文件链接到系统库目录

1
2
haotianfei@tianfei-opensuse:~/bin/scrt8.3.4/openssl-devel/openssl-1.0.2p> sudo ln -sf `pwd`/libssl.so.1.0.0 /usr/lib64/libssl.so.10
haotianfei@tianfei-opensuse:~/bin/scrt8.3.4/openssl-devel/openssl-1.0.2p> sudo ln -sf `pwd`/libcrypto.so.1.0.0 /usr/lib64/libcrypto.so.10

虽然还是会提示版本信息不可用,但已经可以正常运行使用了.

配置DNS服务器

发表于 2019-01-27 | 更新于: 2019-11-08   |   更新于 2019-11-08 | 分类于 Redhat Server

Ovirt虚拟化平台对DNS的可靠要求比较高,DNS服务如果无法正常提供解析,将造成整个虚拟化平台的宕机;

Ovirt官方不推荐只在虚拟化平台上运行DNS服务,防止虚拟机宕机造成整个平台宕机,所以这里采用的是一台实体物理机运行主DNS服务(10.0.0.40),其它两台从服务器运行在虚拟化平台上低成本解决单点问题.

服务器:

  1. 主服务器: 10.0.0.40
  2. 从服务器1: 10.0.0.41
  3. 从服务器2: 10.0.0.42

其中主服务器部署在一台实体物理机上,其它服务器在Ovirt平台上启动的虚拟机.

在所有服务器上执行安装:

1
2
3
[root@dns00 ~]# yum install -y bind bind-utils
[root@dns01 ~]# yum install -y bind bind-utils
[root@dns02 ~]# yum install -y bind bind-utils

配置如下:

1
2
3
4
5
6
7
8
9
10
11
12
13
14
15
16
17
18
19
20
21
22
23
24
25
26
27
28
29
30
31
32
33
34
35
36
37
38
39
40
41
42
43
44
45
46
47
48
49
50
51
52
53
54
55
56
57
58
59
60
61
62
63
64
65
66
67
68
69
70
71
72
73
74
75
76
77
78
79
80
81
82
83
84
85
86
[root@dns00 ~]# cat /etc/named.conf 
//
// named.conf
//
// Provided by Red Hat bind package to configure the ISC BIND named(8) DNS
// server as a caching only nameserver (as a localhost DNS resolver only).
//
// See /usr/share/doc/bind*/sample/ for example named configuration files.
//
// See the BIND Administrator's Reference Manual (ARM) for details about the
// configuration located in /usr/share/doc/bind-{version}/Bv9ARM.html
acl iot-slaves {
10.0.0.41;
10.0.0.42;
};

acl localnet253 {
10.0.0.0/25;
};

options {
listen-on port 53 { any;};
listen-on-v6 port 53 { any; };
directory "/var/named";
dump-file "/var/named/data/cache_dump.db";
statistics-file "/var/named/data/named_stats.txt";
memstatistics-file "/var/named/data/named_mem_stats.txt";
recursing-file "/var/named/data/named.recursing";
secroots-file "/var/named/data/named.secroots";

allow-query { localnets;10.0.0.20; };

recursion yes;
allow-recursion { localnets; };

/*
- If you are building an AUTHORITATIVE DNS server, do NOT enable recursion.
- If you are building a RECURSIVE (caching) DNS server, you need to enable
recursion.
- If your recursive DNS server has a public IP address, you MUST enable access
control to limit queries to your legitimate users. Failing to do so will
cause your server to become part of large scale DNS amplification
attacks. Implementing BCP38 within your network would greatly
reduce such attack surface
*/

forward only;
forwarders {
119.29.29.29;
223.5.5.5;
223.6.6.6;
8.8.8.8;
};
allow-transfer {
iot-slaves;
};

dnssec-enable no;
dnssec-validation no;

/* Path to ISC DLV key */
bindkeys-file "/etc/named.iscdlv.key";

managed-keys-directory "/var/named/dynamic";

pid-file "/run/named/named.pid";
session-keyfile "/run/named/session.key";
};

logging {
channel default_debug {
file "data/named.run" versions 30 size 10240k;
severity debug;
print-time yes;
print-severity yes;
print-category yes;
};
};

zone "." IN {
type hint;
file "named.ca";
};

include "/etc/named.rfc1912.zones";
include "/etc/named.root.key";
1
2
3
4
5
6
7
8
9
10
11
12
13
14
15
16
17
18
19
20
21
22
23
24
25
26
27
28
29
30
31
32
33
34
35
36
37
38
39
40
41
42
43
44
45
46
47
48
49
50
51
52
53
54
55
56
[root@dns00 ~]# cat /etc/named.rfc1912.zones 
// named.rfc1912.zones:
//
// Provided by Red Hat caching-nameserver package
//
// ISC BIND named zone configuration for zones recommended by
// RFC 1912 section 4.1 : localhost TLDs and address zones
// and http://www.ietf.org/internet-drafts/draft-ietf-dnsop-default-local-zones-02.txt
// (c)2007 R W Franks
//
// See /usr/share/doc/bind*/sample/ for example named configuration files.
//

zone "localhost.localdomain" IN {
type master;
file "named.localhost";
allow-update { none; };
};

zone "localhost" IN {
type master;
file "named.localhost";
allow-update { none; };
};

zone "1.0.0.0.0.0.0.0.0.0.0.0.0.0.0.0.0.0.0.0.0.0.0.0.0.0.0.0.0.0.0.0.ip6.arpa" IN {
type master;
file "named.loopback";
allow-update { none; };
};

zone "1.0.0.127.in-addr.arpa" IN {
type master;
file "named.loopback";
allow-update { none; };
};

zone "0.in-addr.arpa" IN {
type master;
file "named.empty";
allow-update { none; };
};

zone "talen.iot" IN {
type master;
file "named.talen.iot";
allow-update { none; };
allow-transfer { iot-slaves; };
};

zone "253.34.10.in-addr.arpa" IN {
type master;
file "named.10.0.0";
allow-update { none; };
allow-transfer { iot-slaves; };
};

注意zone文件中一定要将所有NS服务器列举出来,否则从服务器无法收到主服务的notify

1
2
3
4
5
6
7
8
9
10
11
12
13
14
15
16
17
18
19
20
21
[root@dns00 ~]# cat /var/named/named.talen.iot
$TTL 3H
@ IN SOA @ haotianfei.talen.com. (
2019020300 ; serial
1D ; refresh
1H ; retry
1W ; expire
3H ) ; minimum
NS ns.talen.iot.
NS ns1.talen.iot.
NS ns2.talen.iot.
storage NS ns.talen.iot.
server IN A 10.0.0.40
ns IN A 10.0.0.40
ns1 IN A 10.0.0.41
ns2 IN A 10.0.0.42
engine IN A 10.0.0.20
vnode00 IN A 10.0.0.30
vnode01 IN A 10.0.0.31
vnode02 IN A 10.0.0.32
storage IN A 10.0.0.20
1
2
3
4
5
6
7
8
9
10
11
12
13
14
15
16
17
18
[root@dns00 ~]# cat /var/named/named.10.0.0
$TTL 3H
@ IN SOA ns.talen.iot haotianfei.talen.com. (
2019012700 ; serial
1D ; refresh
1H ; retry
1W ; expire
3H ) ; minimum
NS ns.talen.iot.
NS ns1.talen.iot.
NS ns2.talen.iot.
40 IN PTR ns.talen.iot.
40 IN PTR server.talen.iot.
20 IN PTR engine.talen.iot.
30 IN PTR vnode00.talen.iot.
31 IN PTR vnode01.talen.iot.
32 IN PTR vnode02.talen.iot.
20 IN PTR engine.talen.iot.

配置两个从节点,配置基本一致,zone数据是从主节点同步过来的,所以无需管理.:

1
2
3
4
5
6
7
8
9
10
11
12
13
14
15
16
17
18
19
20
21
22
23
24
25
26
27
28
29
30
31
32
33
34
35
36
37
38
39
40
41
42
43
44
45
46
47
48
49
50
51
52
53
54
55
56
57
58
59
60
61
62
63
64
65
66
67
68
69
70
71
72
73
74
75
76
77
78
79
80
81
82
83
84
85
86
87
88
89
90
91
92
93
94
95
96
97
98
99
100
101
102
103
104
105
106
107
108
109
110
111
112
113
114
115
116
117
118
119
120
121
122
123
124
125
126
127
128
129
130
131
132
133
134
135
136
137
138
139
140
141
142
[root@dns01 ~]# cat /etc/named.conf
//
// named.conf
//
// Provided by Red Hat bind package to configure the ISC BIND named(8) DNS
// server as a caching only nameserver (as a localhost DNS resolver only).
//
// See /usr/share/doc/bind*/sample/ for example named configuration files.
//
// See the BIND Administrator's Reference Manual (ARM) for details about the
// configuration located in /usr/share/doc/bind-{version}/Bv9ARM.html
acl "trusted" {
10.0.0.20;
};

options {
listen-on port 53 { any; };
listen-on-v6 port 53 { any; };
directory "/var/named";
dump-file "/var/named/data/cache_dump.db";
statistics-file "/var/named/data/named_stats.txt";
memstatistics-file "/var/named/data/named_mem_stats.txt";
recursing-file "/var/named/data/named.recursing";
secroots-file "/var/named/data/named.secroots";

allow-query { localnets;10.0.0.20; };
recursion yes;
allow-recursion { localnets; };

forward only;
forwarders {
119.29.29.29;
223.5.5.5;
223.6.6.6;
8.8.8.8;
};
allow-transfer {
none;
};

/*
- If you are building an AUTHORITATIVE DNS server, do NOT enable recursion.
- If you are building a RECURSIVE (caching) DNS server, you need to enable
recursion.
- If your recursive DNS server has a public IP address, you MUST enable access
control to limit queries to your legitimate users. Failing to do so will
cause your server to become part of large scale DNS amplification
attacks. Implementing BCP38 within your network would greatly
reduce such attack surface
*/

dnssec-enable no;
dnssec-validation no;

/* Path to ISC DLV key */
bindkeys-file "/etc/named.iscdlv.key";

managed-keys-directory "/var/named/dynamic";

pid-file "/run/named/named.pid";
session-keyfile "/run/named/session.key";
};

logging {
channel default_debug {
file "data/named.run" versions 30 size 10240k;
severity debug;
print-time yes;
print-severity yes;
print-category yes;
};
};

zone "." IN {
type hint;
file "named.ca";
};

include "/etc/named.rfc1912.zones";
include "/etc/named.root.key";


[root@dns01 ~]# cat /etc/named.rfc1912.zones
// named.rfc1912.zones:
//
// Provided by Red Hat caching-nameserver package
//
// ISC BIND named zone configuration for zones recommended by
// RFC 1912 section 4.1 : localhost TLDs and address zones
// and http://www.ietf.org/internet-drafts/draft-ietf-dnsop-default-local-zones-02.txt
// (c)2007 R W Franks
//
// See /usr/share/doc/bind*/sample/ for example named configuration files.
//

zone "localhost.localdomain" IN {
type master;
file "named.localhost";
allow-update { none; };
};

zone "localhost" IN {
type master;
file "named.localhost";
allow-update { none; };
};

zone "1.0.0.0.0.0.0.0.0.0.0.0.0.0.0.0.0.0.0.0.0.0.0.0.0.0.0.0.0.0.0.0.ip6.arpa" IN {
type master;
file "named.loopback";
allow-update { none; };
};

zone "1.0.0.127.in-addr.arpa" IN {
type master;
file "named.loopback";
allow-update { none; };
};

zone "0.in-addr.arpa" IN {
type master;
file "named.empty";
allow-update { none; };
};

zone "talen.iot" IN {
type slave;
file "named.talen.iot";
masters {10.0.0.40;};
allow-query { localnets; };
zone-statistics yes;
};

zone "253.34.10.in-addr.arpa" IN {
type slave;
file "named.10.0.0";
masters {10.0.0.40;};
allow-query { localnets; };
zone-statistics yes;
};

验证:

1
2
3
4
5
6
7
8
9
10
11
12
13
14
15
16
17
18
19
20
21
22
23
24
25
26
27
28
29
30
31
32
33
34
35
36
37
38
39
40
41
42
43
44
45
46
47
48
49
50
[root@dns00 ~]# dig www.sina.com

; <<>> DiG 9.9.4-RedHat-9.9.4-72.el7 <<>> www.sina.com
;; global options: +cmd
;; Got answer:
;; ->>HEADER<<- opcode: QUERY, status: NOERROR, id: 20729
;; flags: qr rd ra; QUERY: 1, ANSWER: 3, AUTHORITY: 0, ADDITIONAL: 1

;; OPT PSEUDOSECTION:
; EDNS: version: 0, flags:; udp: 4096
;; QUESTION SECTION:
;www.sina.com. IN A

;; ANSWER SECTION:
www.sina.com. 24 IN CNAME us.sina.com.cn.
us.sina.com.cn. 15 IN CNAME spool.grid.sinaedge.com.
spool.grid.sinaedge.com. 28 IN A 202.102.94.124

;; Query time: 8 msec
;; SERVER: 10.0.0.40#53(10.0.0.40)
;; WHEN: Sun Jan 27 17:38:06 CST 2019
;; MSG SIZE rcvd: 119


[root@dns00 ~]# dig engine.talen.iot

; <<>> DiG 9.9.4-RedHat-9.9.4-72.el7 <<>> engine.talen.iot
;; global options: +cmd
;; Got answer:
;; ->>HEADER<<- opcode: QUERY, status: NOERROR, id: 63533
;; flags: qr aa rd ra; QUERY: 1, ANSWER: 1, AUTHORITY: 1, ADDITIONAL: 2

;; OPT PSEUDOSECTION:
; EDNS: version: 0, flags:; udp: 4096
;; QUESTION SECTION:
;engine.talen.iot. IN A

;; ANSWER SECTION:
engine.talen.iot. 10800 IN A 10.0.0.20

;; AUTHORITY SECTION:
talen.iot. 10800 IN NS ns.talen.iot.

;; ADDITIONAL SECTION:
ns.talen.iot. 10800 IN A 10.0.0.40

;; Query time: 1 msec
;; SERVER: 10.0.0.40#53(10.0.0.40)
;; WHEN: Sun Jan 27 17:39:03 CST 2019
;; MSG SIZE rcvd: 93

故障现象一

  • bind可以解析自管理的域名,但无法解析外部域名.
  • 日志中报错:
1
2
3
4
Jan 27 17:22:31 server.talen.iot named[7460]: no valid RRSIG resolving 'net/DS/IN': 223.6.6.6#53
Jan 27 17:22:31 server.talen.iot named[7460]: no valid RRSIG resolving 'net/DS/IN': 223.5.5.5#53
Jan 27 17:22:41 server.talen.iot named[7460]: no valid DS resolving 'l.root-servers.net/AAAA/IN': 223.6.6.6#53
Jan 27 17:22:41 server.talen.iot named[7460]: no valid DS resolving 'l.root-servers.net/A/IN': 223.6.6.6#53

解决方法:

  • 关闭DNSSEC

故障现象二

  • 主服务器域名zone文件是text,从服务器zone文件是data
1
2
3
4
[root@dns00 ~]# file /var/named/named.talen.iot 
/var/named/named.talen.iot: ASCII text
[root@dns01 ~]# file /var/named/named.talen.iot
/var/named/named.talen.iot: data

解决方法:
从服务器/etc/named.conf的option中添加masterfile-format text;

1
2
[root@dns01 ~]# file /var/named/named.talen.iot 
/var/named/named.talen.iot: ASCII text

故障现象三

1
2
3
4
5
6
7
8
9
[root@saltstack bind]# nslookup salt      
Server: 10.34.253.40
Address: 10.34.253.40#53

** server can't find salt: NXDOMAIN

[root@saltstack bind]# vi /etc/resolv.conf
[root@saltstack bind]# hostname
saltstack.talne.iot

解决方法:
hostname中的域名配置错误,只使用主机名解析找不到域.

1
[root@saltstack bind]# hostnamectl set-hostname saltstack.talen.iot
1…567…10

天飞

95 日志
41 分类
79 标签
RSS
GitHub E-Mail
Links
  • 天飞的博客
© 2017 — 2020 天飞
由 Hexo 强力驱动
|
主题 — NexT.Gemini v5.1.4
本站访客数 人次 本站总访问量 次