天飞 学习笔记


  • 首页

  • 关于

  • 标签

  • 分类

  • 归档

  • 公益404

  • 搜索

firefox allways display close button

发表于 2019-01-27 | 更新于: 2019-11-08   |   更新于 2019-11-08

firefox相比chrome不同的一点是标签只有活动的才显示关闭按钮;当你想关闭一个后台标签时,不得不切换到标签然后再关闭,效率比较低.通过在userChrome.css中添加自定义配置,允许标签全部显示关闭按钮.

1
2
3
haotianfei@tianfei-opensuse:~> vi .mozilla/firefox/nnghxxxx.default/chrome/userChrome.css
@namespace url("http://www.mozilla.org/keymaster/gatekeeper/there.is.only.xul");
.tab-close-button:not([pinned="true"]) { display: -moz-box !important; }

效果如下

yum常用操作汇总

发表于 2019-01-26 | 更新于: 2019-11-08   |   更新于 2019-11-08 | 分类于 Redhat

使用DVD或本地源

修改/etc/yum.repo.d/CentOS-Media.repo

1
baseurl=file///root/cdrom # 镜像目录

然后执行

1
yum --disablerepo=\* --enablerepo=c7-media install bind

Enhancing Your Blog with Advanced Features翻译加实践

发表于 2019-01-20 | 更新于: 2019-11-08   |   更新于 2019-11-08 | 分类于 django 2 by example

在上一章节,创建了一个基本的blog应用.现在,将应用转入具有高级特性的全功能blog,例如email分享post,添加评论,文章标签,接收相似文章.在这一章节,将会学习到如下内容:

  • 使用Django发送邮件
  • 视图中创建并处理表单
  • 使用models创建表单
  • 整合第三方应用
  • 创建混合querysets

使用Email分享posts

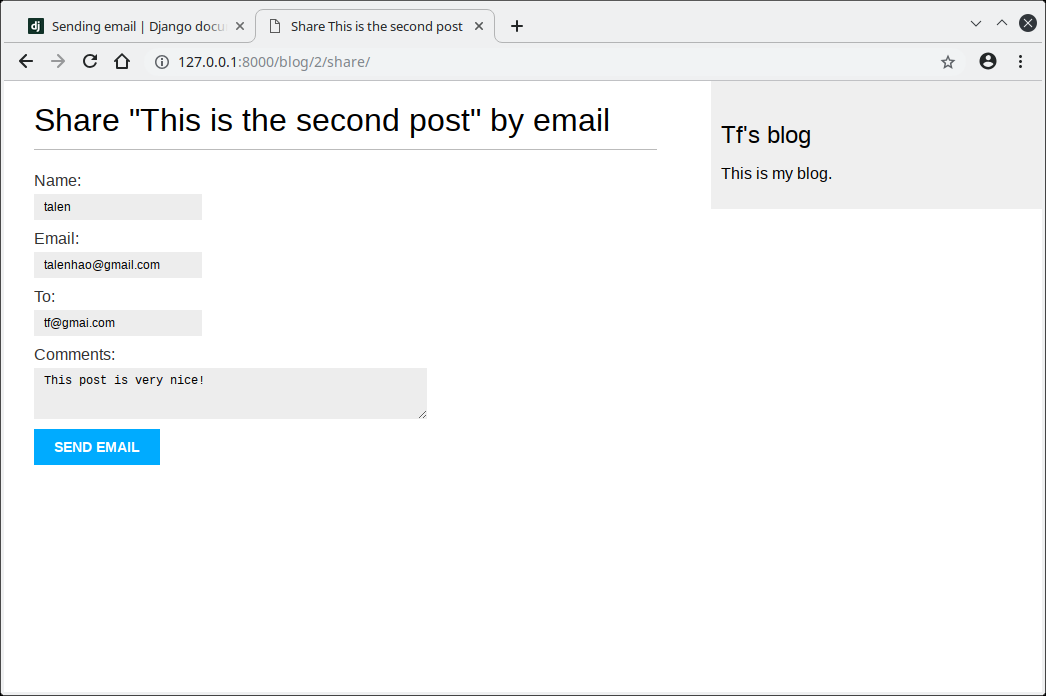
首先,我们将允许用户使用Email分享posts.花一点点时间想一下如何使用上一章节学习的视图,URLS,模板创建这个功能.现在,检查允许用户发送邮件需要哪些东西.你将做如下的操作:

  • 创建一个from允许用户填写用户名,email,email接收者,评论.
  • 创建一个view处理数据和发送邮件
  • 为上面的view添加一个url匹配
  • 创建一个template显示from表单

在Django中创建froms表单

让我们来创建分享表单.Django内置表单框架允许你轻松创建表单.表单框架允许你定义表单字段,指定如何显示,标识如何验证数据.Django表单框架灵活的渲染表单和处理数据.
Django使用两个类来创建表单:

  • from: 创建基本表单
  • ModelForm: 创建数据绑定表单

首先,我们在blog应用目录创建from.py文件:

1
2
3
4
5
6
7
8
9
from django import forms


class EmailPostForm(forms.Form):
name = forms.CharField(max_length=25)
email = forms.EmailField()
to = forms.EmailField()
comments = forms.CharField(required=False,
widget=forms.Textarea)

这是我们第一个表单.分析一下代码内容.我们继承Form类创建一个表单.使用了不同的字段类型,Django将相应的验证这些字段.

表单可以存在于Django工程的任何地方,最好在每个应用的目录下存放在form.py文件中

name字段是字符串字段.这个字段渲染为一个HTML元素

1
<input type="text">

每个字段都有一个默认的微件决定字段在HTML中如何渲染.comments字段我们使用了一个Textarea的微件在HTML显示为

1
<textarea>

元素.
字段验证同样信赖字段类型.例如,email和to字段使用EmailField类型.两个字段都需要验证email地址,否则将提示forms.ValidationError错误.其它参数也将被带入验证:我们为name定义了最大长度25字符,comments字段使用required=False表示不是必须的.所有这些都存在字段验证.这里只使用了Django表单字段的一部分,所有表单字段可查阅:https://docs.djangoproject.com/en/2.0/ref/forms/fields/

在视图中处理表单

你需要创建一个新的视图处理当提交成功时表单发送email.编辑应用下的views.py文件:

1
2
3
4
5
6
7
8
9
10
11
12
13
14
15
16
17
18
19
20
21
22
# 导入表单
from .forms import EmailPostForm


# 处理表单
def post_share(request, post_id):
# 根据post_id取得post对象
post = get_object_or_404(Post, id=post_id, status='published')
# 如果提交操作且经过验证
if request.method == "POST":
# 表单是提交操作
form = EmailPostForm(request.POST)
if form.is_valid():
cd = form.changed_data
# 发送邮件
else:
# 表单是显示操作
form = EmailPostForm
return render(request,
'blog/post/share.html',
{'form': form,
'post': post})

视图处理流程如下:
1 创建post_share视图,带入request和post_id参数
2 使用get_object_or_404()快捷方法接收post对象,根据后面的参数post_id及status=published.
3 使用同一视图显示初始表单及处理表单提交数据.区别是提交还是显示基于request的方法,提交是POST.如果是GET方法,显示表单;如果是POST方法,表单是提交,然后需要view做处理.request.method == ‘POST’是区分两种方式的关键.

下面是处理显示及处理表单数据:
1 当表单是初始状态或接收GET请求,我们创建一个新表单实例在模板中来显示空白表单.
2 当用户输入数据点击提交后接收为POST,然后我们使用提交的数据创建包含request.POST的表单实例:
3 在这个过程中,我们验证提交的数据使用form.is_vaild()方法.这个方法验证表单数据正确返回True.错误返回False.可以使用form.errors查看验证错误列表.
4 如果表单不正确,再次渲染表单模板并显示验证错误.
5 如果表单正确,我们通过form.cleaned_data接收验证过的数据.这个属性是一个表单字段和表单字段值的一个字典.

如果表单数据不正确,cleaned_data将只包含通过验证的数据.

现在,让我学习如何在Django中发送邮件来把事情融合.

使用django发送邮件

Django发送邮件是相当直接的.首先,你需要有一个本地SMTP服务器或在settings.py中定义一个外界的SMTP服务器:

  • EMAIL_HOST: smtp服务器地址,默认是localhost
  • EMAIL_PORT: smtp端口,默认25
  • EMAIL_HOST_USER: 用户名
  • EMAIL_HOST_PASSWORD: 密码
  • EMAIL_USE_TLS: 是否使用TLS安全连接
  • EMAIL_USE_SSL: 是否使用SSL安全连接

如果你不能使用SMTP服务器,你可以告诉Django输出email到终端,添加如下配置:

1
2
# For Email
EMAIL_BACKEND = 'django.core.mail.backends.console.EmailBackend'

这样配置后,Django将输入email到终端.这在没有SMTP服务器的情况下测试非常有用.
如果你想发送邮件,但没有本地SMTP服务器,你可以使用SMTP服务商.下面是使用GMAIL的配置:

1
2
3
4
5
EMAIL_HOST = 'smtp.gmail.com'
EMAIL_HOST_USER = 'your_account@gmail.com'
EMAIL_HOST_PASSWORD = 'your_password'
EMAIL_PORT = 587
EMAIL_USE_TLS = True

运行python manage.py shell打开终端,然后发送email:

1
2
3
4
5
6
7
8
9
10
11
12
13
14
>>> from django.core.mail import send_mail
>>> send_mail('Django mail', 'This e-mail was sent with Django.', 'talenhao@gmail.com', ['talenhao@gmail.com'], fail_silently=False)
Content-Type: text/plain; charset="utf-8"
MIME-Version: 1.0
Content-Transfer-Encoding: 7bit
Subject: Django mail
From: talenhao@gmail.com
To: talenhao@gmail.com
Date: Sun, 20 Jan 2019 14:11:55 -0000
Message-ID: <154799351565.16947.13299734647581468097@tianfei-opensuse>

This e-mail was sent with Django.
-------------------------------------------------------------------------------
1

send_mail()功能带入标题,信息,发送者,一个接收者列表作为必选参数.可选参数fail_silently=False,我们告知它如果不能正确发送触发一个错误.
如果发送email由GMAIL提供,必需允许低安全应用访问https://myaccount.google.com/lesssecureapps.
现在,我们添加发邮件功能到视图中.
修改post_share视图:

1
2
3
4
5
6
7
8
9
10
11
12
13
14
15
16
17
18
19
20
21
22
23
24
25
26
27
28
29
30
31
32
33
34
35
# 发送邮件
from django.core.mail import send_mail


# 处理表单
def post_share(request, post_id):
# 根据post_id取得post对象
post = get_object_or_404(Post, id=post_id, status='published')
sent = False
# 如果提交操作且经过验证
if request.method == "POST":
# 表单是提交操作
form = EmailPostForm(request.POST)
if form.is_valid():
cd = form.changed_data
# 发送邮件
# 创建文章
post_url = request.build_absolute_uri(post.get_absolute_url())
subject = '{} ({}) recommends you reading "{}"'.format(cd['name'],
cd['email'],
post.title)
message = 'Read "{}" at {}\n\n{}\'s comments: {}'.format(post.title,
post_url,
cd['name'],
cd['comments'])
send_mail(subject, message, 'talenhao@test.domain', [cd['to']])
sent = True
else:
# 表单是显示操作
form = EmailPostForm
return render(request,
'blog/post/share.html',
{'form': form,
'post': post,
'sent': sent})

我们宣告一个sent变量,邮件发送成功后设置为True.如果发送成功,我们将稍后在模板中使用这个变量来显示成功消息.因为必需在邮件正文中包含post的链接,我们使用Post模型中定义的get_absolute_url()方法.我们使用这个地址带入request.build_absolute_url()方法来创建包含HTTP结构及主机名的完整的url.
然后我们使用cleaned_data创建邮件标题,信息;最后发送这个邮件到to字段的地址.
现在视图已经完整,但还是需要添加url匹配规则.打开urls.py修改:

1
path('<int:post_id>/share/', views.post_share, name='post_share'),

在模板中渲染表单

创建表单,编写视图,添加URL匹配后,我们还缺少模板.创建一个新文件blog/templates/blog/post/share.html,添加下面的代码:

1
2
3
4
5
6
7
8
9
10
11
12
13
14
15
16
17
18
19
20
{% extends 'blog/base.html' %}

{% block title %}
Share {{ post.title }}
{% endblock %}

{% block content %}
{% if sent %}
<p>
"{{ post.title }}" was successfully sent to {{ form.cleaned_data.to }}
</p>
{% else %}

<h1>Share "{{ post.title }}" by email</h1>
<form action="." method="post">
{% csrf_token %}
{{ form.as_p }}
<input type="submit" value="Send Email">
</form>
{% endblock %}

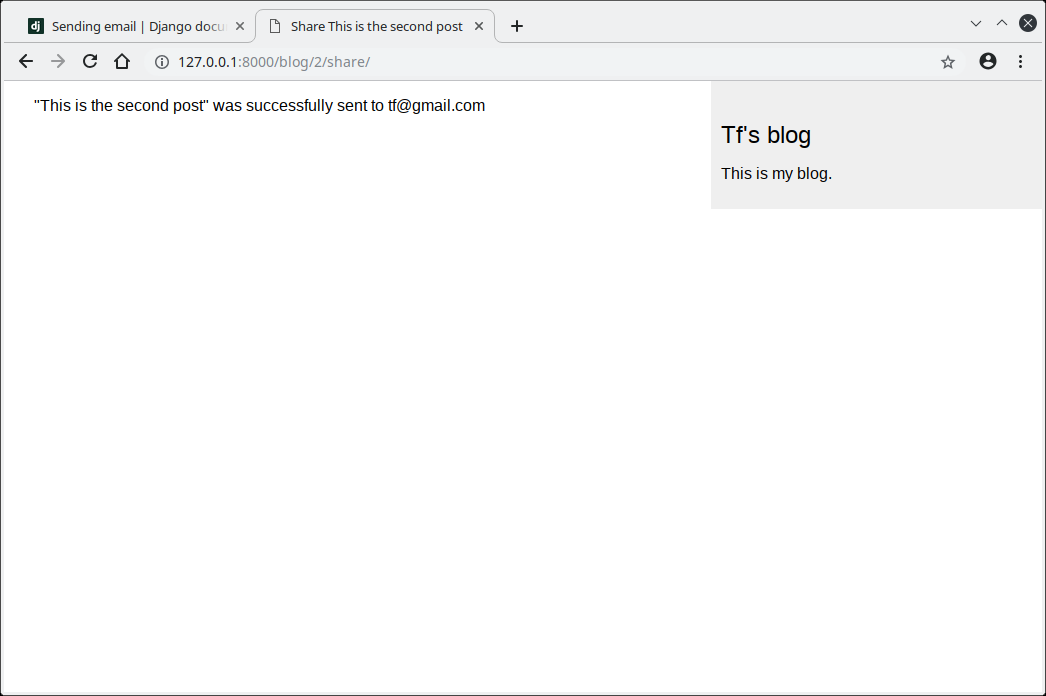
如果已经发送,这个模板将显示一个成功消息.我们创建了一个html元素,POST方法提交.
我们使用as_p()方法告诉Django渲染表单字段在HTML元素

.我们也可以使用as_ul或as_table.如果我们希望渲染每个字段,我们可以迭代每个字段:

1
2
3
4
5
6
{% for field in form %}
<div>
{{ field.errors }}
{{ field.label_tag }} {{ field }}
</div>
{% endfor %}
1
{% csrf_token %}

模板标记隐含字段包含一个自动生成的token防止 cross-site request forgery(CSRF)攻击.那些包含恶意网站或不希望的执行程序在你的站点上.在这里可以找到更多说明https://www.owasp.org/index.php/Cross-Site_Request_Forgery_(CSRF)
处理标记生成一个隐含字段如下:

1
2
<input type='hidden' name='csrfmiddlewaretoken'
value='26JjKo2lcEtYkGoV9z4XmJIEHLXN5LDR' />

修改blog/post/detail.html模板添加分享链接:

1
2
3
4
5
6
{{ post.body|linebreaks }}
<p>
<a href="{% url "blog:post_share" post.id %}">
Share this post
</a>
</p>

在这里我们使用Django提供的url动态创建链接.使用命令空间blog和url名称post_share,然后传递post ID作为参数来创建绝对路径的URL.
现在可以启动开发服务器,查看页面运行情况了.
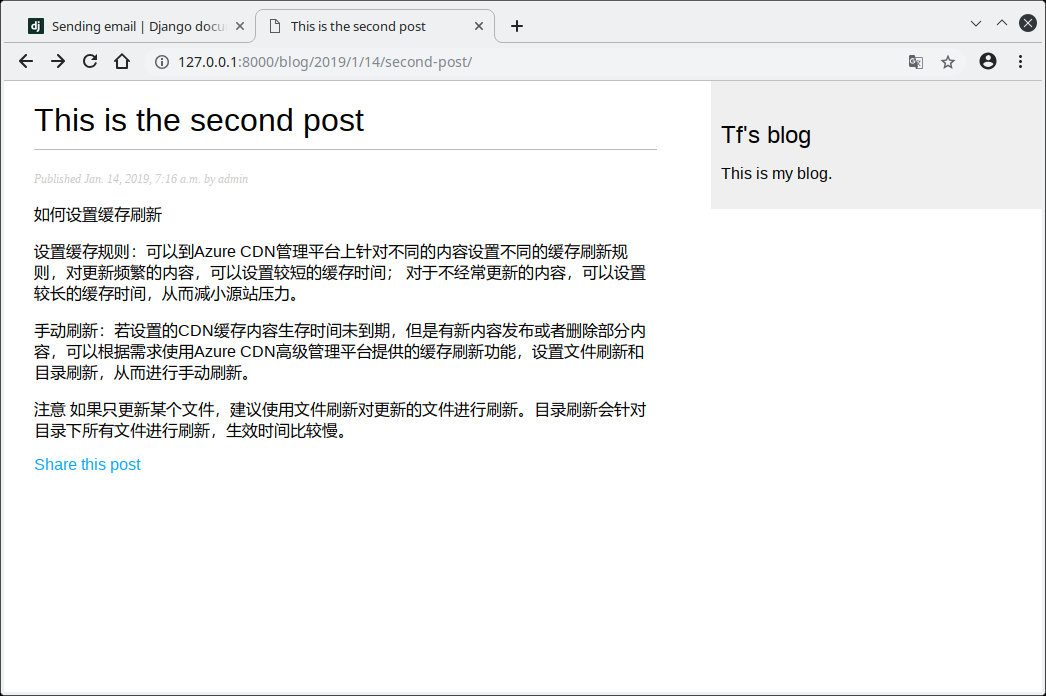


如果输入字段类型不对,会提示错误.

创建一个评论系统

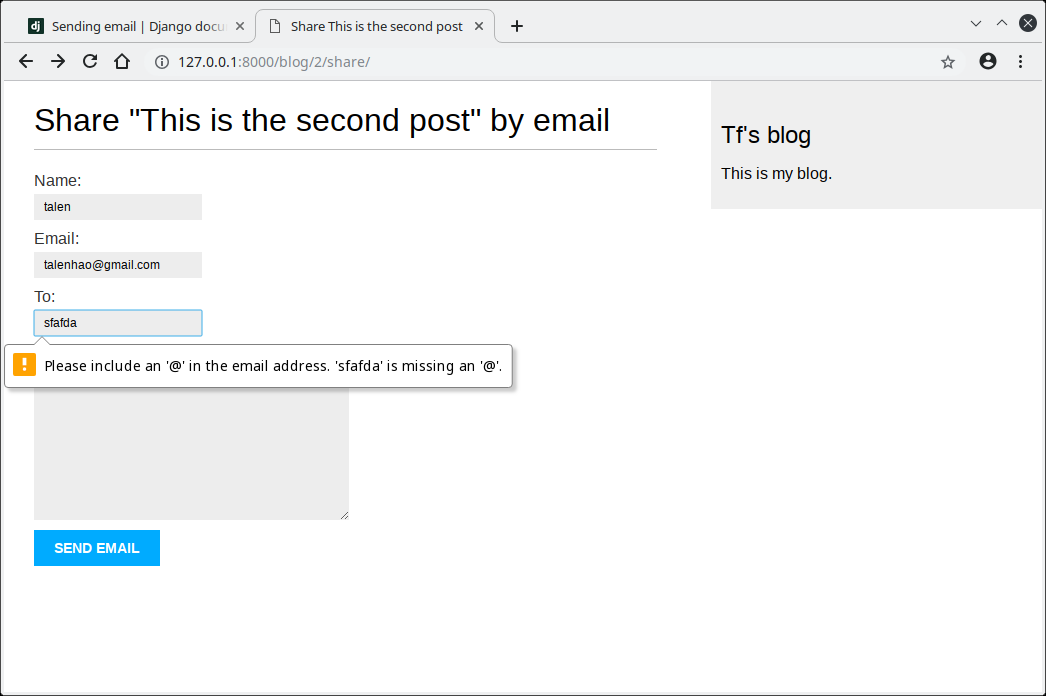
现在,我们将创建一个评论系统,读者能够评论文章.为了实现这个功能,我们将做如下事情:

1 创建一个model存储comments
2 创建一个form验证并提交comments
3 创建一个view处理from并存储commnets到model数据库
4 编辑post detail模板显示comments列表和添加新comment表单

首先,创建一个model存储评论.打开models.py文件:

1
2
3
4
5
6
7
8
9
10
11
12
13
14
15
16
class Comment(models.Model):
post = models.ForeignKey(Post,
on_delete=models.CASCADE,
related_name='comments')
name = models.CharField(max_length=80)
email = models.EmailField()
body = models.TextField()
created = models.DateTimeField(auto_now_add=True)
updated = models.DateTimeField(auto_now=True)
active = models.BooleanField(default=True)

class Meta:
ordering = ('created',)

def __str__(self):
return 'Comment by {} on {}'.format(self.name, self.post)

我们的Comment model,包含外键ForeignKey辅助访问一个post的comment.这里定义了一个多对一关系,因为每个comment只能评论在一个post上,每个post可以有多个comments.related_name属性允许我们为从关联对象回到关系所使用的属性命名.定义后,我们可以使用comment.post接收comment对象的post,接收post的所有comments使用post.comments.all().如果你不定义related_name属性.,Django将使用model的小写加_set作为关联对象post回指的管理器.
查看更多多对一关系https://docs.djangoproject.com/en/2.0/topics/db/examples/many_to_one/

我们创建了一个active布尔字段为了手工关闭不适合的评论.我们使用created创建时间做为排默认排序.
创建完Commnet model后并没有同步到数据库.使用Django迁移命令.

1
2
3
4
5
6
7
8
9
10
11
(django2byExample) haotianfei@tianfei-opensuse:~/PycharmProjects/Django2byExample> python manage.py makemigrations blog
Migrations for 'blog':
blog/migrations/0002_auto_20190121_1444.py
- Create model Comment
- Alter field slug on post
- Add field post to comment
(django2byExample) haotianfei@tianfei-opensuse:~/PycharmProjects/Django2byExample> python manage.py migrate blog
Operations to perform:
Apply all migrations: blog
Running migrations:
Applying blog.0002_auto_20190121_1444... OK

现在,为了通过一个简单的接口管理comments我们添加新model到管理站点.修改admin.py

1
2
3
4
5
6
7
8
from blog.models import Comment


@admin.register(Comment)
class CommentAdmin(admin.ModelAdmin):
list_display = ('name', 'email', 'post', 'created', 'updated', 'active')
list_filter = ('active', 'created', 'upcated')
search_fields = ('name', 'email', 'body')

运行开发服务器,执行python manage.py runserver命令,使用浏览器打开http://127.0.0.1:8000/admin,你将会看到新的model已经在Blog中了.
现在model已经注册到管理站点,我们可以使用一个简单的接口管理Comment实例了

从models创建froms

我们需要创建一个能让用户评论文章的表单.Django有两个基础类可以创建表单,Form和ModelForm.我们使用Form在上面创建用户email分享.在这一部分,因为要从Comment模型创建一个动态表单使用ModelForm.编辑forms.py,添加下面的代码:

1
2
3
4
5
6
7
from .models import Comment


class CommentForm(forms.ModelForm):
class Meta:
model = Comment
fields = ('name', 'email', 'body')

从model创建form,只需要在Meta类中指出从哪个model创建.Django自己会跟model交互然后动态的创建.每个model字段类型都对应有默认的表单字段.定义model类型是为了解释表单验证.Django为model中每一个字段创建表单字段.但可以使用fields列表明确的告知框架你想包含在表单中的字段,或使用exclude定义哪些字段你想要排除.在这个CommentForm表单,我们将使用name,email,body字段,因为我们用户只需要填入这些.

在视图中处理ModelForm

我们将在post的详细页面视图中初始化一个表单并处理,这样可以保持简洁.编辑views.py文件:

1
2
3
4
5
6
7
8
9
10
11
12
13
14
15
16
17
18
19
20
21
22
23
24
25
26
27
28
29
30
# ModelForm
from .forms import CommentForm
from .models import Comment


def post_detail(request, year, month, day, post):
post = get_object_or_404(Post,
slug=post,
status='published',
publish__year=year,
publish__month=month,
publish__day=day)
# 接收所有当前post评论
comments = post.comments.filter(active=True)
comment_form = CommentForm()
new_comment = None
if request.method == "POST":
comment_form = CommentForm(data=request.POST)
if comment_form.is_valid():
new_comment = comment_form.save(commit=False)
new_comment.post = post
new_comment.save()
else:
comment_form = CommentForm()
return render(request,
'blog/post/detail.html',
{'post': post,
'comments': comments,
'new_comment': new_comment,
'comment_form': comment_form})

我们使用post的详细页显示评论.首先使用一个QuerySet接收所有post评论,命名为comments,使用Commnet关系模型关联属性对象的管理器接收对象.
我们同时使用相同的视图来主我们的用户添加新的评论.初始化new_comment变量为None.我们将在创建新的comment时使用这个变量.如果是request.GET请求使用comment_form创建一个初始表单.如果请求是POST,我们将使用提交数据和变量初始表单并使用is_vaild()验证方法.如果表单正确,将产生以下动作:
1 使用表单save()方法创建新Comment对象,附给new_commnet变量.save()方法创建一个表单链接新的模型实例,并存储到数据库.如果调用时使用commit=False,创建实例但不保存到数据库.这可以在保存之间修改对象,我们需要修改数据.save只在ModelForm中有用,Form无效.因为Form没有关联model
2 关联post到刚刚创建的commnet.这样就指定了新的评论到post.
3 最后,调用save()保存新的comment到数据库

现在视图已经可以显示并处理新的评论.

添加评论到文章详细页模板

我们已经创建post管理comment的功能.现在,需要对post/detail.html模板做下面的事情:

  • 显示一篇post的总commnet数量
  • 显示commnets列表
  • 显示一个新commnet表单

首先,添加评论总数.

1
2
3
4
5
6
7
<span>
{% with comments.count as total_comments %}
<h2>
{{ total_comments }} comment{{ total_comments|pluralize }}
</h2>
{% endwith %}
</span>

在模板中使用Django ORM,执行QuerySet comments.count.Django模板语言调用方法不会使用复数.with标签允许附加值到一个新的变量.pluralize模板过滤器根据commnets的值来显示复数后辍.模板过滤器带入变量值做为输入,然后返回一个混合后的值.第三章节将详细介绍过滤器.
如果结果不为1,pluralize过滤器将返回字母s.Django包含完美的模板标记和过滤器帮助显示你想要的信息.
现在,列出评论.代码如下:

1
2
3
4
5
6
7
8
9
10
11
{% for comment in comments %}
<div class="comment">
<p class="info">
Comment {{ forloop.counter }} by {{ comment.name }}
Created {{ comment.created }}
</p>
{{ comment.body|linebreaks }}
</div>
{% empty %}
<p>No Comments.</p>
{% endfor %}

我们使用for模板标签循环commnets.如果评论为空,显示一条消息,提示用户现在还没有评论.列举评论使用forloop.counter变量,包含整数循环计数.然后我们显示评论用户名,日期,评论内容.

最后,需要渲染一个表单或显示成功提交消息.

1
2
3
4
5
6
7
8
9
10
11
12
13
14
15
16
<span>
{% if new_comment %}
<h2>
Your comment has been added.
</h2>
{% else %}
<h2>Add a new commnet</h2>
<form action="." method="post">
{{ comment_form.as_p }}
{% csrf_token %}
<p>
<input type="submit" value="Add comment">
</p>
</form>
{% endif %}
</span>

代码相当简洁直接.如果new_comment对象存在,显示一条成功消息.否则,显示post表单并包含csrf token.

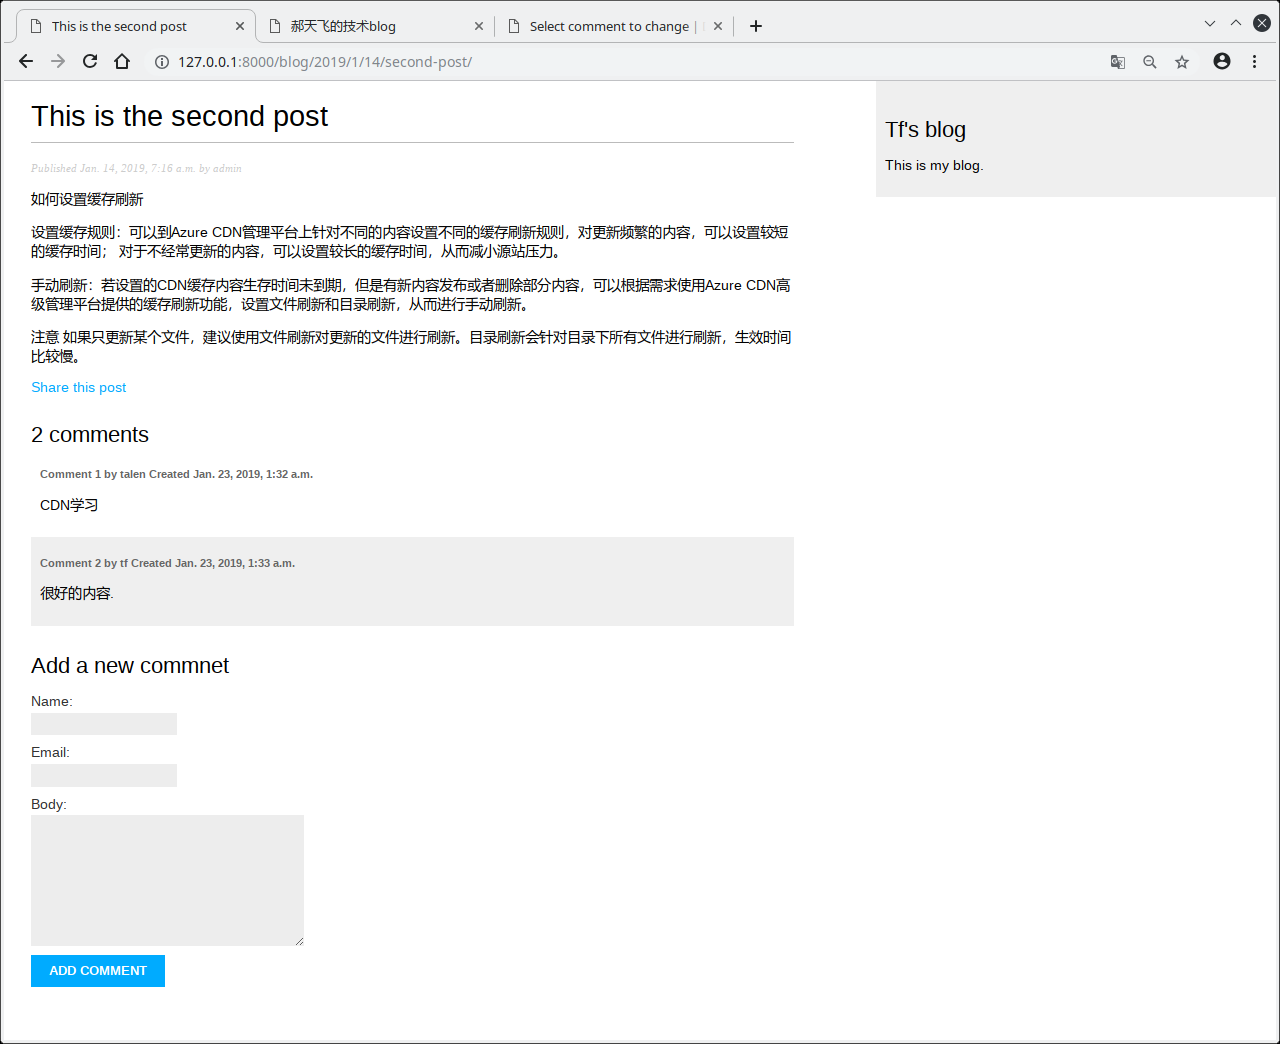
可以通过编辑http://127.0.0.1/admin/blog/comment active字段不显示不合适的评论,从文章评论中屏蔽它们.

添加标签功能

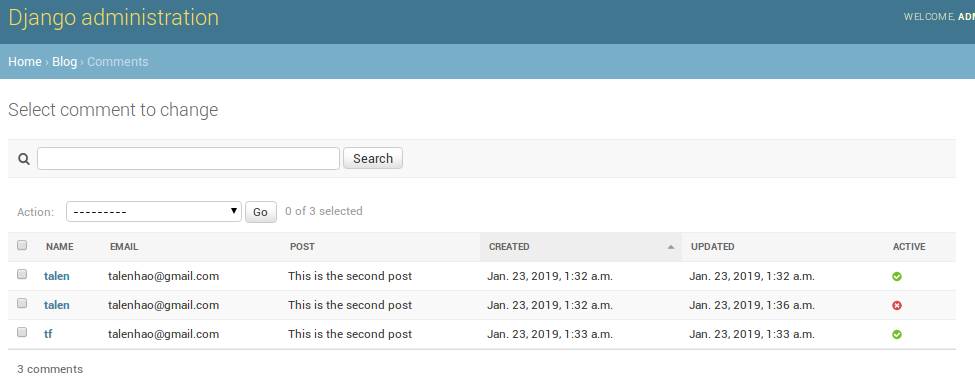
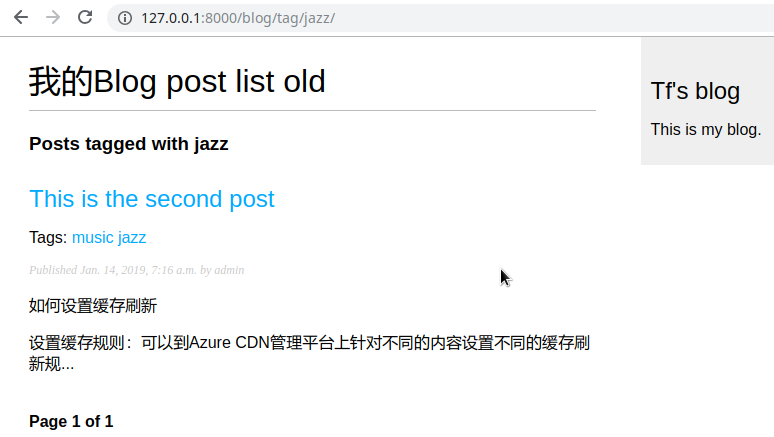
完成实施comment系统后,接下来创建post tag.工程将整合一个第三方Django tag应用。django-tag模块是的利用程序,一个主要提供一个Tag model和轻松标签到任何model一个管理器.可以到https://github.com/alex/django-taggit查看源码。

首先,执行以下命令使用pip安装django-taggit。

1
pip install django-taggit

打开settings.py文件添加taggit到INSTALLED_APPS:

1
2
3
4
5
6
7
8
9
10
INSTALLED_APPS = [
'django.contrib.admin',
'django.contrib.auth',
'django.contrib.contenttypes',
'django.contrib.sessions',
'django.contrib.messages',
'django.contrib.staticfiles',
'blog.apps.BlogConfig',
'taggit',
]

打开models.py文件添加django-taggit提供的TaggableManager管理器到Post model:

1
2
3
4
5
6
7
from taggit.managers import TaggableManager


class Post(models.Model):
tags = TaggableManager()
objects = models.Manager()
...

tags管理器将允许从Post对象中添加,接收,移除tag。
运行下面的命令创建migration。

1
2
3
4
5
6
7
8
9
10
11
(django2byExample) haotianfei@tianfei-opensuse:~/PycharmProjects/Django2byExample> python manage.py makemigrations blog
Migrations for 'blog':
blog/migrations/0003_post_tags.py
- Add field tags to post
(django2byExample) haotianfei@tianfei-opensuse:~/PycharmProjects/Django2byExample> python manage.py migrate
Operations to perform:
Apply all migrations: admin, auth, blog, contenttypes, sessions, taggit
Running migrations:
Applying taggit.0001_initial... OK
Applying taggit.0002_auto_20150616_2121... OK
Applying blog.0003_post_tags... OK

现在数据库已经准备好使用django-taggit models。让我们学习如何来使用tags管理器。打开终端python manage.py shell.首先,接收一个post;然后添加tags到这个post;检查是否已经成功添加。最后,移除一个tag然后再次检查。

1
2
3
4
5
6
7
8
9
10
11
>>> from blog.models import Post
>>> post = Post.objects.get(id=2)
>>> post
<Post: This is the second post>
>>> post.tags.add('music', 'jazz', 'django')
>>> post.tags.all()
<QuerySet [<Tag: music>, <Tag: jazz>, <Tag: django>]>
>>> post.tags.remove('django')
>>> post.tags.all()
<QuerySet [<Tag: music>, <Tag: jazz>]>
>>>

是不是很容易?运行runserver命令,打开admin网站查看看tag对象。
然后到post对象上查看tag字段,还可以编辑它。
下面将在编辑post页面显示tags。
打开blog/post/list.html template添加下面的html代码:

1
<p class="tags">Tags: {{ post.tags.all|join:", " }}</p>

接下来,我们将编辑post_list view让用户可以列出所有打了指定tag的posts。编辑view.py,从django-taggit import Tag model,通过修改post_list view使用可选的tag_slug过滤一个tag的所有posts:

1
2
3
4
5
6
7
8
9
# tag,tag标签复用了post_list模板
from taggit.models import Tag
def post_list(request, tag_slug=None):
# 获取所有的post对象
object_list = Post.published.all()
tag = None
if tag_slug:
tag = get_object_or_404(Tag, slug=tag_slug)
object_list = Post.published.filter(tags__in=[tag])

post_list veiw作用流程如下:
1 带入一个可选的参数tag_slug(默认为None).这个参数来自url.
2 在view内部,创建一个初始QuerySet,接收所有发布的posts,但如果有一个tag slug参数,我们将使用get_object_or_404快捷方式带入slug取得Tag对象.
3 然后,我们过滤包含tag的posts列表.这个一个多对多关联,所有使用包含过滤,在这里,只包含一个元素.

QuerySet只在我们解析模板时才循环post列表.
最后,修改view底部的render()函数将tag变量传递到模板.

1
2
3
4
5
return render(request,
'blog/post/listold.html',
{'posts': posts,
'page': page,
'tag': tag})

编辑urls.py,注释掉PostListView,去掉post_list view的注释,添加tag

1
path('tag/<slug:tag_slug>/', views.post_list, name='post_list_by_tag'),

修改post_list.html加入tag判断

1
2
3
4
5
6
{% for post in posts %}
<p>
{% if tag %}
<h3>Posts tagged with {{ tag.name }}</h3>
{% endif %}
</p>

为每个tag标签添加超链接

1
2
3
4
5
6
7
<p class="tags">
Tags:
{% for p_tag in post.tags.all %}
<a href="{% url "blog:post_list_by_tag" p_tag.slug %}">{{ p_tag.name }}</a>
{% endfor %}
{% if not forloop.last %}{% endif %}
</p>

接收相似文章

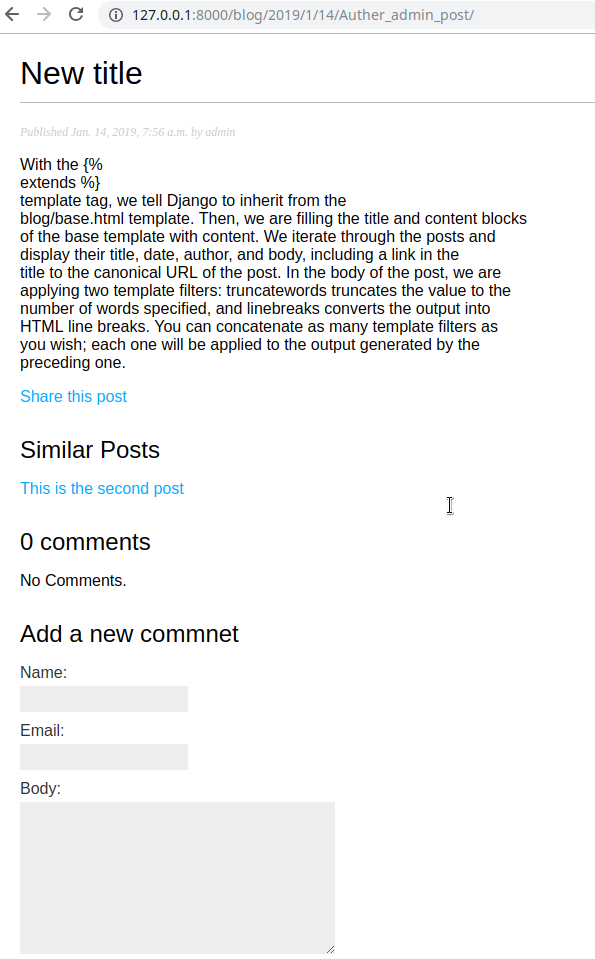
在post_detail view中计算相关性,在detail.html中列举:

1
2
3
4
5
6
7
8
9
10
11
12
post_tags_ids = post.tags.values_list('id', flat=True)
similar_posts = Post.published.filter(tags__in=post_tags_ids)\
.exclude(id=post.id)
similar_posts = similar_posts.annotate(same_tags=Count('tags'))\
.order_by('-same_tags', '-publish')[:4]
return render(request,
'blog/post/detail.html',
{'post': post,
'comments': comments,
'new_comment': new_comment,
'comment_form': comment_form,
'similar_posts': similar_posts})
1
2
3
4
5
6
7
8
9
10
11
12

<span>
<h2>Similar Posts</h2>
{% for similar_post in similar_posts %}
<p>
<a href="{{ similar_post.get_absolute_url }}">{{ similar_post.title }}</a>
</p>
{% empty %}
<p>There are no similar posts yet.</p>
{% endfor %}

</span>

总结

Building a Blog Application 翻译加实践

发表于 2019-01-14 | 更新于: 2019-11-08   |   更新于 2019-11-08 | 分类于 django 2 by example

创建第一个工程

第一个django工程是创建一个完整的blog.Django提供了一个命令创建和初始化工程文件结构.

1
(django2byExample) haotianfei@tianfei-opensuse:~/PycharmProjects> django-admin startproject django_2_by_example

这会创建一个名为django_2django_2_by_example的工程,工程名应该避免使用与python或django内置模块相同的名字,以免引起冲突.
我们来看一下生成的工程结构:

1
2
3
4
5
6
7
8
9
10
(django2byExample) haotianfei@tianfei-opensuse:~/PycharmProjects> tree django_2_by_example/
django_2_by_example/
├── django_2_by_example
│   ├── __init__.py
│   ├── settings.py
│   ├── urls.py
│   └── wsgi.py
└── manage.py

1 directory, 5 files
  • manage.py: 这是一个与工程交互的命令行管理工具.这是一个对django-admin.py的简单封装,一般不需要修改这个文件.
  • django_2_by_example: 工程目录,包括4个文件:
    • init.py: 一个空文件,python将包含此文件的目录视为一个模块.
    • settings.py: 工程配置文件,默认包含一些配置都在此文件中.
    • urls.py: URL配置文件,每个条URL都映射到一个view.
    • uwsgi.py: 工程通过此文件配置部署成web server gateway interface(WSGI)应用.
      生成的settings.py文件包含工程配置,其中默认配置了SQLite3的数据库及包含默认在INSTALLED_APPS列表中的通用应用.我们稍后将在工程设置部分研究这些应用.
      为了完成工程安装,需要在数据库中创建INSTALLED_APPS列表中的应用相应的表.运行下面的命令:
      1
      2
      3
      4
      5
      6
      7
      8
      9
      10
      11
      12
      13
      14
      15
      16
      17
      18
      19
      (django2byExample) haotianfei@tianfei-opensuse:~/PycharmProjects> cd django_2_by_example/
      (django2byExample) haotianfei@tianfei-opensuse:~/PycharmProjects/django_2_by_example> python manage.py migrate
      Operations to perform:
      Apply all migrations: admin, auth, contenttypes, sessions
      Running migrations:
      Applying contenttypes.0001_initial... OK
      Applying auth.0001_initial... OK
      Applying admin.0001_initial... OK
      Applying admin.0002_logentry_remove_auto_add... OK
      Applying contenttypes.0002_remove_content_type_name... OK
      Applying auth.0002_alter_permission_name_max_length... OK
      Applying auth.0003_alter_user_email_max_length... OK
      Applying auth.0004_alter_user_username_opts... OK
      Applying auth.0005_alter_user_last_login_null... OK
      Applying auth.0006_require_contenttypes_0002... OK
      Applying auth.0007_alter_validators_add_error_messages... OK
      Applying auth.0008_alter_user_username_max_length... OK
      Applying auth.0009_alter_user_last_name_max_length... OK
      Applying sessions.0001_initial... OK

上面是Django数据库迁移输出信息.通过migrations,初始应用的表将在数据库中创建.在接下来的”创建及应用迁移”这一章节将会学习migrate管理命令.

在开发环境运行服务

django提供了一个轻量web服务器以便快速测试代码,不需要花大量时间配置一个生产服务器.当运行django开发服务器,它将持续检测代码修改.重载是自动的,不需要代码修改后手工重载服务器.但有些行为可能不会被提示,例如添加新文件到工程,这里必需手动重载服务器.
使用下面的命令在工程根目录运行开发服务器:

1
2
3
4
5
6
7
8
(django2byExample) haotianfei@tianfei-opensuse:~/PycharmProjects/django_2_by_example> python manage.py runserver
Performing system checks...

System check identified no issues (0 silenced).
January 11, 2019 - 06:39:35
Django version 2.0.5, using settings 'django_2_by_example.settings'
Starting development server at http://127.0.0.1:8000/
Quit the server with CONTROL-C.

打开浏览器,输入http://127.0.0.1:8000/将会显示成功运行界面.
标志着Django开发服务器已经在运行中.返回命令行终端,会有GET请求记录打印:

1
[11/Jan/2019 06:50:04] "GET / HTTP/1.1" 200 16348

每个HTTP请求都会被开发服务器记录并打印在终端.任何的错误信息同样会输出到终端.
还可以订制django开发服务器使用指定IP与port,加载指定配置文件(当你拥有多个环境需要多个配置文件时可以为每个环境创建一个配置文件)的方式运行工程,如下:

1
(django2byExample) haotianfei@tianfei-opensuse:~/PycharmProjects/django_2_by_example> python manage.py runserver 127.0.0.1:8001 --settings=django_2_by_example.settings

当然开发服务器只能在开发时使用不能用于生产环境.生产部署django需要使用WSGI应用部署在真实的web服务器上,如apache,gunicorn或uWSGI.关于部署wsgi可以参阅https://docs.djangoproject.com/en/2.0/howto/deployment/wsgi/.

工程设置

让我们打开settings.py文件看看我们工程的配置.这个文件包含许多配置,但这只是settings的一部分.全部参数参考https://docs.djangoproject.com/en/2.0/ref/settings/
比较重要的设置如下:

  • DEBUG: 布尔值,打开或关闭工程调试模式.默认是true,如果应用有非预期的错误,django会显示详细的错误信息.迁移到生产环境时记得设置为false.永远不要在生产环境打开DEBUG部署一个站点,因为有可能泄漏与工程相关的敏感信息.
  • ALLOWED_HOSTS: DEBUG开启及tests时不生效.一旦迁移到生产环境,你可以添加域名允许解析站点.
  • INSTALLED_APPS: 配置在django站点中启用的应用.Django默认包含以下应用:
    • django.contrib.admin: 一个admin管理框架.
    • django.contrib.auth: 一个认证框架.
    • django.contrib.contenttypes: 内容类型处理框架.
    • django.contrib.sessions: 会话框架.
    • django.contrib.messages: 消息系统框架.
    • django.contrib.staticfiles: 静态文件管理框架.
  • MIDDLEWARE: 将要执行的中间件列表.
  • ROOT_URLCONF: 应用定义url匹配位置.
  • DATABASES: 工程中所有数据库信息.必须设置一个默认数据库.默认是SQLite3.
  • LANGUAGE_CODE: 站点默认语言编码.
  • USE_TZ: 打开或关闭时区支持.

工程和应用

在django中,工程被视为带有一些设置的django安装.
一个应用站点是模型,视图,模板和URLS的组合.应用与django框架交互提供一些特殊的功能,然后可以在其它工程中重用.可以把工程视作你的网站,包含了许多应用,如blog,wiki和forum.然后这些应用也可以在其它网站重用.

创建一个应用

现在,让我创建每一个django应用.我们将一步步创建一个blog应用.进入工程根目录,运行下面的命令:

1
(django2byExample) haotianfei@tianfei-opensuse:~/PycharmProjects/django_2_by_example> python manage.py startapp blog

这将创建一个基本的应用结构,如下所示:

1
2
3
4
5
6
7
8
9
10
11
(django2byExample) haotianfei@tianfei-opensuse:~/PycharmProjects/django_2_by_example> tree
.
├── blog
│   ├── admin.py
│   ├── apps.py
│   ├── __init__.py
│   ├── migrations
│   │   └── __init__.py
│   ├── models.py
│   ├── tests.py
│   └── views.py

包括如下文件:

  • admin.py: 注册到django admin管理框架模型,可选项.
  • apps.py: blog应用的主配置文件.
  • migrations: 应用数据库迁移文件目录.迁移允许django追踪model修改,然后相应的同步到数据库.
  • models.py: 应用数据模型,所有的django文件都需要有一个数据模型文件,但可以内容为空.
  • tests.py: 添加测试到应用.
  • views.py: 定义应用逻辑; 每个视图接收http请求,处理请求,然后返回响应.

设置blog应用的数据库结构

通过定义数据模型来设计blog的数据结构.一个模型是django.db.models.Model子类,每个属性对应数据库字段.django会为每个模型创建一个数据库表.通过创建模型,django提供了一个易于查询数据库的事实上的API接口.
首先,我们将定义一个post模型.添加如下内容到models.py:

1
2
3
4
5
6
7
8
9
10
11
12
13
14
15
16
17
18
19
20
21
22
23
24
25
26
27
28
29
30
31
from django.db import models

# create your models here.
from django.utils import timezone
from django.contrib.auth.models import User


class Post(models.Model):
STATUS_CHOICES = (
('draft', 'Draft'),
('published', 'Published'),
)
title = models.CharField(max_length=250)
slug = models.SlugField(max_length=250,
unique_for_date='published')
author = models.ForeignKey(User,
on_delete=models.CASCADE,
related_name="blog_posts")
body = models.TextField()
publish = models.DateTimeField(default=timezone.now)
created = models.DateTimeField(auto_now_add=True)
updated = models.DateTimeField(auto_now=True)
status = models.CharField(max_length=10,
choices=STATUS_CHOICES,
default='draft')

class Meta:
ordering = ('-published',)

def __str__(self):
return self.title

模型属性:

  • title: 文章标题,对应数据库中的varchar字段.
  • slug: 这个字段被打算用于URLs.slug是一个只包含字母,数字,下划线,连字号的一个简短的标记.使用slug可以构建漂亮的,SEO友好的urls.我们为其添加了unique_for_data参数,以便创建使用发布日期与slub结合的文章urls.Django会阻止同一日期使用相同slug的文章.
  • author: 这是一个外键.默认是多对一的关系.我们可以告诉Django文章由一个用户书写,一个用户可以书写一定数量的文章.使用外键,Django将会使用关联模型的主键在数据库中创建一个外键.我们可以信赖Django认证系统的User数据模型.on_delete参数指明当指向的对象删除时采纳的相应动作.这是SQL的基本动作.使用models.CASCADE,我们设定当指定的用户删除时,数据库将删除用户关联的所有文章.关于CASCADE可参考我们同时指定了一个反向关联名称related_name,表示从User到posts.这将轻松访问关联对象.
  • body: 文章的主体内容,一个文本字段,对应SQL数据库的TEXT字段.
  • publish: 当文章发布时的时间.使用Django的timezone的now方法生成,返回值是timezone可识别格式的当前时间.可以看作是python datatime.now方法.
  • created: 文章创建时间.auto_now_add参数表示时间会自动保存到创建对象.
  • updated: 文章更新时间.auto_now表示当更新时日期时间会自动保存.
  • status: 发布状态.使用choice参数,只能在所预设的值中选择.
    Django在不同的模型中使用不同的类型,查阅参考
    Meta类包含模型的元数据.这里使用发布日期的倒序排序查询结果.最近发布的文章将排在第一位.
    str方法返回一个对人友好的描述.Django大量使用此方法,如管理站点.

激活应用

为了让Django可以持续追踪应用,通过模型创建数据库表,首先要激活应用.修改settings.py在INSTALLED_APPS变量中添加blog.apps.BlogConfig.

1
2
3
4
5
6
7
8
9
10
11
# Application definition

INSTALLED_APPS = [
'django.contrib.admin',
'django.contrib.auth',
'django.contrib.contenttypes',
'django.contrib.sessions',
'django.contrib.messages',
'django.contrib.staticfiles',
'blog.apps.BlogConfig',
]

BlogConfig是blog应用主配置文件apps.py中定义的一个类.现在已经激活应用,可以加载应用模型了.

创建及应用migrations

下面来创建数据库表.Django使用一个迁移系统追踪模型修改然后相应的应用到数据库.migrate命令为INSTALLED_APPS表中所有的应用实施与数据库的同步.
首先,创建一个初始migration.执行下面的指令:

1
2
3
4
(django2byExample) haotianfei@tianfei-opensuse:~/PycharmProjects/django_2_by_example> python manage.py makemigrations blog
Migrations for 'blog':
blog/migrations/0001_initial.py
- Create model Post

初始化操作仅是创建了blog/migrations/0001_initial.py文件,一个迁移操作依赖其它迁移,当模型修改时执行数据库同步操作.
我们来看一下将要对模型进行操作的SQL代码.附带了迁移名称的sqlmigrate命令可以返回SQL语句但不真正执行.

1
2
3
4
5
6
7
8
9
(django2byExample) haotianfei@tianfei-opensuse:~/PycharmProjects/django_2_by_example> python manage.py sqlmigrate blog 0001
BEGIN;
--
-- Create model Post
--
CREATE TABLE "blog_post" ("id" integer NOT NULL PRIMARY KEY AUTOINCREMENT, "title" varchar(250) NOT NULL, "slug" varchar(250) NOT NULL, "body" text NOT NULL, "publish" datetime NOT NULL, "created" datetime NOT NULL, "updated" datetime NOT NULL, "status" varchar(10) NOT NULL, "author_id" integer NOT NULL REFERENCES "auth_user" ("id") DEFERRABLE INITIALLY DEFERRED);
CREATE INDEX "blog_post_slug_b95473f2" ON "blog_post" ("slug");
CREATE INDEX "blog_post_author_id_dd7a8485" ON "blog_post" ("author_id");
COMMIT;

Django默认使用应用+类名作为数据库表明,可以在meta类中使用db_table属性指定数据库表名.Django同时为每个模型创建一个主键,也可以便利属性primary_key=True手工指定一个字段为主键.默认主键字段是id,一个自增长整数字段.
下面来实施数据库同步:

1
2
3
4
5
(django2byExample) haotianfei@tianfei-opensuse:~/PycharmProjects/django_2_by_example> python manage.py migrate
Operations to perform:
Apply all migrations: admin, auth, blog, contenttypes, sessions
Running migrations:
Applying blog.0001_initial... OK

如果修改了model模型,需要makemigrates,然后使用migrate同步到数据库.

创建一个管理数据库站点

已经创建好post模型,接下来创建一个简单的管理站点来管理blog文章.Django自带一个非常有用的管理接口编辑内容.Django管理站点通过读取模型元数据动态创建,提供了一个编辑内容的产品级接口.你可以开箱即用,在上面显示你想模型.django.contrib.admin默认已经在INSTALLED_APPS中,不需要自己添加.

创建超级用户

首先,需要一个用户来管理站点.

1
2
3
4
5
6
7
8
9
10
(django2byExample) haotianfei@tianfei-opensuse:~/PycharmProjects/django_2_by_example> python manage.py createsuperuser
Username (leave blank to use 'haotianfei'): admin
Email address: talenhao@gmail.com
Password:
Password (again):
This password is too short. It must contain at least 8 characters.
This password is too common.
Password:
Password (again):
Superuser created successfully.

管理站点

现在打开开发服务器,使用浏览器打开http://127.0.0.1:8000/admin.

1
python manage.py runserver

使用刚才创建的超级用户及密码登陆.
Group和User模型是由Django认证框架django.contrib.auth提供的.之前的Post模型使用auther字段就是关联到这里的User.

添加模型到管理站点

现在添加blog post模型到管理站点.修改admin.py文件:

1
2
3
4
5
6
from django.contrib import admin

# Register your models here.
from blog.models import Post

admin.site.register(Post)

打开http://127.0.0.1:8000/admin将会看到新添加的Post.
是不是很简单?当你的模型注册到管理站点,你会得到由内置框架生成的一个友好的界面,你可以轻松查看,编辑,创建和删除对象.
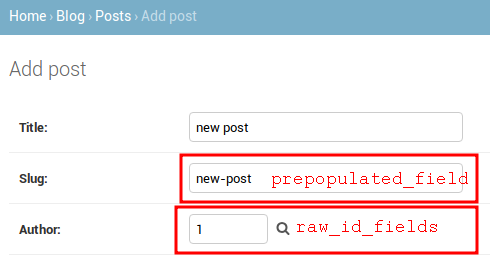
点击右边的添加链接添加一篇新文章.Django针对不同的字段类型使用不同的插件,甚至混合字段如DateTimeField使用javascript 日期插件,也很好的显示出来.
填入内容,然后点击保存按钮,会重定向到文章列表及显示一个成功的消息.

定制模型显示方式

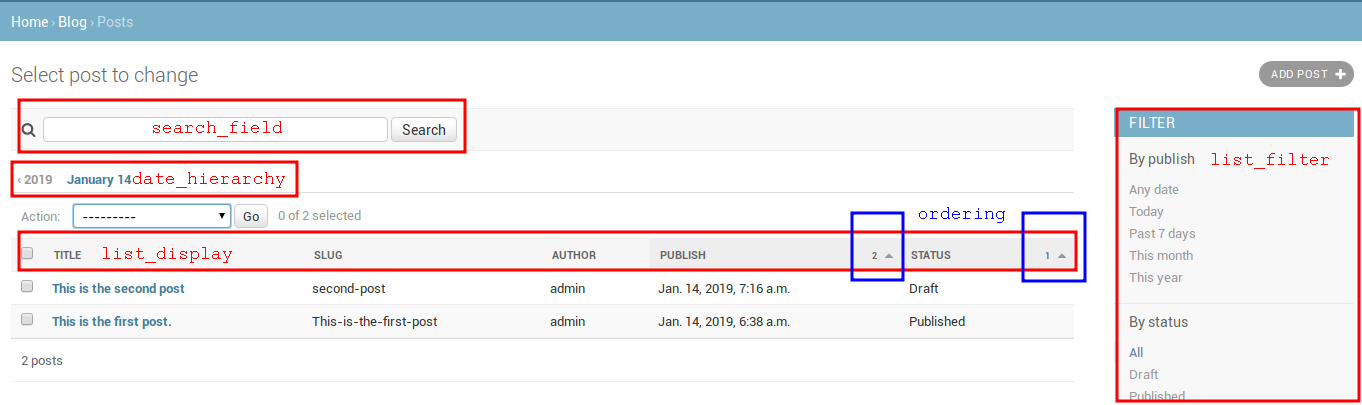
下面来定制管理站点.编辑admin.py:

1
2
3
4
5
6
7
8
9
10
11
12
from django.contrib import admin

# Register your models here.
from blog.models import Post

@admin.register(Post)
class PostAdmin(admin.ModelAdmin):
list_display = ('title',
'slug',
'author',
'publish',
'status')

注册模型Post继承admin.ModelAdmin,使用自定制类.在这个自定类中,可以包括显示,及如何交互.list_display属性允许要显示在管理站对象列表的模型字段.@admin.register()装饰器代替admin.site.register(),注册我们的自定类PostAdmin如何ModelAdmin注册Post.
下面来扩展更多参数:

1
2
3
4
5
6
7
8
9
10
11
12
13
14
from django.contrib import admin

# Register your models here.
from blog.models import Post

@admin.register(Post)
class PostAdmin(admin.ModelAdmin):
list_display = ('title', 'slug', 'author', 'publish', 'status')
list_filter = ('author', 'publish', 'status', 'created', 'updated')
search_fields = ('title', 'body')
prepopulated_fields = {'slug': ('title',)}
raw_id_fields = ('author',)
date_hierarchy = 'publish'
ordering = ('status', 'publish')


使用QuerySet和managers

现在你拥有了全功能的管理站点来管理blog的内容,现在来从数据库接收信息及与之交互.Django自带了一个非常强大的抽象接口,可以轻松创建,接收,更新,删除对象.Django ORM(object-relateional mapper)可以兼容MySQL,PostgreSQL,SQLite,Oracle.不要忘记你可以在settings.py的DATABASES部分定义工程数据库.Django可以同时配置多个数据库,可以编辑数据库路由来自定义路由结构.
一旦创建数据模型,可以自由的在Django中与之交互.数据模型参考官方文档

创建对象

打开终端,然后运行下面的命令来打开python shell:

1
2
3
4
5
6
7
8
9
10
11
12
(django2byExample) haotianfei@tianfei-opensuse:~/PycharmProjects/django_2_by_example> python manage.py shell
Python 3.6.5 (default, Mar 31 2018, 19:45:04) [GCC] on linux
Type "help", "copyright", "credits" or "license" for more information.
(InteractiveConsole)
>>> from django.contrib.auth.models import User
>>> from blog.models import Post
>>> user = User.objects.get(username="admin")
>>> post = Post(title="Auther admin post",
... slug="Auther_admin_post",
... body="Post body",
... author=user)
>>> post.save()

首先使用用户名’admin’接收user对象.get()方法允许你从数据库中接收单个对象.这个方法预期会有一个匹配结果.如果没有结果匹配到,会返回DoesNotExist错误;如果返回多个结果,将会抛出MultipleObjectsReturned错误.
接下来创建了一个post实例,填入title,slug,body,author使用上一步接收到的user,最后使用实例方法save()保存到数据库.
save()会执行一个INSERT SQL语句,我们可以看到如何在内存中首先创建一个对象,然后持久化到数据库中.但我们还可以只需要一个create()操作创建对象然后持久化到数据库:

1
2
>>> Post.objects.create(title='One more post', slug='one-more-post', body='Post body', author=user)
<Post: One more post>

更新对象

现在修改一个post然后保存对象

1
2
>>> post.title = 'New title'
>>> post.save()

这里的save()方法执行的UPDATE SQL语句

接收对象

Django的 ORM基于QuerySets.一个QuerySets是从数据库中收集对象,然后设置多个过滤去限制结果.上面已经知道使用get()接收单个对象.每个Django模型都至少有一个管理器,这个默认的管理器叫做objects.你得到一个QuerySet对象使用模型管理器.为了从一个表中接收所有的对象,使用objects.all()方法

1
>>> all_posts = Post.objects.all()

使用filter()方法

过滤QuerySets使用objects的filter()方法.举个例子,我们需要接收所有发布时间为2019年的文章使用如下的QuerySet:

1
2
>>> Post.objects.filter(publish__year=2019)
<QuerySet [<Post: One more post>, <Post: New title>, <Post: This is the second post>, <Post: This is the first post.>]>

使用多个过滤条件:

1
2
>>> Post.objects.filter(publish__year=2019, author__username='admin')
<QuerySet [<Post: One more post>, <Post: New title>, <Post: This is the second post>, <Post: This is the first post.>]>

上面的命令等效:

1
2
3
>>> Post.objects.filter(publish__year=2019)\
... .filter(author__username='admin')
<QuerySet [<Post: One more post>, <Post: New title>, <Post: This is the second post>, <Post: This is the first post.>]>

使用exclude()

可以使用objects.exclude()从结果中排除适当的内容.

1
2
3
>>> Post.objects.filter(publish__year=2019)\
... .exclude(title__startswith="New")
<QuerySet [<Post: One more post>, <Post: This is the second post>, <Post: This is the first post.>]>

使用order_by()

可以使用objects.order_by()方法按不同的字段排序结果.-号表示反序.

1
2
3
4
>>> Post.objects.order_by('-title')
<QuerySet [<Post: This is the second post>, <Post: This is the first post.>, <Post: One more post>, <Post: New title>]>
>>> Post.objects.order_by('title')
<QuerySet [<Post: New title>, <Post: One more post>, <Post: This is the first post.>, <Post: This is the second post>]>

删除对象

如果想删除一个对象,可以使用对象实例方法delete()

1
2
3
4
5
>>> post_new = Post.objects.get(id=1)
>>> post_new
<Post: This is the first post.>
>>> post_new.delete()
(1, {'blog.Post': 1})

QuerySet评估操作

你可以串连尽可能多的过滤到QuerySet,在没有评估之间是不会去数据库的.
QuerySet只会在下面的情况下被评估:

  • 第一次迭代
  • 当有切片操作,对于实例,Post.objectes.all()[:3]
  • 当数据有pickle或缓存操作
  • 使用repr()或len()
  • 明确的调用list()
  • 使用测试语句,如bool(),or,and,if

创建模型管理器

objects是每个模型在数据库中的默认管理器.但我们还可以为模型定制管理器.我们将创建一个定制管理器接收所有published状态的文章.
有2种方式添加管理器:扩展默认管理器方法或修改初始QuerySets.前者提供一个QuerySets接口如Post.objects.my_manager(),后者提供如Post.my_manager.all().管理器允许我们使用Post.published.all()接收文章.
编辑model.py文件添加自定管理器:

1
2
3
4
5
6
7
8
class PublishedManager(models.Manager):
def get_queryset(self):
return super(PublishedManager, self).get_queryset().filter(status='published')


class Post(models.Model):
objects = models.Manager()
published = PublishedManager()

get_queryset方法用于管理器返回QuerySet.上面采取了覆盖方法,包含了自定过滤条件.

1
2
>>> Post.published.all()
<QuerySet [<Post: This is the second post>]>

构建列表及详细视图

现在已经具有了ORM的知识,现在可以为blog应用创建视图了.Django视图是能够接收web请求然后返回一个web响应的python函数.所有预期的响应逻辑都是包含在视图中.
首先,我们将创建应用视图,然后为每一个视图定义一个URL匹配,最后创建HTML模板渲染视图生成的数据.
每个视图都会传递变量到渲染的模板,然后伴随渲染输出返回一个HTTP响应.

创建列表及详细视图

现在开始创建一个显示文章列表的视图.编辑blog应用的views.py文件如下:

1
2
3
4
5
6
7
8
9
10
11
12
from django.shortcuts import render

# Create your views here.
from django.shortcuts import get_object_or_404
from .models import Post


def post_list(request):
posts = Post.objects.all()
return render(request,
'blog/post/list.html',
{'posts': posts})

这是每个django视图.post_list视图只需要带入request对象作为惟一参数.request也被所有视图作为参数.在这个视图中,我们使用自建管理器published接收了所有published状态的文章.
最后我们使用django提供的render()快捷函数使用模板渲染文章列表.这个函数带入request对象,模板路径,内容变量渲染指定模板.最终返回一个包含渲染文本(通常是HTML代码)的HttpResponse对象.render快捷函数request上下文考虑在内,因此模板上下文处理器设置的任何变量都可以被给定的模板访问.模板上下文处理器是可调用的,用于将变量设置到上下文中.你将会在第三章扩展blog应用中学习如何使用他们.
让我们创建第二个视图以显示单个post.添加下面的函数到view.py文件

1
2
3
4
5
6
7
8
9
10
def post_detail(request, year, month, day, post):
post = get_object_or_404(Post,
slug=post,
status='published',
publish__year=year,
publish__month=month,
publish__day=day)
return render(request,
'blog/post/detail.html',
{'post': post})

这是文章详细视图.这个视图带入year,month,day和post参数来接收给定slug和日期的发布状态文章.在这里,我们确认使用slug与日期只匹配一篇文章.在详细视图,我们使用get_object_or_404()快捷函数接收预期的文章.这个函数接收给定参数所匹配到的对象或在没有对象找到时明确的弹出HTTP404.最后,我们使用render快捷函数使用一个模板渲染接收到的文章.

为视图添加URL匹配

URL匹配允许你映射URLs到视图.一个URL匹配由一个字符串匹配,一个视图和一个工程域可用指向这个URL的名称的可选项.Django顺序执行每个URL匹配然后停止在第一个匹配到的请求URL.然后Django导入匹配URL规则的视图然后执行它,传递一个HttpRequest类和关键字或位置参数.
创建一个urls.py文件在blog应用目录然后添加如下的代码:

1
2
3
4
5
6
7
8
9
10
11
12
13
from django.urls import path
from . import views


app_name = 'blog'

urlpatterns = [
# post views
path('', views.post_list, name='post_list'),
path('<int:year>/<int:month>/<int:day>/<slug:post>/',
views.post_detail,
name='post_detail'),
]

在上面的代码中,我们定义了一个使用app_name变量的应用空间.这允许我们通过指定它们的名字的应用组织URLs.我们使用path()定义了两个不同的匹配.第一个URL匹配不带入任何参数,指向post_list视图.第二个带入下面四个参数然后映射到post_detail视图.

  • year: 整数
  • month: 整数
  • day: 整数
  • post: 提交的文章slug
    我们使用单个<>捕捉URL的值.任何使用<参数>匹配的URL指定匹配都被捕捉为字符串.我们使用类似int:year的路径转换,指定匹配规则,返回一个整数和使用类似slug:post指定匹配一个slug(一个包含asscii字符或数字,连接符-,下划线_的字符串).你可以查看所有路径转换符参考 https://docs.djangoproject.com/en/2.0/topics/http/urls/#path-converters
    如果使用path()和转换不满足你的要求,你可以使用re_path()包含混合RUL匹配规则使用python正则表达式(https://docs.djangoproject.com/en/2.0/ref/urls/#django.urls.re_path).如果你没有学习过正则表达式,你可以先看一下正则表达式howto(https://docs.python.org/3/howto/regex.html).
    创建应用单独的urls.py文件是被其它工程重用的最好手段.
    现在你必须在工程主url匹配中包含blog应用的url匹配规则.编辑工程urls.py文件:
    1
    2
    3
    4
    5
    6
    7
    8
    9
    from django.contrib import admin
    from django.urls import path
    from django.urls import include


    urlpatterns = [
    path('admin/', admin.site.urls),
    path('blog/', include('blog.urls', namespace='blog')),
    ]

新的URL匹配规则使用blog/的路径,include指向blog中定义的urls匹配规则.我们在Namespace(命令空间)blog下使用那些匹配.NameSpace在整个工程环境下是非重复的,后面,我们在Namespace中轻松指定我们的blog应用,类似blog:post_list,blog:blog_detail.你可以学习到更多的namesapce通过下面的链接(https://docs.djangoproject.com/en/2.0/topics/http/urls/#url-namespaces)

models正式的urls

你可以使用上面定义的post_detail为post对象创建正式的URL.在django中习惯在model中添加一个get_absolute_url()方法.使用这个方法,我们将使用reverse()方法带入名称及转入可选参数创建urls.编辑models.py文件然后添加如下:

1
2
3
4
5
6
7
8
9
10
11
12
13
from django.urls import reverse


class Post(models.Model):
...
def get_absolute_url(self):
return reverse('blog:post_detail',
args=[
self.published.year,
self.published.month,
self.published.day,
self.slug
])

我们将在templates中使用get_absolute_url()方法链接到指定posts

为views创建templates

我们将为blog应用创建views和url patterns.
现在,是时候使用用户友好的方式添加templates显示posts.
在blog应用目录下创建下面的目录及文件:

1
2
3
4
5
6
7
8
9
10
haotianfei@tianfei-opensuse:~/PycharmProjects/django_2_by_example/blog> pwd
/home/haotianfei/PycharmProjects/django_2_by_example/blog
h
haotianfei@tianfei-opensuse:~/PycharmProjects/django_2_by_example/blog> tree templates/
templates/
└── blog
├── base.html
└── post
├── detail.html
└── list.html

base.html包含网站的主HTML,分成主内容区及侧边栏区.list.html和detail.html文件继承base.html文件分别来渲染blog post列表和详细视图.
Django拥有一个强大的template语言允许你指定数据如何显示.它基于模板标签,模板变量和模板过滤器:

  • 模板标签控制渲染模板,如

    1
    {% tag %}
  • 模板变量在渲染时替换值, 如

    1
    {{ variable }}
  • 模板过滤器允许修改变量显示, 如

    1
    {{ variable|filter }}
  • 你能够看到所有内置的模板标签和过滤器在这个页面:https://docs.djangoproject.com/en/2.0/ref/templates/builtins/
    让我们来修改base.html文件添加如下的代码:

    1
    2
    3
    4
    5
    6
    7
    8
    9
    10
    11
    12
    13
    14
    15
    16
    17
    18
    19
    20
    21
    22
    {% load static %}
    <!DOCTYPE html>
    <html lang="en">
    <head>
    <meta charset="UTF-8">
    <title>{% block title %}

    {% endblock %}</title>
    <link href="{% static "css/blog.css" %}" rel="stylesheet">
    </head>
    <body>
    <div id="content">
    {% block content %}

    {% endblock %}
    </div>
    <div id="sidebar">
    <h2>Tf's blog</h2>
    <p>This is my blog.</p>
    </div>
    </body>
    </html>
1
{% load static %}

告知Django加载在INSTALLED_APPS中设置的由dango.contrib.staticfiles应用提供的static静态模板标签.加载后就可以在模板的任何地方使用

1
{% static %}

模板过滤器.通过这个过滤器,你可以过滤静态文件,比如位于static目录下的blog.css文件.
在这里有2个

1
{% block %}

标签.这些标签通告Django我们想要在那个区域定义一个代码块.继承于此模板的所有模板能够用内容填允在这个些块中.我们这里定义了title和content块.
让我们来编辑post/list.html:

1
2
3
4
5
6
7
8
9
10
11
12
13
14
15
16
17
18
19
20
21
{% extends "blog/base.html" %}

{% block title %}
Tianfei's Blog
{% endblock %}

{% block content %}
<h1>我的Blog</h1>
{% for post in posts %}
<h2>
<a href="{{ post.get_absolute_url }}">
{{ post.title }}
</a>
</h2>
<p class="date">
Published {{ post.publish }} by {{ post.author }}
</p>
{{ post.body|truncatechars:60|linebreaks }}
{% endfor %}

{% endblock %}

使用

1
{% extends %}

模板标签,我们告知Django继承blog/base.html模板.然后,我们将内容填充到base.html的title和content块中.整合posts,显示post的title,data,author,body字段,为title配置规划的链接到post.post的body部分应用了2个过滤器,truncatechars截取了部分字符 ,linebreaks转换输出为html格式.你可以按照你的想法将过滤器可以多个串起;每一个过滤器都将作用于上一个过滤器的输出.
此时运行python manage.py runserver开启开发服务器.打开http://127.0.0.1/blog.

然后编辑post/detail.html:

1
2
3
4
5
6
7
8
9
10
11
12
13
14
15
{% extends "blog/base.html" %}

{% block title %}
{{ post.title }}
{% endblock %}

{% block content %}
<h1>
{{ post.title }}
</h1>
<p class="date">
Published {{ post.publish }} by {{ post.author }}
</p>
{{ post.body|linebreaks }}
{% endblock %}

返回浏览器,点击列表中的post标题,将会在新的页面查看post内容.

url被设计成针对blog post SEO友好的.

添加分页

当你已经开添加内容到blog,你很快就会领悟到需要分割post列表到多个页面上.Django拥有一个内置的分布类轻松管理分页数据.
编辑blog的view.py文件然后导入分布类,修改post_list视图:

1
2
3
4
5
6
7
8
9
10
11
12
13
14
15
16
17
18
19
20
21
22
23
from django.core.paginator import Paginator, EmptyPage, PageNotAnInteger
def post_list(request):
# 获取所有的post对象
object_list = Post.published.all()
# 以每页3篇post初始化paginator对象实例
paginator = Paginator(object_list, 3)
# 获取当前所处页数.从页面传递过来一个"page"
page = request.GET.get('page')

try:
# 获取当前页的posts对象
posts = paginator.page(page)
except PageNotAnInteger:
# 如果返回page页数不足1,即非整数,只显示一页即第一页
posts = paginator.page(1)
except EmptyPage:
# if page is empty, disable the lastest page
posts = paginator.page(paginator.num_pages)

return render(request,
'blog/post/list.html',
{'posts': posts,
'paginator': paginator})

pagination工作流程是:
1 把我们想每页显示的post数作为参数实例化Paginator类
2 我们使用request.GET.get得到当前页数值
3 我们继承使用Paginator实例对象的page()方法得到要显示的posts
4 在执行上步过程中,如果当前页数值是非整数(有可能输入了非法字符),我们将接收第一个页面.如果当前请求面大于最大页面数,我们将显示最后一页(有可能是在URL直接输入了更大的值).
5 传递页数及接收到的posts对象到模板.
在这里我们单独创建一个pagination模板,以便其它有需要分布的模板可以直接套用.
在blog应用的templates目录下创建pagination.html.

1
2
3
4
5
6
7
8
9
10
11
12
13
14
15
16
17
18
19
<div class="pagination">
<span class="step-links">
{% if page.has_previous %}
<a href="?page={{ page.previous_page_number }}">
Previous
</a>

{% endif %}
</span>
<span>
Page {{ page.number }} of {{ page.paginator.num_pages }}
</span>

<span>
{% if page.has_next %}
<a href="?page={{ page.next_page_number }}">Next</a>
{% endif %}
</span>
</div>

这个pagination模板需要一个page对象来渲染上一个与下一个链接,显示当前页在总页数中的位置.让我们返回blog/templates/list.html的内容块中插入pagination模板:

1
2
3
{% block content %}
{% include "pagination.html" with page=posts%}
{% endblock %}

自此我们传递了一个page=posts的参数到list.html模板.pagination.html模板包含在list.html中会正确渲染.可以使用此方法在其它需要分页的模型中重用pagination模板.

使用基于类视图

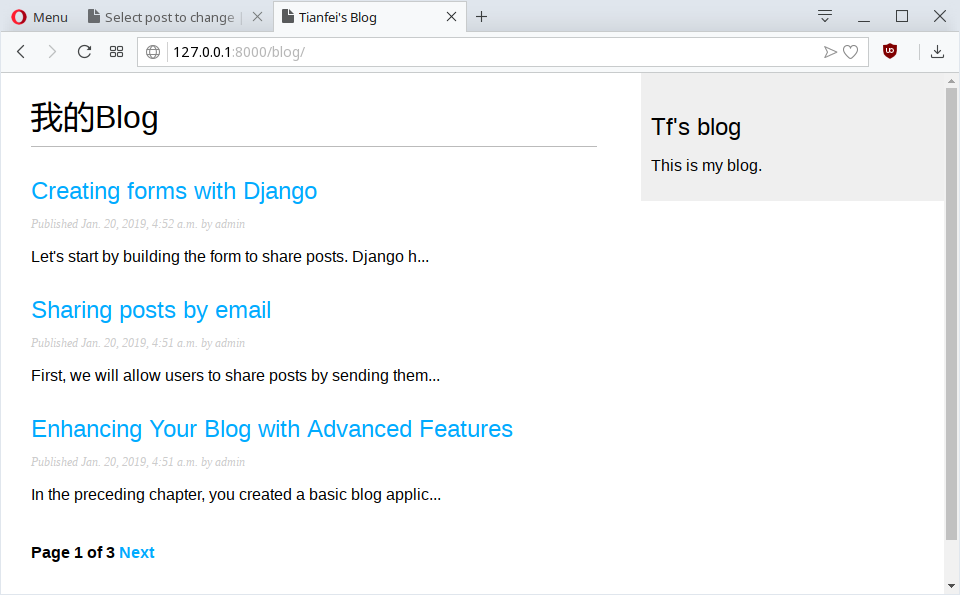
基于类视图是一种使用python对象代替函数实施视图的辅助方法.自从视图调用带入一个web请求然后返回一个web响应,你还可以调用你的视图用类方法.Django提供继承于view类的基于类视图,可以快速处理HTTP方法及公共的功能.
基于类视图提供高于基于函数视图的使用.它们具有以下特性:

  • 关联HTTP方法组织代码,如GET,POST,PUT,使用特殊的方法代替分歧.
  • 使用多少继承创建可重用的视图类.
    我们将修改我们的post_list视图使用由Django提供的基于类的视图ListView.这个基本视图允许你列举任何对象.
    修改view.py:
    1
    2
    3
    4
    5
    6
    7
    8
    9
    # Use class-base view
    from django.views.generic import ListView


    class PostListView(ListView):
    queryset = Post.published.all()
    context_object_name = 'posts'
    paginate_by = 3
    template_name = 'blog/post/list.html'

基于类视图与之前的post_list视图非常相似.在上面的代码中,我们告诉ListView做如下的事情:

  • 使用指定queryset代替接收所有对象.定义一个queryset属性,我们能够指定使用model=Post,Django会为我们创建Post.object.all() queryset对象.
  • 使用上下文变量posts接收查询结果.如果没有指定context_object_name默认变量是object_list.
  • 使用自定义模板渲染页面.如果未指定模板,ListView将使用blog/post_list.html
    关于基本类视图可查看https://docs.djangoproject.com/en/2.0/topics/class-based-views/intro/
    现在,修改urls.py注释掉post_list URL匹配规则,添加使用类URL匹配规则:
    1
    2
    3
    4
    5
    6
    urlpatterns = [
    # post views
    path('list/', views.post_list, name='post_list_old'),
    path('', views.PostListView.as_view(), name='post_list'),
    ...
    ]

同时为了保持pagination正常,我们需要修改接收的page对象.Django的ListView通用视图使用page_obj变量传递,所以我们修改post/list.html模板:

1
{% include "pagination.html" with page=page_obj%}

总结

在这一章节,我们学习了Django web 框架的基础.创建了视图,模板,URLS,包含了一个分页对象.

virtualenvwrapper使用

发表于 2019-01-11 | 更新于: 2019-11-08   |   更新于 2019-11-08 | 分类于 django 2 by example

virtualenvwrapper简介

virtualenvwrapper是virtualenv的一组扩展工具.它方便了创建,删除python虚拟开发环境,使得管理多个虚拟python环境变得更容易

Features

在一个地方组织管理所有的虚拟开发环境.
封装简化了管理虚拟环境(创建,删除,复制等).
使用单一命令就可快在不同环境快速切换.
命令行下支持环境名tab补全.
支持操作配置.
丰富的插件.

安装

1
haotianfei@tianfei-opensuse:~ > sudo pip install virtualenvwrapper

将下面的初始变量添加天.bashrc中

1
2
3
export WORKON_HOME='~/.virtualenvs'
export VIRTUALENVWRAPPER_PYTHON=/usr/bin/python3.6
source /usr/bin/virtualenvwrapper.sh

创建一个虚拟环境

1
2
3
4
5
6
7
8
9
10
11
haotianfei@tianfei-opensuse:~ > mkvirtualenv d2be
Using base prefix '/usr'
New python executable in /home/haotianfei/.virtualenvs/d2be/bin/python3
Also creating executable in /home/haotianfei/.virtualenvs/d2be/bin/python
Installing setuptools, pip, wheel...
done.
virtualenvwrapper.user_scripts creating /home/haotianfei/.virtualenvs/d2be/bin/predeactivate
virtualenvwrapper.user_scripts creating /home/haotianfei/.virtualenvs/d2be/bin/postdeactivate
virtualenvwrapper.user_scripts creating /home/haotianfei/.virtualenvs/d2be/bin/preactivate
virtualenvwrapper.user_scripts creating /home/haotianfei/.virtualenvs/d2be/bin/postactivate
virtualenvwrapper.user_scripts creating /home/haotianfei/.virtualenvs/d2be/bin/get_env_details

显示当前已经创建的虚拟环境

1
2
3
4
(d2be) haotianfei@tianfei-opensuse:~ > lsvirtualenv
d2be
====
d2b3

切换虚拟环境

1
(d2be) haotianfei@tianfei-opensuse:~ > workon d2be

退出

1
(d2b3) haotianfei@tianfei-opensuse:~> deactivate

删除

1
2
haotianfei@tianfei-opensuse:~> rmvirtualenv d2b3
Removing d2b3...

django 2 by example环境

发表于 2019-01-10 | 更新于: 2019-11-08   |   更新于 2019-11-08 | 分类于 django 2 by example

使用虚拟环境:

1
haotianfei@tianfei-opensuse:~/pyproject> sudo pip3 install virtualenv

指定python版本为3.6

1
2
3
4
5
6
7
8
9
10
11
12
13
14
15
16
17
18
19
20
21
22
23
24
25
26
haotianfei@tianfei-opensuse:~/pyproject> virtualenv --python=python3.6 django2byExample
Running virtualenv with interpreter /usr/bin/python3.6
Using base prefix '/usr'
New python executable in /home/haotianfei/pyproject/django2byExample/bin/python3.6
Also creating executable in /home/haotianfei/pyproject/django2byExample/bin/python
Installing setuptools, pip, wheel...
done.
haotianfei@tianfei-opensuse:~/pyproject/django2byExample/bin> source ~/pyproject/django2byExample/bin/activate
(django2byExample) haotianfei@tianfei-opensuse:~/pyproject/django2byExample/bin>

(django2byExample) haotianfei@tianfei-opensuse:~/pyproject/django2byExample/bin> sudo pip3 install virtualenvwrapper
haotianfei@tianfei-opensuse:~/github/tianfei/talenhao.github.io.hexo> export WORKON_HOME=~/.virtualenvs/
haotianfei@tianfei-opensuse:~/github/tianfei/talenhao.github.io.hexo> export VIRTUALENVWRAPPER_PYTHON=/usr/bin/python3.6
haotianfei@tianfei-opensuse:~/github/tianfei/talenhao.github.io.hexo> virtualenvwrapper.sh
virtualenvwrapper.user_scripts creating /home/haotianfei/.virtualenvs/premkproject
virtualenvwrapper.user_scripts creating /home/haotianfei/.virtualenvs/postmkproject
virtualenvwrapper.user_scripts creating /home/haotianfei/.virtualenvs/initialize
virtualenvwrapper.user_scripts creating /home/haotianfei/.virtualenvs/premkvirtualenv
virtualenvwrapper.user_scripts creating /home/haotianfei/.virtualenvs/postmkvirtualenv
virtualenvwrapper.user_scripts creating /home/haotianfei/.virtualenvs/prermvirtualenv
virtualenvwrapper.user_scripts creating /home/haotianfei/.virtualenvs/postrmvirtualenv
virtualenvwrapper.user_scripts creating /home/haotianfei/.virtualenvs/predeactivate
virtualenvwrapper.user_scripts creating /home/haotianfei/.virtualenvs/postdeactivate
virtualenvwrapper.user_scripts creating /home/haotianfei/.virtualenvs/preactivate
virtualenvwrapper.user_scripts creating /home/haotianfei/.virtualenvs/postactivate
virtualenvwrapper.user_scripts creating /home/haotianfei/.virtualenvs/get_env_details

或使用virtualenvwrapper

1
2
3
4
5
6
7
8
9
10
11
12
haotianfei@tianfei-opensuse:~> mkvirtualenv django2byExample
Using base prefix '/usr'
New python executable in /home/haotianfei/.virtualenvs/django2byExample/bin/python3
Also creating executable in /home/haotianfei/.virtualenvs/django2byExample/bin/python
Installing setuptools, pip, wheel...
done.
virtualenvwrapper.user_scripts creating /home/haotianfei/.virtualenvs/django2byExample/bin/predeactivate
virtualenvwrapper.user_scripts creating /home/haotianfei/.virtualenvs/django2byExample/bin/postdeactivate
virtualenvwrapper.user_scripts creating /home/haotianfei/.virtualenvs/django2byExample/bin/preactivate
virtualenvwrapper.user_scripts creating /home/haotianfei/.virtualenvs/django2byExample/bin/postactivate
virtualenvwrapper.user_scripts creating /home/haotianfei/.virtualenvs/django2byExample/bin/get_env_details
(django2byExample) haotianfei@tianfei-opensuse:~> workon django2byExample

安装django

1
2
3
4
5
6
7
8
9
10
(django2byExample) haotianfei@tianfei-opensuse:~> pip install django==2.0.5
(django2byExample) haotianfei@tianfei-opensuse:~> lssitepackages
django easy_install.py pip-18.1.dist-info __pycache__ pytz-2018.9.dist-info setuptools-40.6.3.dist-info wheel-0.32.3.dist-info
Django-2.0.5.dist-info pip pkg_resources pytz setuptools wheel
(django2byExample) haotianfei@tianfei-opensuse:~> python
Python 3.6.5 (default, Mar 31 2018, 19:45:04) [GCC] on linux
Type "help", "copyright", "credits" or "license" for more information.
>>> import django
>>> django.__version__
'2.0.5'

chapter1 Go简介 翻译实践

发表于 2019-01-08 | 更新于: 2019-11-08   |   更新于 2019-11-08 | 分类于 go in action

1 Go简介

计算机一直在演进,但编程语言却原地踏步.手机处理器已经比我们最初的电脑核心数还要多,高性能服务器已经有64,128个甚至更多的核心,但我们还在使用基于单个核心的编程技术.
编程的艺术也已经进化.许多程序已经不再是单一开发者:它们被分布在不同时区与不同时间的团队编写.大型项目被分成小块分配给程序员,然后以软件库或包的形式递送回组成完整的应用.
今天的程序员与计算越来越相信开源软件的力量.Go是一种轻松共享代码程序语言.Go工具集使得使用其它人的打包更轻松,也更容易共享自己的包.
在这一章你会看到Go与其它编程语言的不同.Go重新思考了传统的面向对象的开发,并提供了一个有效的代码重用思想.Go使得有效的利用现存服务器的所有核心更容易,在大型项目中的不利因素一去不复返.

1.1 使用Go解决当今编程挑战

Go团队长期致力于解决面向软件开发的问题.开发者经常为项目的快速开发与性能之间做痛苦的语言选择.C和C++运行快速,但例如ruby和python经常可以快速开发.Go架起了两者的桥梁,并为快速开发提供了高性能特性.
作为一门编程语言,Go被定义为不限定它包含的,也包括它不包含的.Go提供了简明的语法及少量的关键字易于记忆.Go提供了超快的编译器,以至于你会感觉不到它运行过.作为GO开发者,明显花费更少的时间等待项目创建.由于GO内置并行特性,软件不需要被调度使用资源而强制使用特殊的进程库.GO使用简单有效的类系统封装面向对象开发,你可以专注于代码重用.GO提供了GC垃圾回收,不需要关注内存管理.

1.1.1 敏捷开发

使用C或C++编译大型应用通常花费大量的时间.
GO通过使用智能编译器与简便的信赖解决算法提供快速轻量的编译.当你创建一个GO程序,编译器只需要查看直接包含的库,而不是像jave,c,c++一样追踪全部包所包含的所有库的依赖.所以许多GO应用秒内编译.全部的GO资源树在当今的硬件条件下20秒内编译.
使用动态语言编写应用使得产品快速开发因为它们在写代码与执行之间没有中间步骤.交换的代价是动态语言不能提供type安全,但静态语言可以.运行同时需要全面的测试套件去调用发现不正确的type bugs.
想像一下使用动态语言如javascript编写大型应用,通过一个函数等待接收一个ID字段.这个字段是一个整数,字符串还是UUID?只能通过查看源代码找出来.你可以尝试执行这个函数传入一个数字,字符串然后查看将会发生什么.在GO中,你不需要花费时间惊异,因为编译器会为你捕捉不同.

1.1.2 并行

作为程序员的一件困难的事是编写高效地利用硬件上运行的可用资源的应用.现在计算机会有多个核心,但多数程序语言没有高效的工具轻松调度那些附加的资源.它们通常需要大量的线程同步代码,容易带来错误.
GO的concurryency是它强大的特性之一.goroutines类型线程,但使用非常少的内存,只需要非常少的代码实现.Channels可以与内部go例行程序同步发送typed信息.这简化了一个程序模型,你可以在goroutines之间发送数据,而不是让goroutines序使用相同的数据.
下面来详细查看这些特性.

1.1.2.1 goroutines


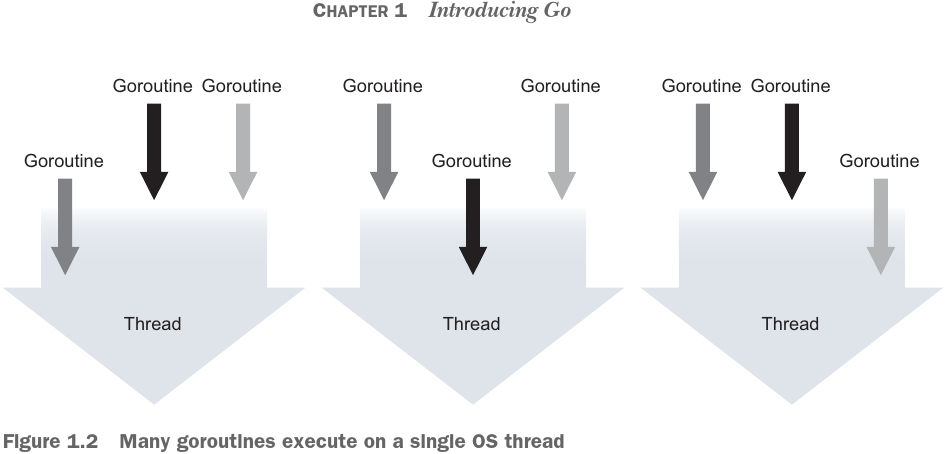
goroutines是与其它goroutines并行运行的功能,是程序的接入口.类似在其它编程语言中使用的线程,但go语言中一个线程上运行多个goroutines.举例说明,如果你想写一个web服务程序同时处理不同的web请求,在C或java中你必须写大量的额外代码处理线程.但在GO内置goroutines使用net/http库处理并行.每个请求自动绑定并只在自己的goroutine中运行.goroutines相比threads只需更少内存,go runtime会自动调度goroutines的执行,配置分配给一些的逻辑处理器.每个逻辑处理器绑定到单个OS thread.如此使得你的应用显著的减少开发工作量更有效率.
如果你想并行的执行一些代码以便抽出时间完成其它事情,对此goroutine是完美的.
如上所述,goruotines的开销很小,所以成千上万的大量运行是常见的.

1.1.2.2 Channels


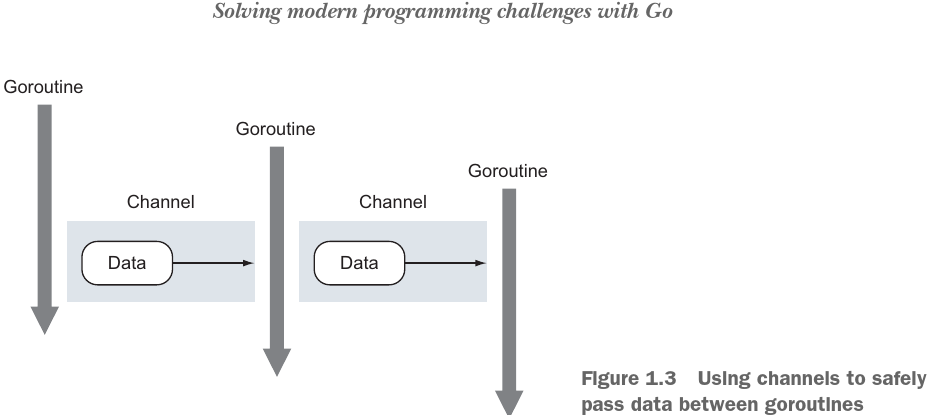
Channels是一种在goroutines之间安全的数据通信的数据构造.channels可以帮助减少编程语言共享内存访问中的常规错误.
并行最大的挑战是确保数据不会被并行运行的程序,线程或goroutines非预期的修改.当多个线程在没有锁或同步机制的状态下修改相同的数据,悲剧总是发生.在其它编程语言中,当你拥有全局变量和共享内存,你需要使用复杂的锁练习避免对同一变量的非同步修改.
Channels的解决方法是提供了一个pattern确保并行修改数据安全.Channels强制pattern同一时间只能有一个goroutine修改数据.想像一下应用有许多不同的进程需要顺序地调用或修改数据.使用goruntines和channels,你可以安全的建模.
如上图,有3个goroutines,2个channels.goroutine 1 通过channel one发送数据到已经等待中的goroutines 2.两个goroutines的数据交换是同步的,一旦传送发生,两个goroutines都会知道交换地址.当goroutine 2 使用这些数据处理完它的任务,它会发送这些数据到已经等待中的goroutine3.交换同样是同步的,双方都可以保证交换成功.这种安全的交换数据方式不需要其它的锁或同步架构.
重要的一点,channels不提供数据访问保护.如果多份数据通过channel交换,每个goroutine只能修改自己那份保证了数据安全.如果数据指向变动,每个goroutine要读写数据的话仍然需要同步.

1.1.3 GO的类型系统

Go提供了一个灵活的无层次的类型系统,它可以最小重构开销重用代码.它仍然面向对象开发,但没有传统的困扰.如果你曾经在java或C++程序中花费大量时间规划抽象类和接口,你会意识到GO简单类型系统的优点.GO composition使开发者重用功能只要简单的封闭类型.其它编程语言使用composition会深感疲惫于继承,非常复杂及难用.go的类型由小型类组成,区别于传统的基于继承的模式.
另外,GO有一个独特的接口实现,允许你建模行为,而不是建模类型.你不需要宣告你的行为接口,编译器的工作会确定类型值是否满足你正使用的接口.GO的基本库的接口通常非常小,只提供了少量的功能.在实践中这将花费一些时间适应,特别是你一直使用面向对象的语言,如java.

类型相当简单


Go拥有内置类如int和string,同时还有用户定义类型.一个典型的用户自定类是存储数据的类字段.如果你了解C的数据结构,GO的用户定义类看起来熟悉,操作也相似.但类需要宣告方法操作那些数据.崦不是创建一长串的继承结构-客户端扩展-用户扩展-实体.GO开发者创建小型类,客户与管理员,然后嵌入一个更大一点类.

小行为接口模型

接口表达了类行为.如果一个类值实现在接口,意味着这个类值拥有了一系列的行为.你不需要宣告你实现了一个接口,只要编写这个实现.在其它编程语言中称为鸭子类型–如果它叫起来像鸭子,它就可以是个鸭子.GO是这种说法的很好实现.在GO中,如果你的类实现一个接口方法,一个类值会被存储在接口上.不需要特别的声明.
在严格的面向对象语言如JAVA,接口总是被围绕.你总是需要在写代码前思考一个大型的继承链.

1
2
3
4
interface User {
public void login();
public void logout();
}

用java实现这个接口需要完整满足所有许诺的类,明确的宣告实现的接口.并为对比,GO接口类描述只需要一个操作.
举例说明,GO使用中一个最通用的接口io.Reader.这个接口提供一个简单的方法宣告类可被其它标准库理解的方式读取数据.

1
2
3
type Reader interface {
Read(p []byte) (n int, err error)
}

写一个类实现io.Reader接口,只需要实现一个read方法,接收一个byte数据片,返回一个整数或错误.
这与其它面向对象的编程语言使用的接口系统有着根本的区别.GO接口更小更直接.在实践中,这对重用代码与组合大有好处.你可以实现一个io.Reader在近乎任何有数据可用的类上,然后发送到任何知道如何从io.Reader读取的go函数.
GO中所有的网络库都使用io.Reader接口构建,因为它允许不同的网络操作需求与应用程序分离.使得接口有趣,优雅,灵活.同一个io.Reader能够对文件,缓存,套接字及其它数据源简单的操作.使用单一接口允许操作数据高效地,不分数据源.

1.1.4 内存管理

不当的内存管理会使用应用崩溃和内存泄漏.GO拥有一个现代垃圾回收机制.在其它系统语言中,如C,C++,你需要使用前分配一片内存,使用完后释放它.如果正确的执行失败,程序会崩溃或内存泄漏.一片内存不再需要时总是很难追踪.线程或重并行架构使得难上加难.如果你脑中有垃圾回收的想法去写代码,GO的垃圾回收只增加了一点的程序执行时间消耗,但显著减少了开发工作量.go去掉了编程的单调,把bean留给了会计师.

1.2 你好,GO

1
2
3
4
5
package main
import "fmt"
func main(){
fmt.Println("Hello Tianfei!)
}

yum列出指定源的包含的所有包

发表于 2018-12-23 | 更新于: 2019-11-08   |   更新于 2019-11-08

列出指定源所包含的所有包列表

1
2
3
4
5
6
7
8
9
10
11
12
13
14
15
[root@tianfeicentos ~]# yum repository-packages kubernetes list
Loaded plugins: fastestmirror
Loading mirror speeds from cached hostfile
* base: mirrors.cn99.com
* epel: ftp.cuhk.edu.hk
* extras: mirrors.163.com
* updates: mirrors.163.com
Installed Packages
kubectl.x86_64 1.13.1-0 @kubernetes
kubelet.x86_64 1.13.1-0 @kubernetes
kubernetes-cni.x86_64 0.6.0-0 @kubernetes
Available Packages
cri-tools.x86_64 1.12.0-0 kubernetes
kubeadm.x86_64 1.13.1-0 kubernetes
rkt.x86_64 1.27.0-1 kubernetes

pts,tty的区别

发表于 2018-12-19 | 更新于: 2019-11-08   |   更新于 2019-11-08 | 分类于 Redhat
1
2
A tty is a regular terminal device (the console on your server, for example).
A pts is a psuedo terminal slave (an xterm or an ssh connection).

转自:”https://unix.stackexchange.com/questions/21280/difference-between-pts-and-tty"

FreeRADIUS Beginner's Guide

发表于 2018-12-14 | 更新于: 2019-11-08   |   更新于 2019-11-08

4. Authentication

认证过程:

  • data link layer -> success -> network layer

认证协议:

  • userpassword:
    • PAP
      • (password Authentication protocal)密码认证协议(p2p)
      • client -> (密码明文) -> NAS -> (加密密码) -> RADIUS SERVER
    • CHAP
      • (challenge-handshake authentication protocal)询问交互认证协议
      • NAS -> 重复发送随机间隔的 challenge -> user -> hash identifiter & 明文密码 -> NAS -> 加密密码 -> radius server
    • MS-CHAP
      • 微软chap协议,增强了功能,如用户修改密码,错误消息等.
      • chapv1 & chapv2
      • user -> 包含微软特殊字段NT-Response + 加密密码 -> NAS
      • EAP协议使用MS-CHAP
1
2
3
4
5
6
7
8
9
10
11
12
13
14
15
16
17
18
19
20
21
22
23
24
25
[root@localhost raddb]# vi /etc/raddb/users
添加以下2行
"tianfei" Cleartext-Password := "passgo"
Reply-Message = "Hello, %{User-Name}"

[root@localhost raddb]# radtest tianfei passgo 127.0.0.1 100 testing123
Sent Access-Request Id 170 from 0.0.0.0:44098 to 127.0.0.1:1812 length 77
User-Name = "tianfei"
User-Password = "passgo"
NAS-IP-Address = 127.0.0.1
NAS-Port = 100
Message-Authenticator = 0x00
Cleartext-Password = "passgo"
Received Access-Reject Id 170 from 127.0.0.1:1812 to 0.0.0.0:0 length 20
(0) -: Expected Access-Accept got Access-Reject
[root@localhost raddb]# radtest tianfei passgo 127.0.0.1 100 testing123
Sent Access-Request Id 155 from 0.0.0.0:44387 to 127.0.0.1:1812 length 77
User-Name = "tianfei"
User-Password = "passgo"
NAS-IP-Address = 127.0.0.1
NAS-Port = 100
Message-Authenticator = 0x00
Cleartext-Password = "passgo"
Received Access-Accept Id 155 from 127.0.0.1:1812 to 0.0.0.0:0 length 36
Reply-Message = "Hello, tianfei"

服务器日志输出

1
2
3
4
5
6
7
8
9
10
11
12
13
14
15
16
17
18
19
20
21
22
23
24
25
26
27
28
29
30
31
32
33
34
35
36
37
38
39
40
41
42
43
44
45
46
47
48
49
50
51
52
53
54
55
56
57
58
59
60
61
62
63
64
65
66
67
68
69
70
71
72
73
74
Ready to process requests

(0) Received Access-Request Id 155 from 127.0.0.1:44387 to 127.0.0.1:1812 length 77
(0) User-Name = "tianfei"
(0) User-Password = "passgo"
(0) NAS-IP-Address = 127.0.0.1
(0) NAS-Port = 100
(0) Message-Authenticator = 0x5328ee7e1eaa61d3555baa241acb7582
(0) # Executing section authorize from file /etc/raddb/sites-enabled/default
(0) authorize {
(0) policy filter_username {
(0) if (&User-Name) {
(0) if (&User-Name) -> TRUE
(0) if (&User-Name) {
(0) if (&User-Name =~ / /) {
(0) if (&User-Name =~ / /) -> FALSE
(0) if (&User-Name =~ /@[^@]*@/ ) {
(0) if (&User-Name =~ /@[^@]*@/ ) -> FALSE
(0) if (&User-Name =~ /\.\./ ) {
(0) if (&User-Name =~ /\.\./ ) -> FALSE
(0) if ((&User-Name =~ /@/) && (&User-Name !~ /@(.+)\.(.+)$/)) {
(0) if ((&User-Name =~ /@/) && (&User-Name !~ /@(.+)\.(.+)$/)) -> FALSE
(0) if (&User-Name =~ /\.$/) {
(0) if (&User-Name =~ /\.$/) -> FALSE
(0) if (&User-Name =~ /@\./) {
(0) if (&User-Name =~ /@\./) -> FALSE
(0) } # if (&User-Name) = notfound
(0) } # policy filter_username = notfound
(0) [preprocess] = ok
(0) [chap] = noop
(0) [mschap] = noop
(0) [digest] = noop
(0) suffix: Checking for suffix after "@"
(0) suffix: No '@' in User-Name = "tianfei", looking up realm NULL
(0) suffix: No such realm "NULL"
(0) [suffix] = noop
(0) eap: No EAP-Message, not doing EAP
(0) [eap] = noop
(0) files: users: Matched entry tianfei at line 1
(0) files: EXPAND Hello, %{User-Name}
(0) files: --> Hello, tianfei
(0) [files] = ok
(0) [expiration] = noop
(0) [logintime] = noop
(0) [pap] = updated
(0) } # authorize = updated
(0) Found Auth-Type = PAP
(0) # Executing group from file /etc/raddb/sites-enabled/default
(0) Auth-Type PAP {
(0) pap: Login attempt with password
(0) pap: Comparing with "known good" Cleartext-Password
(0) pap: User authenticated successfully
(0) [pap] = ok
(0) } # Auth-Type PAP = ok
(0) # Executing section post-auth from file /etc/raddb/sites-enabled/default
(0) post-auth {
(0) update {
(0) No attributes updated
(0) } # update = noop
(0) [exec] = noop
(0) policy remove_reply_message_if_eap {
(0) if (&reply:EAP-Message && &reply:Reply-Message) {
(0) if (&reply:EAP-Message && &reply:Reply-Message) -> FALSE
(0) else {
(0) [noop] = noop
(0) } # else = noop
(0) } # policy remove_reply_message_if_eap = noop
(0) } # post-auth = noop
(0) Sent Access-Accept Id 155 from 127.0.0.1:1812 to 127.0.0.1:44387 length 0
(0) Reply-Message = "Hello, tianfei"
(0) Finished request
Waking up in 4.9 seconds.
(0) Cleaning up request packet ID 155 with timestamp +6
Ready to process requests
1…678…10

天飞

95 日志
41 分类
79 标签
RSS
GitHub E-Mail
Links
  • 天飞的博客
© 2017 — 2020 天飞
由 Hexo 强力驱动
|
主题 — NexT.Gemini v5.1.4
本站访客数 人次 本站总访问量 次