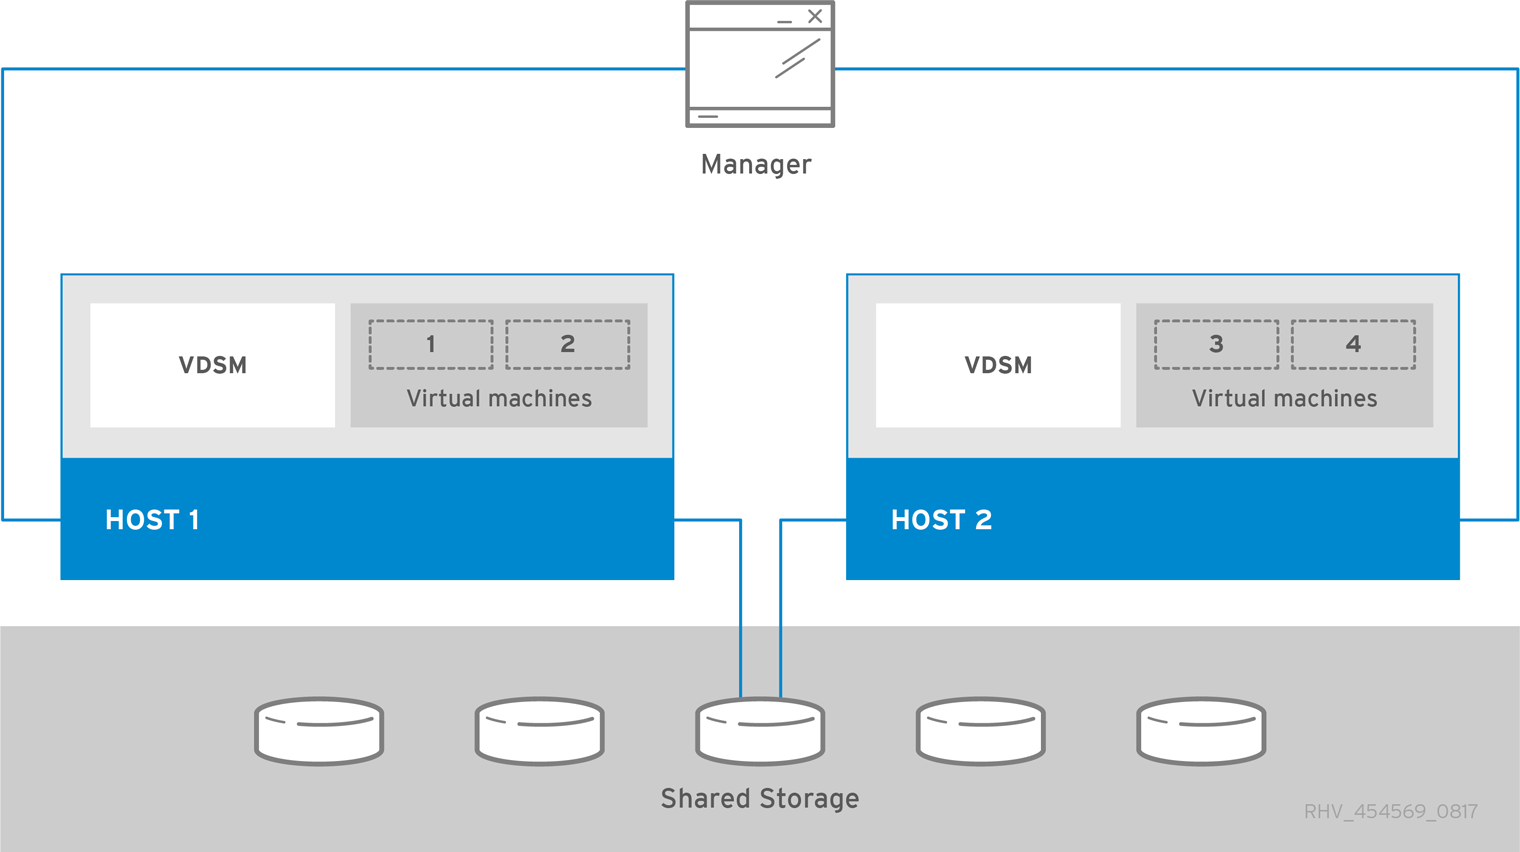
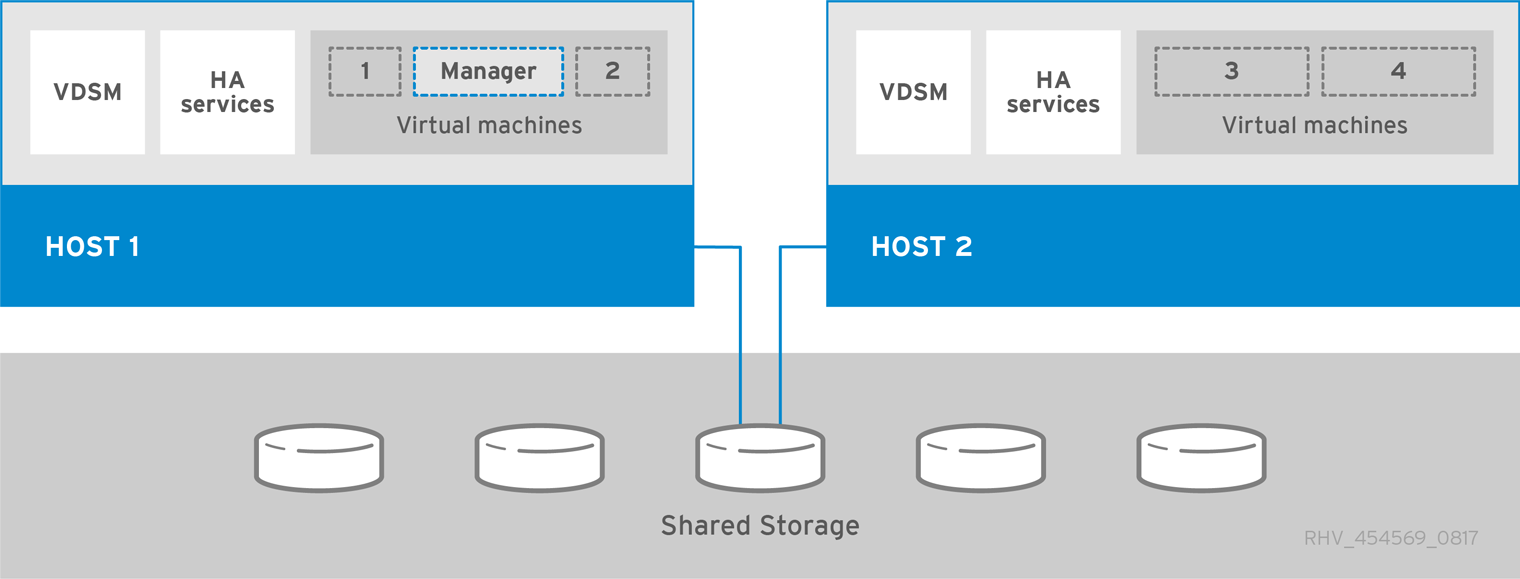
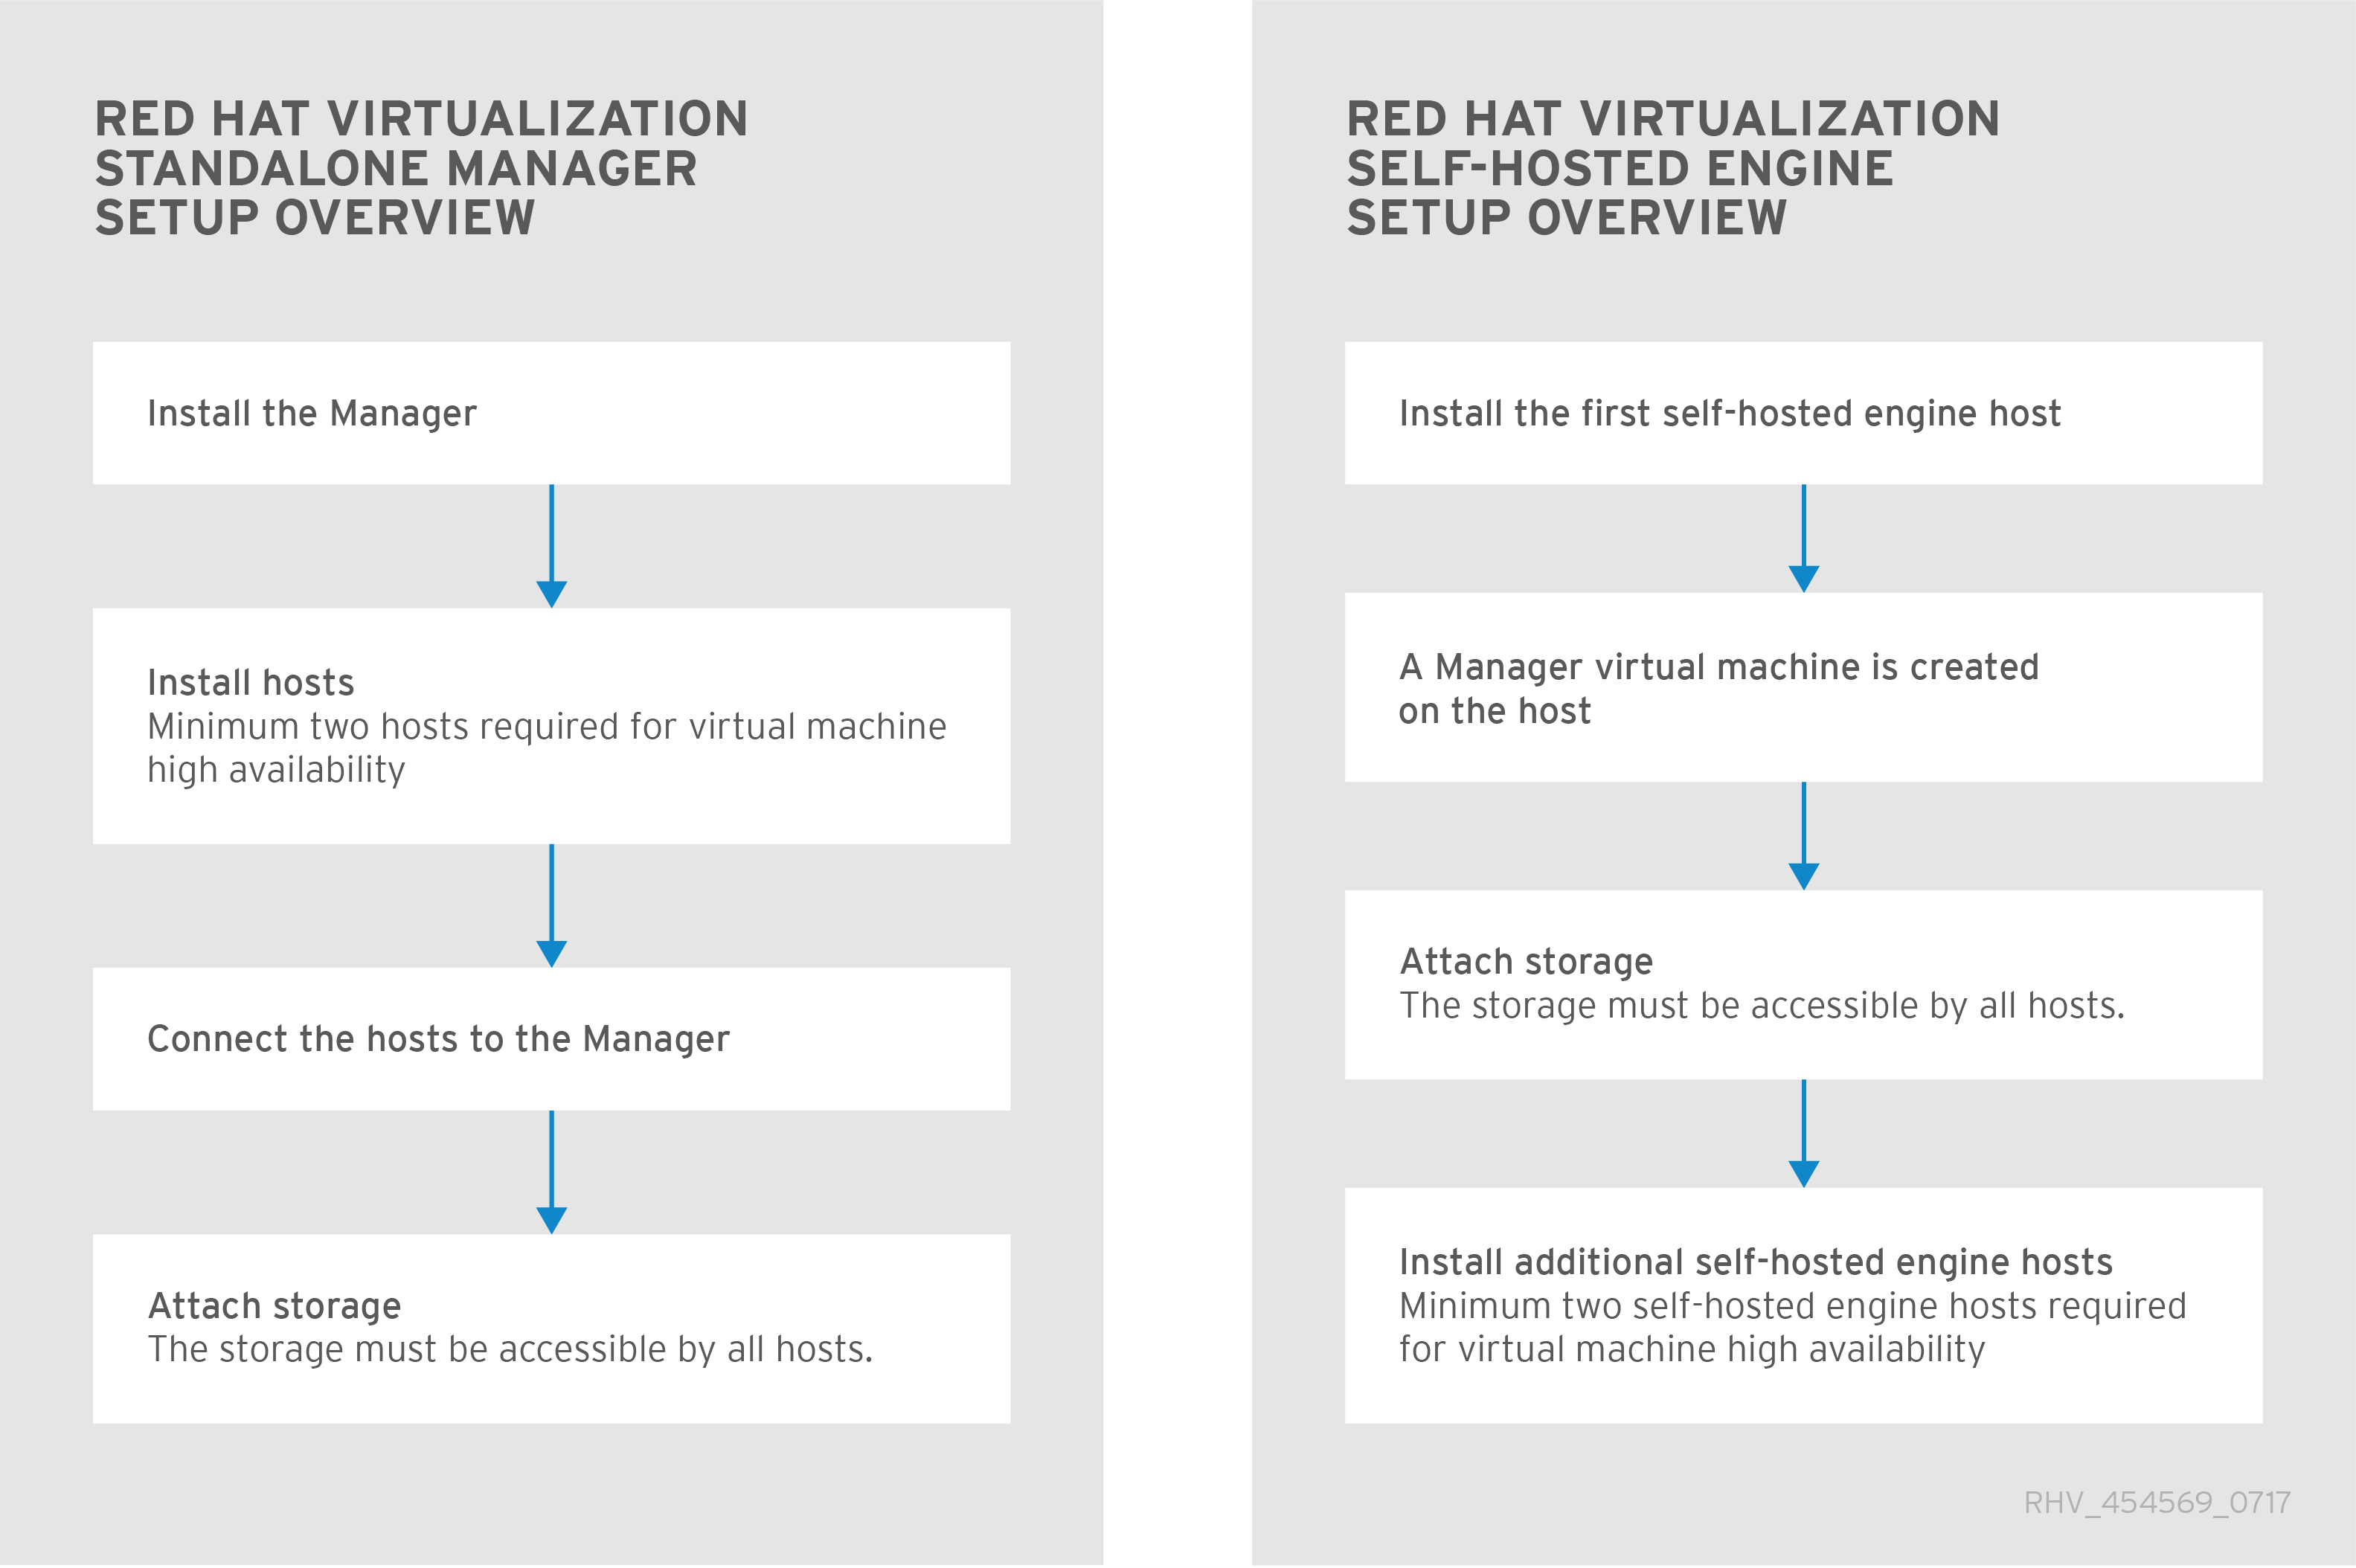
天飞 学习笔记


  • 首页

  • 关于

  • 标签

  • 分类

  • 归档

  • 公益404

  • 搜索

ovirt 运维管理

发表于 2018-12-14 | 更新于: 2019-11-08   |   更新于 2019-11-08 | 分类于 Ovirt

用户管理

internal域用户管理

设置及重置用户密码

  • –password-valid-to选项必须指定密码无期时间,否则过期时间设置为当前时间,时间格式为 yyyy-MM-dd HH:mm:ssX
  • 默认密码长度不小于6位
  • 用户之前3次使用的密码不能再次设置
1
2
3
4
5
[root@ovirt-engine ~]# /usr/bin/ovirt-aaa-jdbc-tool user password-reset vmuser --password-valid-to="2019-01-01 12:00:00+0800"
Password:
Reenter password:
updating user vmuser...
user updated successfully

ovirt 技术参考

发表于 2018-12-12 | 更新于: 2019-11-08   |   更新于 2019-11-08 | 分类于 Ovirt

chapter1.技术架构说明

1.1 Virtualization Manager(Engine)

集中化的虚拟环境管理平台
技术架构

1.2 Hosts

Host_Architecture

  • KVM(kernel-based virtual machine)
    • 使用 Intel VT or AMD-V hardware extensions的全虚拟化内核模块
    • kvm运行在kernel space
  • QEMU()
    • 全平台模拟器
    • QEMU运行在user space
  • VDSM(Host Agent)
    • 初始化虚拟环境
    • host间通信
    • 监控主机资源(CPU,MEM,NET)
    • 虚拟机创建,统计,日志收集
    • 接收来自ovirt engine的指令,监听端口:54321
  • VDSM-REG
    • 负责向engine注册host
    • 提供自身信息及host信息
  • libvirt
    • 管理虚拟机
    • engine(start,stop,reboot指令) -> vdsm -> libvirt
  • SPM(storage pool manager)
    • 辅助维护存储metadata
    • 创建,删除,维护虚拟磁盘,创建映像,模板.
    • 数据中心的所有主机都必需能够访问存储,任何主机都有可能被指定为SPM,但一个数据中心只有一个SPM
    • SPM host不可达时,engine重新指定spm
  • Guest Operating System
    • 虚拟机操作系统不受ovirt环境影响及修改
    • Guest Agent安装在Guest OS上可以更高效率的运行.

1.3 ovirt支撑组件

  • Red Hat JBoss Enterprise Application Platform
    • java程序服务器
  • 报表及历史数据
    • 数据仓库收集监控数据(host,vms,storage)
    • 两个PG数据库
      • engine
      • ovirt_engine_history
        • ovirt-engine-dwhd 历史收集服务
  • 访问目录服务
    • 内部账号: admin
    • Active Directory
    • Identity Management (IdM)
    • OpenLDAP
    • Red Hat Directory Server 9

1.4 存储

逻辑存储池(域)

存储域是共享资源,数据中心的所有主机都必需能够访问存储

  • data(必备惟一,不能夸数据中心)
    • vdisk image
    • snapshots
    • templates
  • export(可选)
    • 主要用来在不同data center之间迁移数据,同一时间只能附在一个data center
  • ISO(可选)
    • ISO域存储操作系统ISO文件,可以在多个data center之间共享,可附加多个data center.

1.5 网络

网络架构不仅连接网络,还可以分隔网络.

网络基础要实现硬件与ovirt逻辑组件之间的连接
Network_Architecture.png

Networking Infrastructure Layer

  • host NIC 连接物理网络
  • VNIC 使用基于 NIC 连接 vms
  • bonds 多个NIC为1个接口
  • bridge 在网络中进行包转发与包交换,是虚拟网络的基础

Logical Networks

  • 隔离网络流量
    • 虚拟机网络
      • bridge转发交换,需要host上创建bridge虚拟设备
    • 非虚拟机网络
      • 直接作用于NIC,不在host上创建bridge
    • 可选的网络
    • 必选的网络
  • 迁移网络是单独的,不影响(ovirtmgmt)
  • 逻辑网络在不同的层次有不同的意义
    • Data Center Layer
      • 逻辑网络是在数据中心层定义的.
    • Cluster Layer
      • 逻辑网络应用在集群上.
      • 在默认的情况下,每个集群都会连接到管理网络中
      • “必需的”逻辑网络被添加到集群中时,它需要被添加到集群中的所有主机上
      • “可选的”逻辑网络可以根据需要被添加到所需的主机上。
    • Host Layer
      • 虚拟机逻辑网络 host bridge -> NIC
      • 非虚拟机逻辑网络 -> NIC
      • 管理网络 ovirtmgmt bridge -> NIC
      • 添加到集群中的required逻辑网络必需关联到host上相当的网卡上才能使用.
    • Virtual Machine Layer
      • 同host,VNIC必需关联到逻辑网络才能使用上面的资源.

1.6 数据中心组件

  • 存储

    • 一个数据中心,一个独享data域
    • export在数据中心共享数据,但同时只能附到一个数据中心
    • ISO域是所有数据中心共享的.
  • 网络(创建于data center,应用于cluster)

    • ip address
    • VLAN tags
    • STP
  • 集群

    • host pool
    • 一致的硬件
    • VM在cluster内的host迁移

chapter2.存储

chapter3.网络

3.1 网络架构

  • 基础网络
  • cluster 网络
  • host 网络

    3.2 介绍基础网络

  • 连通vm,host,LAN
    • A Network Interface Controller (NIC)
    • A Bridge
      • 逻辑网络通过bridge实现
      • IP分配在虚拟的bridge接口上,而不是实际的NIC
      • 虚拟机的VNIC可以与bridge的接口地址不同子网;相同子网的话虚拟机可以访问host上的网络资。
    • A Virtual NIC
      • 基于template或snapshot批量创建虚拟机,系统会自动按顺序配置vnic的MAC地址.
  • 增强安全,高可用,性能
    • A Bond (fault tolerance)
      • 多NIC聚合
        • bond mode
          • bridge and bridgeless
            • 1 Mode 1 (active-backup policy)
            • 2 Mode 2 (XOR policy)
            • 3 模式 3(broadcast policy)
            • 4 模式 4(IEEE 802.3ad policy)
          • bridgeless
            • 0 Mode 0 (round-robin policy)
            • 5 模式 5(adaptive transmit load balancing policy)
            • 6 模式 6(adaptive load balancing policy)
    • A Virtual LAN (VLAN)(数字)
      • 作用在packets上
      • 在switch层隔离网络流量

        3.3 网络标签

  • 标签支持大小写字母、下划线和分号,没有长度限制
  • 简化逻辑网络管理
    • 网络标签与主机关联
      • 自动将逻辑网络关联到具有相同标签的hosts硬件网卡上
      • 自动装hosts NIC关联到具有相同标签的逻辑网络
      • 移除或修改标签会作相应的关联删除或修改
    • 网络标签与集群关联
      • 自动将逻辑网络关联到具有相同标签的cluster中的hosts硬件网卡上
      • 删除cluster中网络标签,自动从cluster中hosts硬件网卡上删除逻辑网络
    • 网络标签和有用户角色的逻辑网络
      • 当一个有网络标识的逻辑网络被设为“显示网络”或“迁移网络”时,它会在主机物理网络接口中被配置为通过 DHCP 获得一个 IP 地址。
      • 当为一个角色网络(如“一个迁移网络”或“一个显示网络”)设置网络标签时,会在所有主机上产生大量部署这个网络的操作。这些大量的网络添加操作是通过使用 DHCP 实现的,而不是通过输入静态地址实现的。这是因为,和 DHCP 相比,输入大量静态地址不具有“可扩展性”.

3.5 集群网络

  • 集群内的hosts访问相同的存储域,逻辑网络
  • VM逻辑网络必须在所有hosts上配置
  • 其它逻辑网络只需在需要的hosts上配置

3.6 逻辑网络

  • 只能在主机处于维护模式时才可以部署逻辑网络
  • 逻辑网络的类型包括:
    • (vm)用来处理虚拟机网络流量的逻辑网络
      • 在host创建相应的bridge, 并添加绑定的物理网卡
      • VM网卡到bridge中,bridge中的网卡可互相通信
      • 为虚拟机逻辑网络所创建的网桥设备需要和主机上的一个网络接口相关联。如果和网桥相关联的主机网络接口已经被其它网络所使用,则新加入的网络接口将同样可以共享那些已经连接到主机网络接口中的网络。当虚拟机被创建并被添加到一个特定的逻辑网中时,它们的虚拟网卡会被添加到那个逻辑网所在的网桥中。这样,虚拟机就可以和连接到相同网桥中的其它设备进行网络交流。
    • (other)不处理虚拟机网络流量的逻辑网络,
      • 直接作用在host物理网卡上
    • (optional)可选的逻辑网络,
    • (required)必需的逻辑网络
  • 定义在数据中心,作用在主机

3.7 必需的网络,可选的网络,虚拟机网络

  • 必需的网络在所有hosts上配置,host的必需网络不可用时会迁移所有虚拟机到其它host
  • 非必需网络不可用不会迁移虚拟机
  • 虚拟机网络(VM network)是那些只处理虚拟机网络流量的逻辑网络

3.8 端口镜像

端口镜像(port mirroring)会把指定逻辑网络和主机上的第 3 层网络流量复制到一个虚拟机的虚拟网络接口上。这样,通过这个虚拟机就可以进行网络纠错、网络优化、网络入侵检测以及对在同一个主机和逻辑网络中运行的虚拟机进行监控。

3.9 主机网络配置

主机上包括的常见网络配置类型:

  • 网桥和网卡配置。
  • 网桥、VLAN(虚拟局域网)和网卡配置。
  • 网桥、网络绑定和 VLAN 配置。
  • 多网桥、多 VLAN 和网卡配置。

chapter4.电源管理

chapter5.负载均衡,调度,迁移

chapter6.活动目录服务

chapter7.模板与池

chapter8.Virtual Machine快照

chapter9.硬件设备与驱动

ovirt 规划与需求

发表于 2018-12-11 | 更新于: 2019-11-08   |   更新于 2019-11-08 | 分类于 Ovirt

使用哪种架构Architecture

1.虚拟化架构

  • standalone管理端部署
    1. 管理端部署在一台物理机上(也可部署在特殊的虚拟机)
    2. 管理机实现高可用要使用第三方实现
      standalone管理端部署
  • Self-Hosted Engine部署
    1. 管理端使用cokpit部署或cli的方式部署在虚拟机中
    2. 不需要扩展HA,实现自管理虚拟机engine高可用
      Self-hosted

2.需求

2.1.Manager需求

硬件需求

资源|最小|推荐
cpu|2|多核
memory|4G|16G
Disk|25G|50G
net interface|1Gbps|1Gbps

浏览器需求

  • 推荐firefox,linux系统全功能支持
  • IE,windows部分功能受限

客户端需求

类型|客户端
VM remote console|virt-viewer|SPICE protocol|QXL graphical driver
vnc|vnc viewer

操作系统需求

RHEL 7或CENTOS 7或ovirt官方node

2.2.hosts需求

类型|特性
CPU|Intel® 64 or AMD64 CPU extensions,AMD-V™ or Intel VT®,No eXecute flag (NX)
memory|2G-2T
disk|Minimum Total - 45 GB
net interface|1Gbps*n
vGPU|GPU

1
2
3
4
5
6
7
8
9
10
11
12
13
14
15
16
17
18
19
20
21
支持的CPU类型
AMD
Opteron G1 (deprecated)
Opteron G2 (deprecated)
Opteron G3 (deprecated)
Opteron G4
Opteron G5

Intel
Conroe (deprecated)
Penryn (deprecated)
Nehalem
Westmere
Sandybridge
Haswell
Haswell-noTSX
Broadwell
Broadwell-noTSX
Skylake (client)
Skylake (server)
IBM POWER8

使用以下命令检测

1
# grep -E 'svm|vmx' /proc/cpuinfo | grep nx

2.3. 网络需求

DNS系统

DNS系统要在ovirt环境外独立安装,保障可用,否则对系统影响很大

逻辑网络

  • 逻辑网络可以使用物理设备网卡或虚拟设备bond网卡
  • Bonding可以提升性能或可靠性,bond默认是4,Bonding modes 1, 2, 3, and 4 support both virtual machine and non-virtual machine network types. Modes 0, 5, and 6 only support non-virtual machine networks.
  • 一块网卡可以承载多个逻辑网络,可以使用VLAN tag隔离网络流量,这需要交换机支持.
  • 逻辑网络附加到HOST的数量受网卡数量及VLAN最大数量4096的限制
  • 单次操作可以附加到一台主机的网络最大50个.
  • 集群的网络数量受限主机,因为都是使用相同的网络.
  • 数据中心的网络数量受限于集群数量及每个集群的网络数量
  • 修改ovirtmgmt网络要非常小心,不当的操作有可能使用整个系统停止.

活动目录服务

不要使用外部用户作为ovirt环境的管理用户.

  • internal
    • 默认创建admin用户初始化管理及排错.
    • ovirt-aaa-jdbc-tool创建新的内部用户
  • openldap
  • active directory
  • Identity Management (IdM - based on IPA)
  • Red Hat Directory Server 9 (RHDS 9 - based on 389DS)
  • IBM Security (Tivoli) Directory Server

Firewall

engine-setup自动配置防火墙
iptables装被覆盖,Firewalld不影响已经存在的规则

存储需求

  • Ovirt目前支持最大400台hosts规模
  • 至少一个data存储域,推荐创建ISO域
  • 存储域可以是块设备(只支持egacy (512b block) ),或文件系统
  • 支持NFS,iSCSI,Fibre,gluster,POSIX-Compliant FS,Local Storage

基础设施需求

在性能不是瓶颈的情况下,将组件与管理机安装在一起维护比较简单.

standalone部署过程中会提示是否安装在管理机上.

self-hosted engine下需要先进行安装后再部署engine.

  • data warehouse
  • manager database
  • web socket proxy

下面的三个系统只能独立于ovirt环境安装

  • DNS系统
  • storage存储
  • identity Management

3.建议

常规建议

  • 定期备份环境
  • 避免将ovirt环境要信赖的服务部署在自身环境中
  • 查看系统entropy不要小于200,否则有可能造成系统cause
  • 可以使用PXE, Kickstart, Satellite, CloudForms, Ansible或混合使用以上工具自动化安装宿主机和虚拟机,但hosted-engine不支持
    • https://access.redhat.com/documentation/en-us/red_hat_virtualization/4.2/html/planning_and_prerequisites_guide/recommendations
  • 部署NTP服务同步所有服务器及虚拟机时间
    1
    2
    [root@ovirt00 ~]# cat /proc/sys/kernel/random/entropy_avail
    3496

安全建议

  • 不要禁用默认开启的安全特性(HTTPS, SELinux, and the firewall)
  • 创建隔离的admin账号
  • 限制访问主机,特别是root账号
  • 不要创建不信任的用户
  • 除了必须的包不要在系统上安装其它服务

主机建议

  • 相同集群中使用相同规格的host
  • 没有特殊需求不要混合部署RHEL,CENTOS,ovirt官方node系统
  • 部署fencing设备,排除故障机器
  • 交换机高可用

网络建议

  • bonding网卡
  • 使用VLAN
  • 如果可用,提升MTU,例如9000,提高吞吐,降低CPU负载
  • 1G网络用于管理,10G,40G网络用于虚拟机或存储
  • 为存储使用单独的网卡,去掉vm network,VLAN直接使用物理网卡.
  • 如果部署了openstack,可以整合neutron添加Open vSwitch 能力.
配置网络的实施建议
  • 手工配置主机网络然后添加到ovirt环境
    • 推荐使用cockpit配置网络,也可以使用nmtui,nmcli
    • 使用administration portol 删除或添加主机,删除网络
    • 命名规范:
      • VLAN devices: VLAN_NAME_TYPE_RAW_PLUS_VID_NO_PAD
      • VLAN interfaces: physical_device.VLAN_ID (for example, eth0.23, eth1.128, enp3s0.50)
      • Bond interfaces: bondnumber (for example, bond0, bond1)
      • VLANs on bond interfaces: bondnumber.VLAN_ID (for example, bond0.50, bond1.128)
    • 使用bonding
1
2
3
4
5
6
7
8
9
10
11
12
Configure a VLAN on a physical NIC as in the following example (although nmcli is used, you can use any tool):

# nmcli connection add type vlan con-name vlan50 ifname eth0.50 dev eth0 id 50
# nmcli con mod vlan50 +ipv4.dns 8.8.8.8 +ipv4.addresses 123.123.0.1/24 +ivp4.gateway 123.123.0.254

Configure a VLAN on a bond as in the following example (although nmcli is used, you can use any tool):

# nmcli connection add type bond con-name bond0 ifname bond0 bond.options "mode=active-backup,miimon=100" ipv4.method disabled ipv6.method ignore
# nmcli connection add type ethernet con-name eth0 ifname eth0 master bond0 slave-type bond
# nmcli connection add type ethernet con-name eth1 ifname eth1 master bond0 slave-type bond
# nmcli connection add type vlan con-name vlan50 ifname bond0.50 dev bond0 id 50
# nmcli con mod vlan50 +ipv4.dns 8.8.8.8 +ipv4.addresses 123.123.0.1/24 +ivp4.gateway 123.123.0.254
  • 不要禁用firewalld

self-engine建议

  • 为hosted-engine创建单独的data center,有助于安全,备份,性能,可用.
  • 专为hosted-engine创建的engine巻不要用于其它虚拟机
  • 分离management,storage,migration网络
  • 建议每个集群中不超过7个host,带来更好的弹性
  • CPU使用相同的架构
  • 有足够的内存空间启动或迁移engine

ovirt 架构介绍

发表于 2018-12-10 | 更新于: 2019-11-08   |   更新于 2019-11-08 | 分类于 Ovirt

关于Ovirt虚拟化

1.虚拟化架构

  • standalone管理端部署
    1. 管理端部署在物理机上
    2. 管理机实现高可用要使用第三方实现
      standalone管理端部署
  • Self-Hosted Engine部署
    1. 管理端使用cokpit部署或cli的方式部署在虚拟机中
    2. 不需要扩展HA,实现自管理虚拟机engine高可用
      Self-hosted

2.组件及术语

术语|解释
data center|包含所有物理机,虚拟机上的逻辑资源的最高级别容器.包含cluster,vm,storage domain,network等
cluster|物理机hosts的集合池,上面部署VMs,共享相同的网络及存储,虚拟机可以在host之间迁移.
host|部署VM的物理宿主机
self-hosted engine node|self-hosted Engine部署的物理宿主机
storage domain|存储域,逻辑概念,存储虚拟磁盘或iso镜像
virtual machines|运行操作系统的虚拟机.多个虚拟机可以组成pool.
Template|预定义的虚拟机配置.方便快速创建大量相同配置的虚拟机.
vm pool|多个相同标记的虚拟机组成的池.
snapshot|保存虚拟机一个时间点的状态,可以恢复到那个点.
logical networks| 物理网络的逻辑描述,逻辑网络分组不同的manager,hosts,storages,vms流量
events and monitors|事件提醒,方便管理员管理
vdsm|host agent服务,与管理端通信.
storage pool manager(spm)|一个数据中心只有一个spm角色,负责存储metadata维护.
Host Storage Manager(HSM)|Any non-SPM host in the data center that can be used for data operations, such as moving a disk between storage domains. This prevents a bottleneck at the SPM host, which should be used for shorter metadata operations.
Remote viewer|连接虚拟机的可视化接口
High availability|虚拟机中断时使用自动重启,维护2份资源,在失败时直接替换.
HA service|包括ovirt-ha-agent,ovirt-ha-broker,管理hosted-engine vm的高可用.

Ovirt虚拟化组件

1. Virtual manager

  1. web 化的图形管理页面
  2. restful api管理接口

2. hosts

两种类型的机器:

  1. 装有REDHAT 7或CENTOS 7的物理机
  2. ovirt官方提供的基于以上系统精减的node节点

3. storage

至少种类型的基本存储域:

  1. ISO domain

    存储系统安装镜像及驱动等

  • data domain

    存储VM磁盘镜像

  • export domain

    临时迁移数据用的,现在已经被import data domain 代替

4. data warehouse

ovirt_engine_history 历史信息数据库,为报表等服务.

5. network

Ovirt通过逻辑网络切分隔离流量,默认只有一个虚拟网络,可以添加多个分配到不同的网卡及bond不同的网卡提升性能

ovirtmgmt|Management
vmnet|General virtual machine traffic
storagenet|Storage-related traffic (such as NFS or iSCSI)
mvmt|Virtual machine migration traffic
vmdt|Virtual machine display traffic
glusternet|Gluster storage traffic

安装Ovirt

访问Ovirt

  • 支持读写的接口

    • Administration Portal
      • 浏览器图形界面,管理资源环境
    • VM Portal
      • 浏览器图形界面,受限用户管理虚拟机资源
    • Cockpit
      • 主机管理配置
      • self-hosted Engine部署
    • Rest api
      • 任何支持HTTP action的语言,通过API的方式查询或修改虚拟环境
    • Software Development Kit (SDK)
      • Python
      • Java
      • Ruby
    • Ansible
      • 自动化程序
    • Self-Hosted Engine Command Line Utility
      • 执行管理任务
      • 管理虚拟环境
    • VDSM Hooks
      • 由 Administration Portal 触发修改虚拟机
    • Command Line Shell(ovirt-engine-cli)(未来将放弃)
  • 支持只读的接口

    • ovirt_engine_history
    • Libvirt on Hosts
      • virsh -r
  • 不被支持的接口

    • vdsm-client
    • 直接修改(engine)数据库

安装telnet服务

发表于 2018-10-12 | 更新于: 2019-11-08   |   更新于 2019-11-08

#环境

  • os: OpenSUSE Tumbleweed
  • pc: Thinkpad T460s

#描述

远程登陆方式主要有三种:

1 明文文本模式:telnet,rsh等,不安全,现在很少使用,但在一些特殊场所还会有所使用。
2 加密文本模式:ssh
3 图形模式:xdmcp,vnc,rdp等

1.查询系统中是否已经安装了telnet服务

1
[root@ovirt ~]# rpm -qa |grep telnet

2.安装telnet-server服务端及telnet客户端包

1
[root@ovirt ~]# yum install telnet-server talnet

3.telnet服务是由xinetd守护进程维护的,需要启动xinetd服务

1
[root@ovirt ~]# yum install xinetd

4.rhel7版本使用systemd代替init.d维护启动进程,7版本以下使用init.d管理

1
[root@ovirt ~]# systemctl start xinetd

7版本以下修改/etc/xinetd.d/telnet

1
2
3
4
5
6
7
8
9
10
11
12
13
14
[root@hostovirt ~]# vi /etc/xinetd.d/telnet 
# default: on
# description: The telnet server serves telnet sessions; it uses \
# unencrypted username/password pairs for authentication.
service telnet
{
flags = REUSE
socket_type = stream
wait = no
user = root
server = /usr/sbin/in.telnetd
log_on_failure += USERID
disable = no # 这个配置项由yes修改为no
[root@ovirt ~]# service xinetd start

5.启动telnet-server,7版本使用systemd,7版本以下使用init.d启动xinetd后会自动启动telnet

1
[root@ovirt etc]# systemctl start telnet.socket

6.防火墙开放端口

1
2
[root@ovirt etc]# firewall-cmd --zone=public --add-port=23/tcp
success

iptables操作方法:

1
2
3
[root@hostovirt ~]# iptables -I INPUT -p tcp --dport 23 -j ACCEPT
[root@ovirt etc]# firewall-cmd --zone=public --list-ports
23/tcp

7.使用nmap查看端口状态,STATE为open状态

1
2
3
4
5
6
7
8
9
haotianfei@tianfei-opensuse:~> nmap 192.168.56.101 -p 23
Starting Nmap 7.70 ( https://nmap.org ) at 2018-10-11 14:41 CST
Nmap scan report for ovirt.wasu (192.168.56.101)
Host is up (0.00037s latency).

PORT STATE SERVICE
23/tcp filtered telnet

Nmap done: 1 IP address (1 host up) scanned in 0.05 seconds
1
2
3
4
5
6
7
8
9
haotianfei@tianfei-opensuse:~> nmap 192.168.56.101 -p 23
Starting Nmap 7.70 ( https://nmap.org ) at 2018-10-11 14:43 CST
Nmap scan report for ovirt.wasu (192.168.56.101)
Host is up (0.00032s latency).

PORT STATE SERVICE
23/tcp open telnet

Nmap done: 1 IP address (1 host up) scanned in 0.05 seconds

8.出于安全原因,默认telnet终端是不能登陆的,暂时移除/etc/securetty

1
2
3
4
5
6
7
8
9
10
11
12
13
14
15
16
17
18
haotianfei@tianfei-opensuse:~> telnet -l root 192.168.56.101
Trying 192.168.56.101...
Connected to 192.168.56.101.
Escape character is '^]'.
Password:
Login incorrect

ovirt login:
[root@ovirt etc]# mv /etc/securetty{,.bak}
haotianfei@tianfei-opensuse:~> telnet -l root 192.168.56.101 23
Trying 192.168.56.101...
Connected to 192.168.56.101.
Escape character is '^]'.
Password:
Last failed login: Thu Oct 11 02:44:46 EDT 2018 from ::ffff:192.168.56.1 on pts/1
There were 3 failed login attempts since the last successful login.
Last login: Thu Oct 11 02:35:13 from ::ffff:192.168.56.1
[root@ovirt ~]#

Homebrew,MacOS下类yum,zypper,apt的包管理工具

发表于 2018-10-01 | 更新于: 2019-11-08   |   更新于 2019-11-08

环境

  • os: macOS Mojave
  • pc: Apple macbook 13’ pro 2015

描述

Home-brew 是macos下类似rpm系的yum,zypper,dnf等的包管理系统。官方定义为:macOS 缺失的软件包的管理器。

安装

安装方式很简单,直接一条脚本命令完成。其间会自动下载一些所需要的组件。

1
2
3
4
5
6
7
8
9
10
11
12
13
14
15
16
17
18
19
20
21
22
23
24
25
26
27
28
29
30
31
32
33
34
35
36
37
38
39
40
41
42
43
44
45
46
47
48
49
50
51
52
53
54
55
56
57
58
59
60
61
62
63
64
65
66
67
68
69
70
71
72
73
74
75
76
77
78
79
80
81
82
83
84
85
86
87
88
89
90
91
92
93
94
95
96
97
98
99
100
101
102
103
104
105
106
107
108
109
110
111
112
113
114
115
116
117
118
119
120
121
122
123
124
125
126
127
128
129
130
131
132
133
134
135
136
137
138
139
140
141
142
143
144
145
146
147
148
149
150
151
152
153
154
155
156
157
158
159
160
161
162
163
164
165
192:~ tf$ /usr/bin/ruby -e "$(curl -fsSL https://raw.githubusercontent.com/Homebrew/install/master/install)"
==> This script will install:
/usr/local/bin/brew
/usr/local/share/doc/homebrew
/usr/local/share/man/man1/brew.1
/usr/local/share/zsh/site-functions/_brew
/usr/local/etc/bash_completion.d/brew
/usr/local/Homebrew
==> The Xcode Command Line Tools will be installed.

Press RETURN to continue or any other key to abort
==> Searching online for the Command Line Tools
==> /usr/bin/sudo /usr/bin/touch /tmp/.com.apple.dt.CommandLineTools.installondemand.in-progress
Password:
==> Installing Command Line Tools (macOS Mojave version 10.14) for Xcode-10.0
==> /usr/bin/sudo /usr/sbin/softwareupdate -i Command\ Line\ Tools\ (macOS\ Mojave\ version\ 10.14)\ for\ Xcode-10.0
Software Update Tool


Downloading Command Line Tools (macOS Mojave version 10.14) for Xcode
Downloaded Command Line Tools (macOS Mojave version 10.14) for Xcode
Installing Command Line Tools (macOS Mojave version 10.14) for Xcode
Done with Command Line Tools (macOS Mojave version 10.14) for Xcode
Done.
==> /usr/bin/sudo /bin/rm -f /tmp/.com.apple.dt.CommandLineTools.installondemand.in-progress
==> /usr/bin/sudo /usr/bin/xcode-select --switch /Library/Developer/CommandLineTools
==> Downloading and installing Homebrew...
remote: Enumerating objects: 30, done.
remote: Counting objects: 100% (30/30), done.
remote: Compressing objects: 100% (27/27), done.
remote: Total 111012 (delta 11), reused 11 (delta 3), pack-reused 110982
Receiving objects: 100% (111012/111012), 25.26 MiB | 884.00 KiB/s, done.
Resolving deltas: 100% (81258/81258), done.
From https://github.com/Homebrew/brew
* [new branch] master -> origin/master
* [new tag] 0.1 -> 0.1
* [new tag] 0.2 -> 0.2
* [new tag] 0.3 -> 0.3
* [new tag] 0.4 -> 0.4
* [new tag] 0.5 -> 0.5
* [new tag] 0.6 -> 0.6
* [new tag] 0.7 -> 0.7
* [new tag] 0.7.1 -> 0.7.1
* [new tag] 0.8 -> 0.8
* [new tag] 0.8.1 -> 0.8.1
* [new tag] 0.9 -> 0.9
* [new tag] 0.9.1 -> 0.9.1
* [new tag] 0.9.2 -> 0.9.2
* [new tag] 0.9.3 -> 0.9.3
* [new tag] 0.9.4 -> 0.9.4
* [new tag] 0.9.5 -> 0.9.5
* [new tag] 0.9.8 -> 0.9.8
* [new tag] 0.9.9 -> 0.9.9
* [new tag] 1.0.0 -> 1.0.0
* [new tag] 1.0.1 -> 1.0.1
* [new tag] 1.0.2 -> 1.0.2
* [new tag] 1.0.3 -> 1.0.3
* [new tag] 1.0.4 -> 1.0.4
* [new tag] 1.0.5 -> 1.0.5
* [new tag] 1.0.6 -> 1.0.6
* [new tag] 1.0.7 -> 1.0.7
* [new tag] 1.0.8 -> 1.0.8
* [new tag] 1.0.9 -> 1.0.9
* [new tag] 1.1.0 -> 1.1.0
* [new tag] 1.1.1 -> 1.1.1
* [new tag] 1.1.10 -> 1.1.10
* [new tag] 1.1.11 -> 1.1.11
* [new tag] 1.1.12 -> 1.1.12
* [new tag] 1.1.13 -> 1.1.13
* [new tag] 1.1.2 -> 1.1.2
* [new tag] 1.1.3 -> 1.1.3
* [new tag] 1.1.4 -> 1.1.4
* [new tag] 1.1.5 -> 1.1.5
* [new tag] 1.1.6 -> 1.1.6
* [new tag] 1.1.7 -> 1.1.7
* [new tag] 1.1.8 -> 1.1.8
* [new tag] 1.1.9 -> 1.1.9
* [new tag] 1.2.0 -> 1.2.0
* [new tag] 1.2.1 -> 1.2.1
* [new tag] 1.2.2 -> 1.2.2
* [new tag] 1.2.3 -> 1.2.3
* [new tag] 1.2.4 -> 1.2.4
* [new tag] 1.2.5 -> 1.2.5
* [new tag] 1.2.6 -> 1.2.6
* [new tag] 1.3.0 -> 1.3.0
* [new tag] 1.3.1 -> 1.3.1
* [new tag] 1.3.2 -> 1.3.2
* [new tag] 1.3.3 -> 1.3.3
* [new tag] 1.3.4 -> 1.3.4
* [new tag] 1.3.5 -> 1.3.5
* [new tag] 1.3.6 -> 1.3.6
* [new tag] 1.3.7 -> 1.3.7
* [new tag] 1.3.8 -> 1.3.8
* [new tag] 1.3.9 -> 1.3.9
* [new tag] 1.4.0 -> 1.4.0
* [new tag] 1.4.1 -> 1.4.1
* [new tag] 1.4.2 -> 1.4.2
* [new tag] 1.4.3 -> 1.4.3
* [new tag] 1.5.0 -> 1.5.0
* [new tag] 1.5.1 -> 1.5.1
* [new tag] 1.5.10 -> 1.5.10
* [new tag] 1.5.11 -> 1.5.11
* [new tag] 1.5.12 -> 1.5.12
* [new tag] 1.5.13 -> 1.5.13
* [new tag] 1.5.14 -> 1.5.14
* [new tag] 1.5.2 -> 1.5.2
* [new tag] 1.5.3 -> 1.5.3
* [new tag] 1.5.4 -> 1.5.4
* [new tag] 1.5.5 -> 1.5.5
* [new tag] 1.5.6 -> 1.5.6
* [new tag] 1.5.7 -> 1.5.7
* [new tag] 1.5.8 -> 1.5.8
* [new tag] 1.5.9 -> 1.5.9
* [new tag] 1.6.0 -> 1.6.0
* [new tag] 1.6.1 -> 1.6.1
* [new tag] 1.6.10 -> 1.6.10
* [new tag] 1.6.11 -> 1.6.11
* [new tag] 1.6.12 -> 1.6.12
* [new tag] 1.6.13 -> 1.6.13
* [new tag] 1.6.14 -> 1.6.14
* [new tag] 1.6.15 -> 1.6.15
* [new tag] 1.6.16 -> 1.6.16
* [new tag] 1.6.17 -> 1.6.17
* [new tag] 1.6.2 -> 1.6.2
* [new tag] 1.6.3 -> 1.6.3
* [new tag] 1.6.4 -> 1.6.4
* [new tag] 1.6.5 -> 1.6.5
* [new tag] 1.6.6 -> 1.6.6
* [new tag] 1.6.7 -> 1.6.7
* [new tag] 1.6.8 -> 1.6.8
* [new tag] 1.6.9 -> 1.6.9
* [new tag] 1.7.0 -> 1.7.0
* [new tag] 1.7.1 -> 1.7.1
* [new tag] 1.7.2 -> 1.7.2
* [new tag] 1.7.3 -> 1.7.3
* [new tag] 1.7.4 -> 1.7.4
* [new tag] 1.7.5 -> 1.7.5
* [new tag] 1.7.6 -> 1.7.6
HEAD is now at b41d2e525 Merge pull request #4995 from sjackman/gcc
==> Homebrew is run entirely by unpaid volunteers. Please consider donating:
https://github.com/Homebrew/brew#donations
==> Tapping homebrew/core
Cloning into '/usr/local/Homebrew/Library/Taps/homebrew/homebrew-core'...
remote: Enumerating objects: 4860, done.
remote: Counting objects: 100% (4860/4860), done.
remote: Compressing objects: 100% (4655/4655), done.
remote: Total 4860 (delta 55), reused 343 (delta 15), pack-reused 0
Receiving objects: 100% (4860/4860), 4.08 MiB | 870.00 KiB/s, done.
Resolving deltas: 100% (55/55), done.
Tapped 2 commands and 4646 formulae (4,903 files, 12.7MB).
==> Migrating /Library/Caches/Homebrew to /Users/tf/Library/Caches/Homebrew...
==> Deleting /Library/Caches/Homebrew...
Already up-to-date.
==> Installation successful!

==> Homebrew has enabled anonymous aggregate formulae and cask analytics.
Read the analytics documentation (and how to opt-out) here:
https://docs.brew.sh/Analytics.html

==> Homebrew is run entirely by unpaid volunteers. Please consider donating:
https://github.com/Homebrew/brew#donations
==> Next steps:
- Run `brew help` to get started
- Further documentation:
https://docs.brew.sh

使用

使用跟其它包管理工具类似,如先查找包keepassxc,然后brew install安装.
brew cask 用来安装一些macos app,字体,插件及一些第三方非开源软件。

1
2
3
4
5
6
7
8
9
10
11
12
13
14
15
16
17
18
19
20
21
192:~ tf$ brew  search keepassxc
==> Casks
homebrew/cask/keepassxc


192:~ tf$ brew cask install keepassxc
Updating Homebrew...
==> Auto-updated Homebrew!
Updated 1 tap (homebrew/cask).
No changes to formulae.

==> Satisfying dependencies
==> Downloading https://github.com/keepassxreboot/keepassxc/releases/download/2.3.4/KeePassXC-2.3.4.dmg
==> Downloading from https://github-production-release-asset-2e65be.s3.amazonaws.com/52729242/4b068f00-a70b-11e8-9301-d3a2d7e33ccd?X-Amz-Algorithm=AWS4-HMAC-SHA256&X-Amz-Credentia
######################################################################## 100.0%
==> Verifying SHA-256 checksum for Cask 'keepassxc'.
==> Installing Cask keepassxc
==> Moving App 'KeePassXC.app' to '/Applications/KeePassXC.app'.
🍺 keepassxc was successfully installed!

参考:

Homebrew官方网站 https://brew.sh

ssh免密码登陆的一些注意点

发表于 2018-08-03 | 更新于: 2019-11-08   |   更新于 2019-11-08

#环境

  • os: OpenSUSE Tumbleweed
  • pc: Apple macbook 13’ pro 2015

#描述
Linux 系统用户免密码使用key登陆有时还会提示要输入密码。

#修复
生成key

1
2
3
4
5
6
7
8
9
10
11
12
13
14
15
16
17
18
19
20
21
22
23
24
25
[root@localhost jenkins]# su - jenkins
-bash-4.2$ ssh-key
ssh-keygen ssh-keyscan
-bash-4.2$ ssh-keygen
Generating public/private rsa key pair.
Enter file in which to save the key (/var/lib/jenkins/.ssh/id_rsa):
Created directory '/var/lib/jenkins/.ssh'.
Enter passphrase (empty for no passphrase):
Enter same passphrase again:
Your identification has been saved in /var/lib/jenkins/.ssh/id_rsa.
Your public key has been saved in /var/lib/jenkins/.ssh/id_rsa.pub.
The key fingerprint is:
SHA256:KklV05QIfjCcFfvP7g8id+wfV+DthbY5ojXsLo5hiOM jenkins@localhost.localdomain
The key's randomart image is:
+---[RSA 2048]----+
| .++==.. |
| .o+.oo |
| o o . |
| . . . . + |
| . S . + +|
| . o o = . +o|
| = o + o @ = o|
| . o . =.O + + |
| E ..o+*oo |
+----[SHA256]-----+

将生成的pubkey文件内容添加到目标主机用户的authorized_keys文件中,可以选择复制或使用下面的方式

1
2
3
4
5
6
7
8
9
10
11
12
13
14
-bash-4.2$ ssh-copy-id -i ~/.ssh/id_rsa.pub git@10.10.105.118
/bin/ssh-copy-id: INFO: Source of key(s) to be installed: "/var/lib/jenkins/.ssh/id_rsa.pub"
The authenticity of host '10.10.105.118 (10.10.105.118)' can't be established.
ECDSA key fingerprint is SHA256:hKMm0UBSHnJSMJoIW904lN2qhsasOMk8QheyIvYMqzE.
ECDSA key fingerprint is MD5:5b:7c:a0:be:50:a8:b3:91:03:2b:e4:2d:de:f5:7b:10.
Are you sure you want to continue connecting (yes/no)? yes
/bin/ssh-copy-id: INFO: attempting to log in with the new key(s), to filter out any that are already installed
/bin/ssh-copy-id: INFO: 1 key(s) remain to be installed -- if you are prompted now it is to install the new keys
git@10.10.105.118's password:

Number of key(s) added: 1

Now try logging into the machine, with: "ssh 'git@10.10.105.118'"
and check to make sure that only the key(s) you wanted were added.

确认已经存在目标主机的authorized_keys文件中后执行登陆操作

1
2
3
4
5
6
7
8
9
10
11
12
13
14
15
16
17
18
19
20
21
22
23
24
25
26
27
28
29
30
31
32
33
34
35
36
37
38
39
40
41
42
43
44
45
46
47
48
49
50
51
52
53
54
55
56
57
58
59
60
61
62
63
64
65
66
67
68
69
-bash-4.2$ ssh -v -l git 10.10.105.118 
OpenSSH_7.4p1, OpenSSL 1.0.2k-fips 26 Jan 2017
debug1: Reading configuration data /etc/ssh/ssh_config
debug1: /etc/ssh/ssh_config line 58: Applying options for *
debug1: Connecting to 10.10.105.118 [10.10.105.118] port 22.
debug1: Connection established.
debug1: identity file /var/lib/jenkins/.ssh/id_rsa type 1
debug1: key_load_public: No such file or directory
debug1: identity file /var/lib/jenkins/.ssh/id_rsa-cert type -1
debug1: key_load_public: No such file or directory
debug1: identity file /var/lib/jenkins/.ssh/id_dsa type -1
debug1: key_load_public: No such file or directory
debug1: identity file /var/lib/jenkins/.ssh/id_dsa-cert type -1
debug1: key_load_public: No such file or directory
debug1: identity file /var/lib/jenkins/.ssh/id_ecdsa type -1
debug1: key_load_public: No such file or directory
debug1: identity file /var/lib/jenkins/.ssh/id_ecdsa-cert type -1
debug1: key_load_public: No such file or directory
debug1: identity file /var/lib/jenkins/.ssh/id_ed25519 type -1
debug1: key_load_public: No such file or directory
debug1: identity file /var/lib/jenkins/.ssh/id_ed25519-cert type -1
debug1: Enabling compatibility mode for protocol 2.0
debug1: Local version string SSH-2.0-OpenSSH_7.4
debug1: Remote protocol version 2.0, remote software version OpenSSH_7.4
debug1: match: OpenSSH_7.4 pat OpenSSH* compat 0x04000000
debug1: Authenticating to 10.10.105.118:22 as 'git'
debug1: SSH2_MSG_KEXINIT sent
debug1: SSH2_MSG_KEXINIT received
debug1: kex: algorithm: curve25519-sha256
debug1: kex: host key algorithm: ecdsa-sha2-nistp256
debug1: kex: server->client cipher: chacha20-poly1305@openssh.com MAC: <implicit> compression: none
debug1: kex: client->server cipher: chacha20-poly1305@openssh.com MAC: <implicit> compression: none
debug1: kex: curve25519-sha256 need=64 dh_need=64
debug1: expecting SSH2_MSG_KEX_ECDH_REPLY
debug1: Server host key: ecdsa-sha2-nistp256 SHA256:hKMm0UBSHnJSMJoIW904lN2qhsasOMk8QheyIvYMqzE
debug1: Host '10.10.105.118' is known and matches the ECDSA host key.
debug1: Found key in /var/lib/jenkins/.ssh/known_hosts:1
debug1: rekey after 134217728 blocks
debug1: SSH2_MSG_NEWKEYS sent
debug1: expecting SSH2_MSG_NEWKEYS
debug1: SSH2_MSG_NEWKEYS received
debug1: rekey after 134217728 blocks
debug1: SSH2_MSG_EXT_INFO received
debug1: kex_input_ext_info: server-sig-algs=<rsa-sha2-256,rsa-sha2-512>
debug1: SSH2_MSG_SERVICE_ACCEPT received
debug1: Authentications that can continue: publickey,gssapi-keyex,gssapi-with-mic,password
debug1: Next authentication method: gssapi-keyex
debug1: No valid Key exchange context
debug1: Next authentication method: gssapi-with-mic
debug1: Unspecified GSS failure. Minor code may provide more information
No Kerberos credentials available (default cache: KEYRING:persistent:997)

debug1: Unspecified GSS failure. Minor code may provide more information
No Kerberos credentials available (default cache: KEYRING:persistent:997)

debug1: Next authentication method: publickey
debug1: Offering RSA public key: /var/lib/jenkins/.ssh/id_rsa
debug1: Server accepts key: pkalg rsa-sha2-512 blen 279
debug1: Authentication succeeded (publickey).
Authenticated to 10.10.105.118 ([10.10.105.118]:22).
debug1: channel 0: new [client-session]
debug1: Requesting no-more-sessions@openssh.com
debug1: Entering interactive session.
debug1: pledge: network
debug1: client_input_global_request: rtype hostkeys-00@openssh.com want_reply 0
debug1: Sending environment.
debug1: Sending env LANG = en_US.UTF-8
Last login: Fri Aug 3 02:08:43 2018 from 10.10.105.118

如果多次登陆还是需要密码,确认以下文件的权限是否正确:

  • .ssh目录的权限0600
  • 目标主机的authorized_keys文件权限为0600.
1
2
3
4
5
6
7
-bash-4.2$ ls -ld .ssh/
drwx------. 2 jenkins jenkins 57 Aug 3 02:27 .ssh/
-bash-4.2$ ls -l .ssh/
total 12
-rw-------. 1 jenkins jenkins 1679 Aug 3 02:21 id_rsa
-rw-r--r--. 1 jenkins jenkins 411 Aug 3 02:21 id_rsa.pub
-rw-r--r--. 1 jenkins jenkins 175 Aug 3 02:27 known_hosts

音节音标笔记

发表于 2018-06-08 | 更新于: 2019-11-08   |   更新于 2019-11-08

#环境

  • os: CentOS 7
  • pc: Apple macbook 13’ pro 2015

#描述

1
2
3
4
5
6
7
8
9
10
11
12
13
14
15
16
17
18
19
20
21
22
23
24
25
26
27
28
29
30
31
32
音位-音节-音素
48个音素(音节的最小单位)
- 元音:20
- 单元音:12
- 前元音: /iː/, /ɪ/, /e/, /æ/
- 中元音: /ɜː/, /ə/
- 后元音: /ɑː/, /ʌ/, /ɔː/, /ɒ/,/uː/,/ʊ/
- 双元音(diphthongs):8
- 合口双元音: /aɪ/, /eɪ/, /aʊ/, /əʊ/, /ɔɪ/
- 集中双元音: /ɪə/, /eə/ ,/ʊə/
- 辅音:28
- 清辅音
- 10
- /p/ /t/ /k/ /f/ /s/ /θ/ /ʃ/ /tʃ/ /ts/ /tr/
- 浊辅音
- 10
- /b/ /d/ /g/ /v/ /z/ /ð/ /ʒ/ /dʒ/ /dz/ /dr/
- other:8
- /m/,/n/,/l/,/ŋ/,/h/,/r/,/j/,/w/
音节(音位的最小结构单位)
- 划分音节是按元音来划的,元音音素是构成音节的主体,辅音是音节的分界线
- 元音音素可以构成音节,辅音音素不响亮,不能构成音节。但英语辅音音素中有 4 个辅音[m],[n],[ng],[l]是响音,它们和辅音音素结合,也可构成音节。它们构成的音节往往出现在词尾,一般是非重读音节。
- 音节的核心是元音,元音可以单独构成音节,也可以与辅音字母一起构成音节
- 两元音音素之间有一个辅音音素时,辅音音素归后一音节
- 有两个辅音音素时,一个辅音音素归前一音节,一个归后一音节
- 开音节(以元音字母结束的音节)在开音节中,发音的元音字母发 “字母”本身的音
- 绝对开音节(以发音的元音字母结束的音节)
- 相对开音节(元音字母+辅音字母+不发音的e字母)
- 闭音节(以一个或几个辅音字母(r 除外)结尾而中间只有一个元音音素的音节)在闭音节中,元音字母不发 “字母”本身的音。
- 重读
指在双音节或多音节词中有一个发音特别响亮的音节
- 非重读

yum安装提示NOKEY

发表于 2018-05-31 | 更新于: 2019-11-08   |   更新于 2019-11-08

#环境

  • os: CentOS 7
  • pc: VirtualBox

#故障描述
安装过程中已经导入一个PUBKEY,但还是提示NOKEY

1
2
3
4
5
6
7
8
9
10
11
12
13
14
-------------------------------------------------------------------------------------------------------------------------------------------------------------------------------------
Total 1.5 MB/s | 83 MB 00:00:56
Retrieving key from https://packages.cloud.google.com/yum/doc/yum-key.gpg
Importing GPG key 0xA7317B0F:
Userid : "Google Cloud Packages Automatic Signing Key <gc-team@google.com>"
Fingerprint: d0bc 747f d8ca f711 7500 d6fa 3746 c208 a731 7b0f
From : https://packages.cloud.google.com/yum/doc/yum-key.gpg
Is this ok [y/N]: y

Public key for 571c54a5e4049647541a24d77337898fb4243f6b39c7f3df5d92ab180055bd87-kubectl-1.10.3-0.x86_64.rpm is not installed

Failing package is: kubectl-1.10.3-0.x86_64
GPG Keys are configured as: https://packages.cloud.google.com/yum/doc/yum-key.gpg
warning: /var/cache/yum/x86_64/7/kubernetes/packages/571c54a5e4049647541a24d77337898fb4243f6b39c7f3df5d92ab180055bd87-kubectl-1.10.3-0.x86_64.rpm: Header V4 RSA/SHA512 Signature, key ID 3e1ba8d5: NOKEY

#修复
查看下载下来的rpm文件的信息

1
2
[root@k8s-node-b pki]# rpm -K /var/cache/yum/x86_64/7/kubernetes/packages/571c54a5e4049647541a24d77337898fb4243f6b39c7f3df5d92ab180055bd87-kubectl-1.10.3-0.x86_64.rpm
/var/cache/yum/x86_64/7/kubernetes/packages/571c54a5e4049647541a24d77337898fb4243f6b39c7f3df5d92ab180055bd87-kubectl-1.10.3-0.x86_64.rpm: RSA sha1 ((MD5) PGP) md5 NOT OK (MISSING KEYS: (MD5) PGP#3e1ba8d5)

查看当前系统是否已经导入相应的key文件

1
2
3
[root@k8s-node-b pki]# rpm -q gpg-pubkey-*
gpg-pubkey-f4a80eb5-53a7ff4b
gpg-pubkey-ba07f4fb-5ac168db

回看之前安装过程中导入的key与rpm的并不相附,应该是还有key没有导入;
查看repo文件

1
2
3
4
5
6
7
8
9
[root@k8s-node-b pki]# cat /etc/yum.repos.d/kubernetes.repo 
[kubernetes]
name=Kubernetes
baseurl=http://yum.kubernetes.io/repos/kubernetes-el7-x86_64
enabled=1
gpgcheck=1
repo_gpgcheck=1
gpgkey=https://packages.cloud.google.com/yum/doc/yum-key.gpg
https://packages.cloud.google.com/yum/doc/rpm-package-key.gpg

应该是写入repo文件时换行了,导入没有导入正确的key文件
修复repo文件,也可手工导入相应的key文件

1
2
3
4
5
[root@k8s-node-b pki]# rpm --import https://packages.cloud.google.com/yum/doc/rpm-package-key.gpg
[root@k8s-node-b pki]# rpm -q gpg-pubkey-*
gpg-pubkey-f4a80eb5-53a7ff4b
gpg-pubkey-ba07f4fb-5ac168db
gpg-pubkey-3e1ba8d5-558ab6a8

删除key使用下面的命令

1
[root@k8s-node-b pki]#  rpm -e --allmatches gpg-pubkey-3e1ba8d5-558ab6a8

重新执行安装

1
2
3
4
5
6
7
8
9
10
11
12
13
14
15
16
17
Downloading packages:
warning: /var/cache/yum/x86_64/7/kubernetes/packages/571c54a5e4049647541a24d77337898fb4243f6b39c7f3df5d92ab180055bd87-kubectl-1.10.3-0.x86_64.rpm: Header V4 RSA/SHA512 Signature, key ID 3e1ba8d5: NOKEY
Retrieving key from https://packages.cloud.google.com/yum/doc/yum-key.gpg
Importing GPG key 0xA7317B0F:
Userid : "Google Cloud Packages Automatic Signing Key <gc-team@google.com>"
Fingerprint: d0bc 747f d8ca f711 7500 d6fa 3746 c208 a731 7b0f
From : https://packages.cloud.google.com/yum/doc/yum-key.gpg
Is this ok [y/N]: y
Retrieving key from https://packages.cloud.google.com/yum/doc/rpm-package-key.gpg
Importing GPG key 0x3E1BA8D5:
Userid : "Google Cloud Packages RPM Signing Key <gc-team@google.com>"
Fingerprint: 3749 e1ba 95a8 6ce0 5454 6ed2 f09c 394c 3e1b a8d5
From : https://packages.cloud.google.com/yum/doc/rpm-package-key.gpg
Is this ok [y/N]: y
Running transaction check
Running transaction test
Transaction test succeeded

kubernetes删除Terminating的pod

发表于 2018-05-29 | 更新于: 2020-01-14   |   更新于 2020-01-14 | 分类于 kubernetes

#环境

  • os: CentOS 7
  • pc: VirtualBox

#描述
创建的dashboard pod无法删除

#修复
使用–grace-period=0 –force 参数
参见官方文档
https://kubernetes.io/docs/tasks/run-application/force-delete-stateful-set-pod/

1
2
3
4
5
6
7
8
9
10
11
12
13
14
15
16
17
18
19
20
21
22
23
24
25
26
27
28
29
30
31
32
33
34
35
36
37
[root@k8s-master ~]# kubectl get all -n kube-system
NAME READY STATUS RESTARTS AGE
pod/calico-etcd-7jdbr 1/1 Running 0 22h
pod/calico-kube-controllers-685755779f-wvh48 1/1 Running 0 22h
pod/calico-node-mg7j2 2/2 Running 1 22h
pod/calico-node-mjggr 2/2 Running 1 22h
pod/etcd-k8s-master 1/1 Running 0 22h
pod/kube-apiserver-k8s-master 1/1 Running 0 22h
pod/kube-controller-manager-k8s-master 1/1 Running 0 22h
pod/kube-dns-86f4d74b45-clw69 2/3 Running 210 22h
pod/kube-proxy-jks5s 1/1 Running 0 22h
pod/kube-proxy-xl2b7 1/1 Running 0 22h
pod/kube-scheduler-k8s-master 1/1 Running 0 22h
pod/kubernetes-dashboard-5d676fccd5-2vwnx 1/1 Terminating 77 20h
pod/kubernetes-dashboard-7d5dcdb6d9-j7m75 1/1 Terminating 0 21h
pod/kubernetes-dashboard-7d5dcdb6d9-lxlvn 1/1 Terminating 11 22h
pod/kubernetes-dashboard-f56559df6-4bjj5 1/1 Terminating 205 5h
...
[root@k8s-master ~]# kubectl -n kube-system delete $(kubectl -n kube-system get pod -o name | grep dashboard) --grace-period=0 --force
warning: Immediate deletion does not wait for confirmation that the running resource has been terminated. The resource may continue to run on the cluster indefinitely.
pod "kubernetes-dashboard-5d676fccd5-2vwnx" deleted
pod "kubernetes-dashboard-7d5dcdb6d9-j7m75" deleted
pod "kubernetes-dashboard-7d5dcdb6d9-lxlvn" deleted
pod "kubernetes-dashboard-f56559df6-4bjj5" deleted
[root@k8s-master ~]# kubectl get all -n kube-system
NAME READY STATUS RESTARTS AGE
pod/calico-etcd-7jdbr 1/1 Running 0 22h
pod/calico-kube-controllers-685755779f-wvh48 1/1 Running 0 22h
pod/calico-node-mg7j2 2/2 Running 1 22h
pod/calico-node-mjggr 2/2 Running 1 22h
pod/etcd-k8s-master 1/1 Running 0 22h
pod/kube-apiserver-k8s-master 1/1 Running 0 22h
pod/kube-controller-manager-k8s-master 1/1 Running 0 22h
pod/kube-dns-86f4d74b45-clw69 2/3 Running 210 22h
pod/kube-proxy-jks5s 1/1 Running 0 22h
pod/kube-proxy-xl2b7 1/1 Running 0 22h
pod/kube-scheduler-k8s-master 1/1 Running 0 22h
1…78910

天飞

95 日志
41 分类
79 标签
RSS
GitHub E-Mail
Links
  • 天飞的博客
© 2017 — 2020 天飞
由 Hexo 强力驱动
|
主题 — NexT.Gemini v5.1.4
本站访客数 人次 本站总访问量 次